PocketBook Pro 912 User Manual
Table of Contents SAFETY PRECAUTIONS............................................................ 3 APPEARANCE.............................................................................. 7 Front View 7 Back View 9 TECHNICAL CHARACTERISTICS..........................................10 GET TING STARTED.................................................................
TTTTTTTTTTTTTTTTT Loading of the Protected Electronic Books (Adobe DRM) Reading Mode Using the Stylus 2 27 29 35 SOFTWARE................................................................................37 Favorites 37 Notes 37 Applications 37 Dictionary 41 Music 42 Photo 43 Search 44 NETWORK CONNECTIONS....................................................45 Bluetooth 45 Configuring Wi-Fi Connection 50 Closing Network Connections 51 CONFIGURATION.............................................................
Safety Precautions Before start working with the Device, please, read this section carefully. Following these instructions will help you ensure your safety and extend service life of the Device. Storage, Carriage and Usage Conditions Device operating temperature range is 0°С to 40°С, so don’t expose the Device to excessively high or low temperatures. Never leave cables near heat sources. Heated cables or their insulation may become deformed or damaged, which could lead to fire or electric shock.
SSSSSSSSSSSSSSSSSS 4 Do not leave the Device for a long time in poorly ventilated environment, e.g. in a car or in closed tight boxes/packaging. Neither drop nor try to bend the Device. Protect the screen from objects that may scratch or damage it. To ensure adequate protection of the screen, we recommend storing the Device in a protective and/or hard cover. Keep away from children. Maintenance Do not disassemble or modify the book reader.
SSSSSSSSSSSSSSSSSS 5 By the end of product guarantee term, please contact the nearest authorized service facility for examination on the subject of security is maintained. For detailed information about service centers in your region please visit the official website of PocketBook International: http://www.pocketbook-int.com. RF Safety The Device receives and transmits radio frequencies and may interfere with radio communications and other electronic equipment. If you use personal medical Devices (e.g.
SSSSSSSSSSSSSSSSSS 6 service, store where you purchased the Device, or the authorized service center. Disposal of electric and electronic components (the Directive is applicable to the EU and other European countries where separate waste disposal systems exist). In other countries dispose batteries accordingly to local laws.
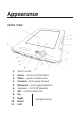
Appearance FRONT VIEW 1. 2. 3. 4. 5. 6. 7. 8. 9. 10. 11. Touch screen Home – returns to Main Menu Menu – opens context menu Forward – turns page forward Backward – turns page backward Speakers – 2×0.
AAAAAAAAAA 8 12. Return – goes back to the previous menu 13. Reset button – restarts the Device 14. 3.5 mm audio jack 15. LED indicator – indicates the Device’s power mode. Flashing orange – charging, solid orange – charged, solid green – power consumption 16. Micro-USB port – designed for connecting your Device to either PC or charger (optional) via the micro-USB cable 17.
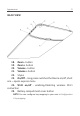
AAAAAAAAAA 9 BACK VIEW 18. Zoom - button 19. Zoom + button 20. Volume - button 21. Volume + button 22. Stylus 23. On/Off – long press switches the Device on/off, short one – opens express menu 24. Wi-Fi on/off - enabling/disabling wireless Wi-Fi connection 25. Battery compartment cover button NOTE You can configure key mapping to your own in Configuration > Key mapping.
Technical Characteristics Display Touch Panel Processor RAM Internal Storage Operating system 9.7’’ E Ink Vizplex™ 1200×825, 155 dpi, black/ white EMR (E-Writing, pen touch module) 533 МHz 256 МB 2 GiB Linux® Wi-Fi™ (b/g) Communications Bluetooth™ 2.1 USB 2.0 (480 Mb/s) Memory slot microSD up to 32 GiB 3.5 mm stereo jack Audio output 2×0.5 W speakers Accelerometer Yes PDF, EPUB (including DRM), PDF, EPUB, FB2, Book formats TXT, DJVU, RTF, HTML, CHM, DOC, TCR, FB2.
Getting Started IN THIS CHAPTER… You will learn how to prepare the Device to work and about main control features. CHARGING BATTERY To extend battery lifetime, it’s recommended to charge the Device for the first time from 8 to 12 hours in the off state. You can charge the battery from PC using USB-cable or from the power line using charger (optional). To charge the battery for the first time, do the following: 1. Connect the Device to a computer or charger with USB-cable.
GGGGGGGGGGGGGGG 11 TURNING ON To turn on the Device, press and hold On/Off button for a few seconds until startup logo will appear. When the Device is ready to operate, an image will be changed to Main menu or last opened book, depending on settings (Configuration > At startup, open). MODES OF DEVICE OPERATION Normal operating mode is the main mode of Device operation. Green light of indicator signalizes about power consumption (e.g. screen refresh, network connection or music playback).
GGGGGGGGGGGGGGG 11 LOADING FILES Connect the Device to the PC using micro-USB cable. NOTE The Device should be kept on while transferring files. You will be prompted to select USB mode PC Link or Charge either. Select PC Link. Operating system of computer will detect Device’s storage as removable disk (if SD card installed – as two ones). Now you can copy files to the Device or SD card using Explorer or other file manager.
GGGGGGGGGGGGGGG 11 USING THE STYLUS To calibrate the stylus initially, go to Configuration > Maintenance > Calibrate Touch panel. Touch the crosses appearing on the screen. It’s recommended to calibrate touch panel periodically to keep accurate Device control with stylus.
GGGGGGGGGGGGGGG 11 WORKING WITH ON - SCREEN KEYBOARD On-screen keyboard is used when it’s necessary to enter text information, for example, for search or network connection credentials. To type a symbol, select it with navigation keys and press OK, or press symbol or control key with stylus. To switch to another input language, press the current language button. To add the language to the onscreen keyboard layout go to Configuration > Keyboard. 1.
Main Menu IN THIS CHAPTER… You will learn about basic elements of user interface of the Device. Main menu contains main functional and control software elements (main panel and widgets) displayed after turning on and launching the Device (if the corresponding option in Configuration > At startup, open is selected). To access Main menu from other application, press Home button or press several times Back button. Appearance of Main menu can be changed in correspondent Configuration section.
MMMMMMMMM 11 Detailed information about each Main Panel section see in Software section of the Manual. WIDGETS Widget is a brief view of a particular application. To bring up an application in full screen, open the widget as usual application. Context menu allows changing or configuring widget. Last opened books Displays recently opened books list. Number of displayed books depends on Main menu appearance settings. Widget settings allow toggle view between list and thumbnails.
MMMMMMMMM 11 Music player Displays current track and provides basic music playback control: play/pause, previous/next track. Calculator Simple calculator allows you to perform 4 arithmetic operations, calculate per cent, and take the square root. By pressing the button in the right bottom corner of the widget you can switch to full-screen application Engineering Calculator (to see more in Applications). eBook Quick access to online bookstores. You can switch between stores in widget context menu.
MMMMMMMMM 11 To change settings copy file eBook.cfg to PC and edit it with any text editor (e.g. Windows Notepad). Widget parameters are described below. Parameter Name Format Description Example Store name String (up to Displayed as wid- BookLand 12 symbols) get title Logo file name string .bmp file should Bookland. be located in bmp folder \system\ config\widgets\ eBook. The image should have resolution 235×205 Web-site address string Link to web page http://bookopens after wid- land.
MMMMMMMMM Parameter Name Serial number transfer flag 22 Format 1 or 0 Description Sends Device serial number. Can be used by some stores for automatic log in Example 1 Device mod- 1 or 0 el transfer flag Sends Device’s 1 model and manufacturer info Connection type transfer flag Sends information about connection type (either Wi-Fi or 3G) 1 or 0 0 After editing file, copy it to the internal Device storage to \ system\config\widgets\eBook folder.
MMMMMMMMM 22 STATUS BAR Status bar is located at the bottom of the screen and displays next service information: • Date and time • Battery charge • – Multitasking icon – touch this icon to open running tasks list • – Wi-Fi is active: touch it with stylus to open connection info • – Bluetooth is active: touch it with stylus to view connection info • – Bluetooth headset is connected • – Music player is on.
MMMMMMMMM 22 TASK LIST Device software supports multitasking, and you can quickly switch between running applications in several ways: • by touching status bar icon with stylus • by opening short task list with continuous Back button press • by calling extended Task list with short On/Off button press. Except task switching, you can force close running applications: select an application, bring up context menu by pressing Menu button and select Delete task.
MMMMMMMMM 22 you exit the book by pressing Home. To close application completely, press Back button.
Reading Books IN THIS CHAPTER… You will learn how to use reading software, fill in your library and configure the Device for the most comfortable reading. LIBRARY Library is e-books file manager. To open a book, touch its title with stylus or select it using navigation keys and press OK. Library menu allows to filter, group, sort, change appearance of the section and perform search.
RRRRRRRRRRRRR • • 22 Genre Format. Sorting criteria • File names • Book titles • Last opened • Creation date • Series • Author Sorting can be ascending or descending.
RRRRRRRRRRRRR 22 Storage-dependent appearance has three options: • Internal + memory card • Internal • Memory card. Information block at the bottom of the screen displays read books and storage status.
RRRRRRRRRRRRR 22 LOADING OF THE PROTECTED ELECTRONIC BOOKS (ADOBE DRM ) You must register on the www.adobe.com site to be able to use the book protected format (Sign in>Create an Adobe Account). Downloading Book Using the *.acsm Link 1. Visit the www.adobe.com site using a PC browser. NOTE The current browser version does not support Flash Player 2. Go the Products section 3. Follow the Digital Editions link in the alphabetical index of products 4.
RRRRRRRRRRRRR 22 3. Follow on-screen instructions to activate your Device. Use the on-screen keyboard to enter login and password of your account into the Device activation form at www.adobe. com to proceed. Then you will be able to download the book. 4. Download a book. The full version of the book will be available in the Digital Edition folder after download is completed. The downloaded book is protected with DRM and it cannot be opened by an unregistered user. Book downloading via PC 1.
RRRRRRRRRRRRR 22 Book Borrowing A registered user can borrow a book from online bookstores (e.g. www.adobe.com). A borrowed book will be placed in the Borrowed books section of the user’s account and becomes available for reading. The book can be opened on a PC or the Device using the account data on the www.adobe.com site. Every time you open a book the Device will prompt you to return book. After the borrowing period or after reading the book completely it becomes unavailable for reading.
RRRRRRRRRRRRR 33 (if a current page contain links, otherwise you’ll get a message about links absence). A cursor will appear in the right top corner. Select the link to follow using Up and Down keys and press OK to go to a link. If a link is external one, the browser will open it; to return to reading press Return key. If a link is a footnote, you will be redirected to it; to return to an original place in a book, enter the links mode again and select the footnote’s number or symbol.
RRRRRRRRRRRRR 33 You can tune appearance of contents in context menu. There you can rename or edit note, expand or collapse all subsections branches and set up items to display in contents (under the Settings section): contents, bookmarks, markers, comments, pens or snapshots. Please, note that you can edit notes and bookmarks you’ve made while reading on the Device only. Voice Text-to-Speech (TTS) software is designed to transform text into speech.
RRRRRRRRRRRRR 33 To install TTS package, do the following: • Download package (.pbi extension file) from website http://pocketbook-int.com/download/tts/ • Connect the Device to PC and copy TTS package file to applications folder of the internal storage • Open Main panel Applications section, run package file and confirm installation • After install open Configuration > Speech Synthesis > Language and Voice and select package to use. Also in this section you can set up speed and tone of speech.
RRRRRRRRRRRRR 33 margins width, or encoding (for txt and html books). FB2 books has two refresh modes: Best Quality or High Speed (default). Zoom Pdf and DjVu books has Zoom menu item instead of Settings. Next zooming modes are available: • 4, 9 page – preview mode, several pages on a screen • Fit width – scaling page to the screen width • Usual mode – one page scaling • Columns – for reading books with columns. To navigate the page use navigation buttons.
RRRRRRRRRRRRR 33 • – brings up on-screen keyboard to type in the word to translate • – change dictionary. Rotate Fixes the screen orientation: select the suitable one with navigation keys or press OK for automatic accelerometer-based page rotation. ATTENTION! Screen rotation changes navigation keys mapping! For example, after 90° screen rotation pages will be turned with Up/Down keys. Notes Notes allows you to save favorite book fragments and make handwritten records directly in the text.
RRRRRRRRRRRRR 33 Pencil – use to draw notes in the text. Eraser – clears markers and pencils. Slide the stylus across the area with note to erase it. Screenshot – saves selected text fragment as a picture. Table of Contents – opens the book’s Table of Contents. Help – opens a window with instructions on using the tools. Close notes mode. All notes are visible from Main Menu (section Notes). Press OK on the note being viewed to get to the exact place in the book where this note was created.
RRRRRRRRRRRRR 33 Zooming You can also zoom using the stylus: to increase slide the stylus bottom-up on the right edge of the screen; to decrease, respectively, slide the stylus down. Zooming mode depends on chosen earlier. Menu To call reader’s menu, touch the center of the screen with the stylus. Bookmarks Touch with the stylus the right top corner of the screen to create bookmark. To remove bookmark, touch the bookmark sign.
Software IN THIS CHAPTER… You will learn about additional software features of the Device. FAVORITES After selecting this section Library opens, displaying the books, added to Favorites. NOTES In this section you can view all the notes made during reading. After you select a note, the table of contents of the book, where it was made, will open. After opening the note, you will be able to edit it as described above. APPLICATIONS This section contains games and additional software.
SSSSSSSS 33 Calculator You can also launch this application via Calculator widget. The calculator provides a wide range of mathematical operations, such as: numerical notations, as well as logical, constant, and trigonometric functions. The engineering calculator can be used to perform extremely complicated calculations. Chess Classic chess game. You can play against either the computer or another person.
SSSSSSSS 33 PocketNews An application for adding and reading RSS feeds. To add RSS news feeds, open RSS setup. Select the Add RSS feed option. Enter the feed address using the on-screen keyboard. To delete the feed, select it, open the context menu (by pressing the Menu button) and select the Delete command. To edit the feed, select it, open the context menu (by pressing the Menu button) and select Edit command. Edit the feed address using the on-screen keyboard.
SSSSSSSS 44 Browser Application for viewing web-pages. After opening the browser, you will be asked to connect to one of the available networks. To navigate the browser use the stylus, to enter web-addresses and other text information – on-screen keyboard. Scribble Application for drawing. To use this application your touch screen must be precisely calibrated. You must draw on the screen with the stylus held perpendicular to the screen surface.
SSSSSSSS 44 Current drawing/total number of drawings: change the current drawing New: start a new drawing Delete drawing Exit application. To save a picture, click the New Picture icon. The current picture will be saved to the My Pictures folder in the root folder of the Device. DICTIONARY Enter a word from on-screen keyboard, and the application will find its translation. To hide/show the on-screen keyboard, press OK button.
SSSSSSSS 44 4. Unpack the archive to your PC 5. Connect the Device to PC and copy dictionary (*.dic files) to the Device into folder system > dictionaries. MUSIC This Main Menu item is designed for you to listen to your favorite MP3 music. ATTENTION Music player is the most energy-consuming application. If the music player is enabled, a note icon is displayed at the status bar.
SSSSSSSS 44 Player Controls • OК button – Play/Pause • Left/Right buttons: • Short press – next/previous track in the playlist • Long press – fast-forward/rewind track • Menu button – change playback mode • One track • All tracks in order • Shuffle. • Forward/Backward and Volume +/- – adjust volume • Press Return to exit the player. PHOTO In this mode the Photo folder opens. You can view image in other folders by going up to one level and selecting a folder.
SSSSSSSS 44 SEARCH After you open this Main menu section, the on-screen keyboard will appear. Enter text in file name, title or author name, and application will open found books list.
Network Connections IN THIS CHAPTER… You will learn how to preconfigure network connections to go online or communicate with other devices. To configure connection, enter the section Configuration > Connectivity. Enter the Device name, visible to other network equipment, under the Device name section. To select network access mode, press Access to network and choose on, off, or Ask user. Under Preferred connection section select one of the preconfigured connections to be used by default.
NNNNNNNNNNNNNNNNNNN 44 2. Press Connection Name and enter name from the onscreen keyboard appeared 3. Press Connect via. The Device will search for available Bluetooth devices. Select the device to connect to from the list 4. Set an access point name (APN), username and password under the corresponding sections NOTE APN, username and password can be provided by your mobile operator. Your cell phone (or other device) should have preconfigured GPRS connection 5.
NNNNNNNNNNNNNNNNNNN 44 Connecting Bluetooth Audio Device You can connect a Bluetooth audio device to listen to the music or Text-to-Speech. NOTE You can connect a Bluetooth audio device that uses the A2DP Bluetooth-profile. Conventional Bluetooth headset for mobile phones works using the headset and hands free profile. To connect an A2DP audio device, create a connection profile: 1. Select Configuration > Connectivity > Bluetooth connections > Bluetooth Audio Devices.
NNNNNNNNNNNNNNNNNNN 44 Upon completing the connection it will be necessary to enter a Bluetooth PIN, it should be provided by the audio device manufacturer. PIN is required for the first connection only. After the connection and icons will appear in status bar. NOTE Playback control with A2DP device (e.g. play/pause, next/previous track device buttons) is not supported recently. To disconnect audio device, return to the profile configuration and select off in Turn on? section.
NNNNNNNNNNNNNNNNNNN 44 NOTE A list of all Bluetooth devices that are compatible with your Device will be displayed (all nearby Bluetooth devices that are enabled will be displayed, not only keyboard). 4. Open Disconnect when idle (min) and select a value from the drop-down list 5. To link to a keyboard, enable the connection by pressing the Turn on? option. Upon completing the connection enter PIN from the on-screen keyboard and re-type it on the Bluetooth one.
NNNNNNNNNNNNNNNNNNN 55 CONFIGURING WI - FI CONNECTION 1. Select Configuration > Connectivity > Bluetooth connections > Bluetooth Audio Devices. Select the connection you want to configure. By default, non-preset connections are named Connection No… 2. Press Network name (SSID) and select the access point from the list 3. Connection name will turn to the network name. If you want to rename the connection, press Connection Name and enter name from the on-screen keyboard appeared 4.
NNNNNNNNNNNNNNNNNNN 55 7. Preset a proxy server (if necessary): select Proxy configuration and enter connection parameters (proxy server name, port, username and password) from the on-screen keyboard 8. Press Test connection to check network configuration. The message Connecting will appear. If connection fails you can look through the event log. NOTE You can use Wi-Fi to connect to the Internet. You cannot transfer files over the Wi-Fi network.
Configuration IN THIS CHAPTER… You will learn how configure the interface and software features of the Device for the most comfortable usage. Changes you’ve made in Configuration will be applied after you will exit this section. Registration This menu item is displayed only if the Device is not registered at BookLand online bookstore (www.bookland.net). The Device will be registered automatically during the first Internet connection. NOTE During the registration only serial number of the Device is sent.
CCCCCCCCCCCCC 55 Language Select the Device’s interface language. Keyboard Under this section you can add up to 3 keyboard layouts and set the keyboard layout switching for Bluetooth keyboard. User Profiles Here you can configure up to 6 user profiles (5 can be stored in the internal storage and 1 – on micro SD card). Each profile stores individual books’ status, last opened books, bookmarks, notes, favorites and preconfigured network connections. To add new profile, open the corresponding item.
CCCCCCCCCCCCC 55 • Main menu – select Main menu elements layout • Screen orientation – select the most suitable for you or select auto for accelerometer-based NOTE The navigation key map may change as you change orientation from portrait to landscape. • Boot logo – startup image.
CCCCCCCCCCCCC 55 Clock In this section you will be able to set date, time, time zone and clock format. Update clock item defines how often the clock at status bar will be updated during reading: on page turn, every time or disabled at all. Also you can set idle time before locking keyboard and automatic power off. Open at Startup Here you can set either open last opened book or main menu. Connectivity In this section you can set paramteres needed for network and USB connections.
CCCCCCCCCCCCC 55 • USB mode – set how the Device handles USB connection: PC link, charge or ask user. Speech Synthesis In this section you can set parameters for TTS: • Language and voice – select the TTS package • Speed of Speech • Tone. Maintenance This section allows you to configure system parameters. • Update software – the Device will search for updates in the following order: internal storage, microSD card (if installed) and Internet. • Removing packages – remove dictionaries and TTS packages.
CCCCCCCCCCCCC 55 • Update interval – set the interval to check for updates • Calibrate g-sensor – put the Device on a flat horizontal surface and press any button • Remove ADE authorization. Library This section is intended for optimization of Library databased.
Firmware Update WARNING! Firmware Update is a responsible operation, during which management software of e-book will be changed. In case of improper execution control program may be damaged and will require treatment in the service center. Please perform the upgrade procedure in accordance with the instructions below. There are 2 ways to update the Device firmware. Automatic Update To start automatic software update select Settings > Maintenance > Update software.
FFFFFFFFFFFFFFF 55 Manual Update 1. Open site www.pocketbook-int.com. Select your country 2. Click the Support button on top menu. Select hardware model of your Device 3. Download the Firmware to your PC 4. Unpack the content of the archive, file SWUPDATE. BIN and copy it to the root folder of MicroSD-Card or internal Device storage 5. Switch off PocketBook Pro by pressing button On/Off 6. Switch on PocketBook Pro by pressing On/Off 7.
FFFFFFFFFFFFFFF 66 Troubleshooting Error Message Reason Correction Method file SWUPDATE. Try to format your Micro SD BIN cannot be card (make a backup copies of No upgrade image found on the Mi- all its content prior to format- found cro SD card. Make ting) and copy the file to the sure the file is in root of the empty card. If this the root folder of error persists, use another card. the card. SWUPDATE.
Troubleshooting Malfunciton Possible Reason Device does not turn on or turns on but only the logo is loaded Battery is low A book does not open - the message Book is probably damaged or The book is damaged protected appears, or nothing happens at all Solution Charge the battery If the book was downloaded from the online store try to reload it again. If the file opens on your PC, but does not open on the Device, save the book in another format. Html book opens but is displayed incorrectly.
TTTTTTTTTTTTTTT Malfunciton 66 Possible Reason Solution Close the frozen application by pressing the Sometimes (e.g., when Return key for 1–2 sec downloading damNo response when you and delete task from aged or too large press any key task list. If this doesn’t books) the Device may help, press Reset on freeze the rear panel to reload your device. Your Device is in Check USB mode in the battery charging Configuration Main mode. Menu item.
TTTTTTTTTTTTTTT Malfunciton 66 Possible Reason Disabled automatic turning off Battery discharges too fast Solution Configuration > Clock in Main Menu. Select automatic turn off time in Auto Turn Off in… item Music player is in background mode. The music player is one of the most energy-consuming application.
Customer Support For detailed information about service centers in your country please use contacts below: Web site: http://www.pocketbook-int.com/support/ E-mail: service@pocketbook-int.
Compliance with International Standards The EUT should be supplied by USB port from complied Limited Power Source of personal computer or notebook. The EUT should be supplied by Adapter from complied Limited Power Source. AC Power Manufacturer: FLEET Model: FCC050100U Rated output voltage: DC 5V 1A This equipment is marked with the 0984 symbol and can be used throughout the European community.
CCCCCCCCCCCCCCCCCCCCCCCCCCCCCCCCCCCCCCC 66 • EN 300 328 V1.7.1 – Electromagnetic compatibility and Radio spectrum Matters (ERM); Wideband Transmission Systems; Data transport equipment operating in the 2.4 GHz ISM band and using wide band modulation techniques; Harmonized EN covering essential requirements under article 3.2 of the R&TTE Directive • EN 301 489-1 V1.8.
CCCCCCCCCCCCCCCCCCCCCCCCCCCCCCCCCCCCCCC 66 • ETSI EN 301 511 V9.0.2 – Global System for Mobile communications (GSM); Harmonized EN for mobile stations in the GSM 900 and GSM 1 800 bands covering essential requirements under article 3.2 of the R&TTE directive (1999/5/EC) • ETSI EN 301 908-1 V3.2.
CCCCCCCCCCCCCCCCCCCCCCCCCCCCCCCCCCCCCCC 66 negate your authority to operate the product. This product has demonstrated EMC compliance under conditions that included the use of compliant peripheral devices and shielded cables between system components. It is important that you use compliant peripheral devices and shielded cables between system components to reduce the possibility of causing interference to radios, televisions, and other electronic devices.
CCCCCCCCCCCCCCCCCCCCCCCCCCCCCCCCCCCCCCC 66 • Reorient or relocate the receiving antenna. • Increase the separation between the equipment and receiver. • Connect the equipment into an outlet on a circuit different from that to which the receiver is connected. • Consult the dealer or an experienced radio/TV technician for help. FCC Radiation Exposure Statement This equipment complies with FCC RF radiation exposure limits set forth an uncontrolled environment.
CCCCCCCCCCCCCCCCCCCCCCCCCCCCCCCCCCCCCCC 77 The SAR limit stated in the ICNIRP guidelines is 2.0 watts/ kilogram (W/kg) averaged over 10 grams of tissue. Tests for SAR are conducted using standard operating positions with the device transmitting at its highest certified power level in all tested frequency bands. The actual SAR level of an operating device can be below the maximum value because the device is designed to use only the power required to reach the network.