
User's Manual


1
CONTENTS
1. INTRODUCTION ················································································· 4
PM200 Model Name & P/N
························································································ 4
Trademarks
·················································································································· 4
About the PM200 Handy Terminal
··········································································· 4
Accessories
··················································································································· 5
2. SAFETY REGULATIONS ········································································ 6
2.1. General Safety Rules ······················································································· 6
2.2. Power Supply ··································································································· 6
2.3. Laser Safety ····································································································· 7
2.4. LED Safety ······································································································· 9
2.5. FCC/EU RF Exposure ······················································································ 9
2.6. CB Scheme ······································································································ 9
2.7. FCC Part 15 Regulation ··················································································· 9
2.8. Radio Compliance ·························································································· 10
2.9. WEEE Compliance ························································································· 10
3. GETTING STARTED ··········································································· 10
3.1. Install the Battery ···························································································· 10
3.2. Charge the Batteries ······················································································ 12
3.3. LED Indicators ································································································ 13
3.4. Guidelines for Battery Pack Use and Disposal ··············································· 13
3.5. Turn Your Device On ······················································································ 15
3.6. Desktop ·········································································································· 15
3.7. Indicator Icons ································································································ 16
3.8. Using the Stylus ····························································································· 17
3.9. Selecting Program ·························································································· 17
3.10. Pop-Up Menus ······························································································· 17
3.11. Using Windows Explorer ················································································ 17
4. GET TO KNOW YOUR DEVICE ····························································· 18
4.1. Feature of Your Device ·················································································· 18
4.2. PM200 Handy Terminal ·················································································· 18
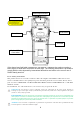
4.3. Front Panel Layout ························································································· 19
4.4. Display Backlight ···························································································· 20
4.5. Keypad Backlight ···························································································· 21
4.6. Using Screen Protectors ················································································ 21
4.7. Installing Your Screen Protector ····································································· 22
4.8. Back Panel Layout ························································································· 24
4.9. Left Side Panel Layout ··················································································· 26
4.10. Installing Memory Cards ················································································· 26
4.11. Right Side Panel Layout ················································································· 27
4.12. Top Panel Layout ··························································································· 28
4.13. Bottom Panel Layout ······················································································ 28
4.14. Peripherals and Accessories ·········································································· 29