
Owners manual

©2015 POISON SPYDER CUSTOMS 951-849-5911•WWW.POISONSPYDER.COM
INSTALLATION INSTRUCTIONS INST-17-17-010_A
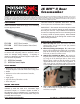
JK BFH™ II
Rear
Crossmember
IMPORTANT: Thank you for purchasing this Poison Spyder product. Please read through this entire document before proceeding with installation. If you are not
confident in your mechanical skills, please seek the help of a professional to perform the installation. Check your packages immediately upon arrival to ensure that
everything listed is included, and to check for damage during shipping. If anything is missing or damaged, or if you need technical assistance with any aspect of
this installation, call Poison Spyder at (951) 849-5911 as soon as possible. This document last updated August 2015.
APPLICATIONS
These installation instructions apply to the following
Poison Spyder products:
17-17-010 JK BFH™ II Rear Crossmember
17-17-030 JK BFH™ II Rear Crossmember - Reciever (shown)
PARTS LIST
Please check your packages immediately upon arrival
to ensure that everything listed is included, and to
check for damage during shipping. If anything is
missing or damaged, call Poison Spyder at (951) 849-
5911 as soon as possible.
(1) JK BFH II Rear Crossmember
(1) JK BFH II Rear Frame Cut Template
TOOLS NEEDED
• Reciprocating saw with bi-metal blade OR pneumatic cut-
off wheel OR plasma cutter OR similar tool for cutting metal
• Welder
• Mechanic’s tool set with an assortment of wrenches,
sockets, etc.
• Angle grinder
• Light-color fine-tip felt marker or scribe
• Primer and paint
BEFORE YOU BEGIN
NOTE: The JK BFH II Rear Crossmember may be
installed by itself and used as a “minimalist” high
clearance bumper, or a Poison Spyder JK BFH II
Rear Bumper may be installed over it. Procedures for
installing the bumper are not covered here—they are
provided with the bumper.
This item comes as unpainted, bare steel. You will
need to paint the crossmember after installation.
IMPORTANT: The reciever tube built into part number
17-17-030 is not rated for towing on public highways.
Do so at your own risk. It is provided as a convenience
for short non-highway tasks such as launching a boat
or moving a trailer on private property. Most standard
reciever hitches will not t through the reciever tube
without being shortened.
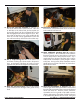
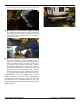
INSTALLATION PROCEDURE
1. Park the Jeep on a flat, level surface and set the
parking brake. You will want to wear eye protection
beyond this point in time.
2. Removeexistingrearbumper.Ifa JK BFH II Rear
Bumper will be installed after installing the crossmember,
keep the OE hardware that attached the bumper to the
frame rails, as some of it will be re-used.
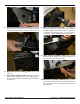
3. Attach the provided JK BFH II Rear Frame Cut
Template (laser cut from steel plate) to the side of the frame
rail, using two of the OE bumper bolts as shown in the
following photo. Make sure that the template is exactly
aligned with the frame rail as the bolts are tightened. In
other words, the top and bottom edges of the template
must be parallel with the top and bottom of the frame rail.
4. Use a light-colored felt-tip marker or scribe to
mark a cut-line along the diagonal edge at the rearward
end of the cut template.