
Owners manual

©2015 POISON SPYDER CUSTOMS 951-849-5911•WWW.POISONSPYDER.COM
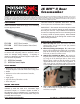
POISON SPYDER CUSTOMS INST-17-62-020_A • JK BFH™ II Rear Crossmember 3
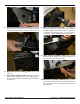
11. Re-use the steel Cut Template to make the cut-
lines on the inboard side of each frame rail. There are
no bolt holes on the inboard side, but the template can
be manually aligned with the oval-shaped hole and the
hole that slightly intrudes into the diagonal cut line. Also,
ensure that the template is once again parallel with the
frame rail, and even with the perpendicular cut-line that
was made across the top of the frame rail in earlier steps.
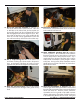
12. Use a reciprocating saw or cut-off wheel to cut
each frame rail along the cut-lines made in the previous
steps. For the bottom of the frame rail, simply cut across
perpendicularly between the diagonal cuts on both sides.
13. Once the cuts have been made and the trimmed
pieces removed, de-burr the edges with a grinder or flap
wheel.
14. Test-fit the JK BFH II Rear Crossmember to the ends of
the frame rails. It should extend over the cuts on each side,
to the outside of each frame rail.
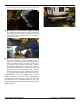
15. Some additional grinding may be needed to
achieve a perfect fit. The crossmember will be welded to
the Jeep’s frame rails at every seam and joint, so the pieces
must be closely fitted to achieve the best results. Lay a
straight-edge across the tops of the frame rails in order to
make sure the crossmember is exactly straight in relation
to the frame. The top surface of the crossmember must be
parallel to the top surfaces of the frame rail, both side-to-
side and front-to-back.
16. Once the crossmember is properly fitted, use a
scribe or light colored fine-tip felt marker to mark around
the ends of the crossmember where it joins into the inboard
side of each frame rail. Once this is done, remove the
crossmember and use a grinder or flap-wheel to remove
all paint, undercoating, oil and other residue from the area
to be welded along the line that was made. Also grind