
User Manual


INSTALLATION INSTRUCTIONS
©2013 POISON SPYDER CUSTOMS, INC. • 951-849-5911 • WWW.POISONSPYDER.COM
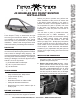
The Poison Spyder Customs Brawler MID
Front Bumper is easy to install with the right
tools and good mechanical abilities. If you are
not condent in your mechanical skills, please
seek the help of a professional to perform the
installation. Please read through these entire
instructions before proceeding with installation.
PARTS LIST
Please check your packages immediately upon
arrival to ensure that everything listed is included,
and to check for damage during shipping. The
locknuts and washers are shipped attached to the
mounting studs inside the bumper. If anything is
missing or damaged, call Poison Spyder at (951)
849-5911 as soon as possible.
(1) JK Brawler MID Front Bumper
(8) 1/2-13 nylon insert lock nut
(8) 1/2atwasher
TOOLS NEEDED
• Ratchet with 6” socket extension, 19mm
deepsocketand3/4”deepsocket
• Torquewrench(ft./lbs.)
• 7/32”hexkey
• Deadblowhammerorrubbermallet
• Phillips&atheadscrewdrivers
• Removal tool for push-in retainer clips or
smallprybar
BEFORE YOU BEGIN
The JK Brawler MID Front Bumper and
associated components are shipped un-painted.
Before you paint or powder coat, perform the
entire installation of the product to ensure that
it ts without risking damage to your paint or
powder coat nish. Poison Spyder Customs is
not responsible for paint or powder coat costs
in the event you damage the nish during
installation, or that the parts are incorrect or
defective.
You will want to paint or powder-coat these
components prior to FINAL installation. If
painting them yourself, we recommend starting
with a quality etching primer and allowing
sufcient cure/dry time between coats and
before you apply color. Quality spray-can paints
are ne, however be sure to thoroughly paint all
of the inside corners and hard-to-reach areas
of the bumper. A little extra time and attention
to detail on your preparation and paint process
will pay off in longer-lasting good looks and rust
prevention.
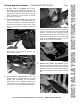
INSTALLATION PROCEDURE
1. Park vehicle on a level surfaceandsetthe
emergencybrake.Youwillwanttoweareye
protectionbeyondthispoint.
2. Remove the plastic lower air dam.Usea
push-inretainerremovaltooltopopoutthe
plasticpush-inretainersalongthefrontedge
and also underneath/behind the air dam
whereitattachestothecrashbar.Ifyoudo
nothaveapush-inretainertool,aat-edge
screwdriverorsmallpry-barmaybeused.
FIGURE 2
JK BRAWLER MID FRONT BUMPER
INSTALLATION