
User Manual
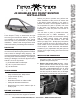

INSTALLATION INSTRUCTIONS
©2013 POISON SPYDER CUSTOMS, INC. • 951-849-5911 • WWW.POISONSPYDER.COM
Poison Spyder Customs •
JKBRAWLERMIDFRONTBUMPER Page3
IMPORTANT: If installing the optional Skid Plate,
refer at this point to the instructions that came
with the Brawler MID Skid Plate, and proceed
with those steps. Return to these instructions
and proceed with the next step, below, once the
Skid Plate installation instructions have been
completed.
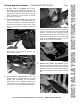
7. Install the Bumper onto the frame.There
are eight (8) threaded studs located on the
inside/backside of the bumper, which will
correspondwiththebumpermountingholes
on the frame. It may be a tight t due to
slightmanufacturing variances from Jeep to
Jeep,butthebumperwilltwithsomegentle
persuasion.You mayneedtouse a rubber
mallet or soft dead-blow hammer to tap the
bumperintoplace.Becarefulnottomaryour
paintorpowdercoatnish.
8. Locate the 1/2-13 nylon insert lock nuts and
1/2”atwashersthatcamewithyourbumper
(usuallytheseareshippedthreadedontothe
studs).Installaatwasherandlocknutonto
eachoftheeightbumpermountingstudsat
the outside and inside of the frame rail on
either side of the Jeep. Snug these with
the3/4”deepsocket,extensionandratchet.
Torquethesenutsto70ft.-lbs.
9. If you installed the OE fog lamps into the
Brawler MID bumper, plug the harness
connectorsbackintothesocketsintheback
ofeachlamp.TheOEwireharnessmaybe
secured with stick-on harness anchors and
zip-ties(notprovided).
Congratulations, you have completed the
installation of your Poison Spyder JK Brawler
MID Front Bumper!