
Installation Instructions
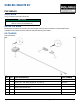
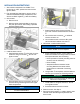
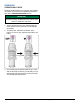
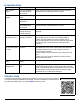
Table Of Contents

Instr 9929286 Rev 01 2018-04 Page 3 of 5
INSTALLATION INSTRUCTIONS
1. Shift vehicle transmission into “PARK”. Turn
ignition key to “OFF” position and remove from
ignition switch.
2. Flip up passenger seat bottom, remove driver’s
seat and underseat storage compartment, then
disconnect black negative (-) cable from battery.
3. Gain access.
a. Remove hood.
b. Remove upper dash cupholder by removing
two push pin rivets
A
, then sliding cupholder
rearward. Retain rivets.
4. Install wireless receiver.
a. Install wireless receiver
q
to RH side of under-
hood liner using four screws
w
. Do not over-
tighten screws.
b. Route wireless receiver connectors 1B and 1C
rearward through firewall grommet into upper
dash compartment.
NOTE
See previous section, HARNESS DETAIL, for
connector identification.
c. Detach existing wired remote connector
B
from main vehicle harness breakout connector
C
.
d. Join wired remote connector
B
to wireless
remote connector 1C.
e. Join wireless remote connector 1B to main
vehicle harness breakout connector
C
.
5. OPTIONAL: Install wireless remote.
NOTE
Wireless remote can be stowed in any suitable
location. Holder
r
is not required.
a. Remove wireless remote
e
from holder
r
.
Determine suitable mounting location for holder
with special attention to the following:
• Driver operation of vehicle (including travel of
controls, such as shift lever)
• Driver visibility
• Adequate clearance between holder
mounting fasteners and other vehicle
components on underside of mounting
surface
b. Using holder
r
as template, mark and drill two
1/8 inch (3 mm) holes into mounting surface.
IMPORTANT
Control drill depth to prevent damage to underlying
structure or components.
c. Install holder
r
using two screws
t
. Do not
over-tighten screws.
d. Reinstall wireless remote into holder.
6. Restore access. See Step 3.
7. Reconnect black negative (-) cable to battery, then
reinstall under-seat storage compartment and
driver’s seat.