
Installation Guide

Installation Instructions
Because of their wide and tapered rims, and nished surfaces inside and out, some models constructed of copper and
stainless steel have the option of being installed in three different fashions.
The installation steps below address all three mounting techniques. The diagrams show that undermounting offers three
style choices, and usually includes the use of clips. Topmounting requires the use of silicone caulking. Vessels can be
mounted on the countertop or recessed into it. When vessels with rounded bottoms are mounted above the counter, a
sink ring is typically installed below the basin in order to stabilize it.
• Using the template provided, measure and cut out the hole.
• Determine the locations for the clip brackets around
the perimeter of the sink. Pre-drill holes for the clips.
• With denatured alcohol, clean the surfaces of the sink
and countertop which will meet.
• Topmount: Apply a bead of silicone along underside of the
sink rim or the top perimeter edge of the countertop opening.
Undermount: Apply similarly on the top of sink rim or
underside of countertop.
• Topmount: Carefully align the sink over the countertop
opening and lower into position, applying pressure to secure
a seal of the silicone against the countertop. Undermount:
Similarly align the sink under the countertop.
• Re-check that the sink is evenly aligned and level.
• Attach and tighten the clip brackets.
• Remove excess sealant along edges with denatured alcohol.
Undermount
or Topmount
or Vessel Sinks
The Installation of Sinks Which Can Be Mounted Under, Over, or Atop the Countertop
The Steps
Polaris Sinks © 2015
www.polarissinks.com
sales@polarissinks.com
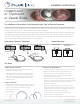
Undermount/Topmount Techniques Vessel Techniques
ABOVE COUNTER RECESSED
INTO COUNTER
TOPMOUNT
CAULKING
UNDERMOUNT CLIPS
UNDERMOUNT
CAULKING
VESSEL ABOVE COUNTER TOPMOUNT & UNDERMOUNT
• Measure and cut a hole in the countertop matching
the diameter of the drain pipe.
• If the bowl has a curved bottom it will require a sink
ring. Position the ring on the counter over the drain
hole, then rest the basin on the ring. If the bowl has a
at bottom it can be rested directly on the counter.
• Install the drain.
• Measure and cut a beveled hole in the countertop to
the diameter necessary to hold the sink at the desired
depth, not to exceed half of the bowl’s height.
• Rest the basin in the hole.
• Install the drain.
VESSEL RECESSED