
User Guide

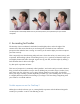


The back of the camera body should rest on your cheek, with 2" (5 cm) between your eye and the
viewfinder.
2. Accounting for Parallax
The OneStep 2 uses a traditional viewfinder located slightly above and to the right of the
camera's lens. This means that what you see through the viewfinder is from a different
perspective than what the lens is seeing. As a result, you’ll need to adjust your aim to compose
your shot correctly.
This is especially true when shooting subjects that are closer than 4 feet (1.2 meters) away, such
as portraits. When taking a photo of something close-up, it’s a good rule of thumb to adjust your
aim slightly downwards and to the right. Again: line up your shot, and then adjust by aiming a
little downwards and a little to the right.
Try this quick experiment at home:
This issue of perspective is commonly called “parallax”, and can be easily recreated at home to
help you better understand this concept. Start by holding out your index finger 2 inches (5 cm)
away from your face. Close one eye at a time, and pay attention to your finger. You should
notice your finger “shifting” position depending on which eye you’re looking with, as each eye is
in a slightly different position when looking at your finger. The same thing is happening with
your camera’s viewfinder and lens.
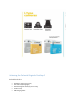
Double-exposures on the OneStep 2
Although not a built-in feature, per se, creating double exposures with the Polaroid Originals
OneStep 2 is possible. It can be a bit addicting as well.