
User Guide


Lighten/Darken: Use the lighten/darken switch on the right side of the lens barrel
to adjust the exposure of your shot. To get a brighter photo, move the
lighten/darken switch right to the plus/lighten position. For a darker photo, move
the lighten/darken switch left to the minus/darken position. These two settings
correspond to different Exposure Values (EV). The camera’s Exposure Values are
+½ EV (when you move the switch to plus/lighten) and -½ EV (when you move
the switch to minus/darken).
5. Using the viewfinder:
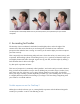
The OneStep 2 uses a traditional view finder located on the right side of the lens
barrel. The viewfinder is most accurate when you align your right eye with the
space behind the viewfinder, resting your cheek on the slope of the camera body.
Note: Remember that the viewfinder sits slightly above and to the right of the
camera’s lens — above and to the left from your perspective when shooting — so
you will need to adjust your aim to compose your shot correctly when shooting at
distances of 1.2 meters or less. Learn more about aiming and framing with the
OneStep 2 in this article.
6. Compose your photo:
To avoid a blurry photo, make sure you are at least 60cm (2 feet) away from your
subject when you take the picture. For the best results, always try to shoot with
your light source behind you.
7. Take the photo:
Press the shutter button all the way in to take the photo. The photo will be ejected
from the slot at the front of the camera as soon as you let go of the shutter button.
It will be shielded from the light by the film shield, and will be held in place until
you are ready to remove it.
8. Remove and shield the photo
Remove the photo from beneath the film shield and let the film shield roll back
into the camera. Place the photo face down to continue shielding it from light as it
develops.