
Operating Manual CCD Camera Models ST-7E, ST-8E, ST-9E, ST-10E, ST-1001E
Section 3 - At the Telescope with a CCD Camera
Page 18
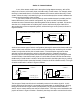
eyepiece and slide it back and forth to find the best visual focus, and then scribe the outside of
the eyepiece barrel. The next time the CCD is used the eyepiece should be first inserted into
the tube to the scribe mark, and the telescope visually focused and centered on the object. At
f/6 the depth of focus is only 0.005 inch, so focus is critical. An adapter may be necessary to
allow the eyepiece to be held at the proper focus position. SBIG sells extenders for this
purpose.
3.5. Finding and Centering the Object
Once best focus is achieved, we suggest using "Dim" mode to help center objects. This mode
gives a full field of view, but reduces resolution in order to increase the sensitivity, and
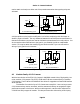
digitization and download rate. If you have difficulty finding an object after obtaining good
focus, check to be sure that the head is seated at best focus, then remove the head and insert a
medium or low power eyepiece. Being careful not to adjust the focus knob on the telescope,
slide the eyepiece in or out until the image appears in good focus. Then visually find and
center the object, if it is visible to the eye. If not, use your setting circles carefully. Then, re-
insert the CCD head and use FOCUS mode with an exposure time of about ten seconds, if it is
dim. Center the object using the telescope hand controls.
Note: With a 10 second exposure, objects like M51 or the ring nebula are easily detected with
modest amateur telescopes. The cores of most galactic NGC objects can also be seen.
3.6. Taking an Image
Take a CCD image of the object by selecting the Grab command and setting the exposure time.
Start out with the Image size set to full and Auto Display and Auto contrast enabled. The
camera will expose the CCD for the correct time, and digitize and download the image. One
can also take a dark frame immediately before the light image using the Grab command.
Because the ST-7E/ST-8E/ST-9E have regulated temperature control, you may prefer to
take and save separate dark images, building up a library at different temperatures and
exposure times, and reusing them on successive nights. At the start it's probably easiest to just
take the dark frames when you are taking the image. Later, as you get a feel for the types of
exposures and setpoint temperatures you use, you may wish to build this library of dark
frames.
3.7. Displaying the Image
The image can be displayed on the computer screen using the graphics capability of your PC.
Auto contrast can be selected and the software will pick background and range values which
are usually good for a broad range of images or the background and range values can be
optimized manually to bring out the features of interest.
The image can also be displayed as a negative image, or can be displayed with
smoothing to reduce the graininess. Once displayed, the image can be analyzed using
crosshairs, or can be cropped or zoomed to suit your tastes.