
Operating Manual CCD Camera Models ST-7E, ST-8E, ST-9E, ST-10E, ST-1001E


Appendix B - File Formats
Page 51
B. Appendix C - Maintenance
This appendix describes the maintenance items you should know about with your CCD
camera system.
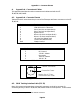
B.1. Cleaning the CCD and the Window
The design of SBIG cameras allows for cleaning of the CCD. The optical heads are not
evacuated and are quite easy to open and clean. When opening the CCD chamber, one should
be very careful not to damage the structures contained inside.
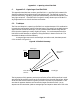
To open the CCD Chamber, remove the six screws that hold the 5 inch front cover in
place. Remove the six screws and lift the front cover, exposing the structures inside. There is a
rubber O-Ring that sets in the groove on the top of the Chamber housing.
The CCD array is protected by a thin cover glass that can be cleaned with Q-Tips and
Isopropyl Alcohol. Do not get alcohol on the shutter. Dust on the CCD should be blown off. Use
alcohol only if necessary. The optical window of the chamber housing can be cleaned the same
way. When reinstalling the chamber housing, be very careful to make sure the O-ring is in the
groove when seated.
B.2. Regenerating the Desiccant
This section describes the regeneration procedure for the desiccant used in the
ST-7E/8E/9E/10E/1001E. The desiccant absorbs moisture in the CCD chamber, lowering the
dew point below the operating temperature of the cooled CCD, thus preventing the formation
of frost. The desiccant is contained in a small cylindrical plug that screws into the chamber
from the rear. In normal operation the useful life of the desiccant is over a year. If the CCD
chamber is opened often, the desiccant should be regenerated when frosting is noticed. Follow
the procedure below to regenerate the desiccant:
1. Unscrew the brass desiccant container from the rear of the camera and
remove the O-ring.
2.. Plug the resulting hole by screwing in the supplied bolt or plug 2 or 3 turns.
Finger tight is adequate. Don't put a wrench on it.
2. Heat the dessicant container in an oven at 350°F (175 deg C) for 4 hours.
The solder used to seal the can melts at 460 degrees F, so be sure to stay at
least 50 degrees below this number. Preheating the oven to avoid hot spots
is advised.
3. Replace the desiccant container into the rear of the camera, being careful to
reinstall the O-ring and insure that it does not get pinched.
4. Expect the camera to take an hour or two to reach the frost free state. If it
does seem to frost and you need to capture images, reduce your cooling to
the zero degree C range - the CCD dark current will still be quite low.