20” Color Television TTM-2004
Important Safeguards This symbol indicates that this product incorporates double insulation between hazardous mains voltage and user accessible parts. RISK OF ELECTRIC SHOCK When servicing use only identical replaceDO NOT OPEN ment parts. Caution: To reduce the risk of electric shock, do not remove cover (or back). No user serviceable parts inside. Refer servicing to qualified service personnel. CA UTION AU This symbol indicates important instructions accompanying the product.
Important safeguards 12. Use only with the cart, stand, tripod, bracket, or table specified by the manufacturer, or sold with the apparatus. When a cart is used, use caution when moving the carts/apparatus combination to avoid injury from tip-over. 13. Unplug this apparatus during lightning storms or when unused for long periods of time. 14. Refer all servicing to qualified service personnel.
Contents Overview 4 Remote control 5 Basic operation 6 Menu overview 7 External connection 8 Using the PICTURE menu 10 Using the P.
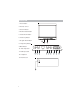
Overview 1. Power Button 2. Remote Sensor 3. Power Indicator 4. TV/AV Selection Button 5. Volume Down Button 6. Volume Up Button 7. Program Down Button 3 2 1 8. Program Up Button 9. Menu Button 10. Video Input Jack 11. Audio Input Jack 4 12. Headphone 13.
Remote control Mute Key Press once to turn off the volume Press again to restore Number Keys Two keys must be pressed to select a channel when when ANTENNA is se to AIR. For channels 2 through 9, press 0 first,then the channel number (for example, 02,12). Three keys must be pressed when you select a channel under 20 when ANTENNA is set to CABLE. For channels above 19, you can press their digit number directly. For example, 001, 019, 20, 100.
Basic operation Connect to AC outlet Insert the mains wire plug of the unit into 120V AC outlet, unplug the AC cord when the unit will not be used for a long period time. How to power on/off You can turn on the power by using the POWER button at TV front panel (or the POWER button on the remote control). Non-signal power-off in 10 minutes If the unit doesn’t receive a signal state, the TV will enter standby mode automatically in 10 minutes. To turn it on, press the POWER button on the remote control.
Menu overview The PICTURE menu will allow you to make adjustments to your picture settings. You can set P.LOCK and V-CHIP in this menu. The TIMER menu sets the clock on your TV and allows you to program your TV for scheduled viewing by using the ON/OFF timer. The PRESET menu provides several options for your channel settings. G Set CCD, LANGUAGE and BLUE BACKGROUND in this menu. Menu basic operation 1. To enter a menu, press the menu button on the TV (or on the remote control), then use the PROG.
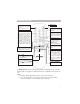
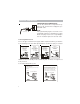
External connection CONNECTING TO AC POWER SUPPLY Use the AC polarized line cord provided for operation on AC. Insert the AC cord plug into a polarized AC outlet. AC Outlet Polarized AC Plug NOTE: If the polarized AC plug does not fit into a nonpolarized AC outlet, do not attempt to fix or cut the blade of the plug. It is the user’s responsibility to have an electrician replace the obsolete outlet. Connecting Antenna to TV Choose the type of antenna hook-up style (A,B,C or D) that resembles your antenna.
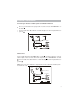
External connection Connecting an Antenna or Cable System to VCR and TV Antenna Choose your antenna hook-up style A, B or C and connect to “IN FROM ANT.” on the VCR. Connect cable from “OUT TO TV” on VCR directly to the 75 Ω input terminal on your TV. STYLE A STYLE B STYLE C 75 Ω TERMINAL BACK OF VCR IN OUT BACK TV PANEL Cable Service Connect cable directly to “IN FROM ANT” on VCR . (If using a cable box, connect cable to input on box. Connect cable from output on box to “IN FROM ANT” on VCR .
Using the PICTURE menu Using the SETUP menu CONTRAST BRIGHT COLOR TINT SHARPNESS 10 Adjust left to decrease picture contrast. Adjust right to increase picture contrast. Adjust left to darken the picture. Adjust right to brighten the picture. Adjust left to decrease color intensity or saturation. Adjust right to increase color intensity or saturation. Adjust left to decrease the red tone. Adjust right to increase the red tone. Adjust left to soften the picture detail.
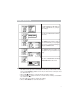
Using the P.LOCK menu Using the SETUP menu (continued) Figure 1 Note: 1. When you enter P.LOCK submenu first time, red “NEW CODE” will display on the menu, input four-digit numbers as your password by pressing 0-9 buttons. After you input the numbers, blue “ENTER CODE” will display on the menu, input again the password you have set to enter P.LOCK submenu, the submenu will display as the following: Figure 2 2. 3. If you have set your password, when you want to enter P.
Using the P.LOCK menu Using V-CHIP menu Select this item to enter V-CHIP submenu. V-CHIP the V-CHIP ON: Turn on V-CHIP function. OFF: Turn off V-CHIP function. MPAA RATING: Set MPAA rating. “BLOCK” prohibits watching the BLOCK channels, VIEW permits watching all channels. If ab high rating is set as “VIEW”, lower ratings will be set to VIEW mode. If a low rating is set to “BLOCK”, higher ratings will be set to BLOCK mode. G: For all children. PG: Directed to old children. PG-13: General Audience.
Using the TIMER menu CLOCK Press number buttons to set HOUR and MINUTE. Press VOL button to circles between AM and PM. TIMER ON: Set the timer to be active. OFF: Turn off the timer. Note: Clock must be programmed before you can use the timer. ON TIME Press number buttons to set HOUR and MINUTE. Press VOL button to set AM or PM. Note: ON-TIME will turn on the TV automatically at preset time, and this function activates only when you set TIMER ON. ON CH.
Using the PRESET menu G CH NO. Press number buttons or VOL desired channel. / button to select your CH ADDED: Select to add the channel that you selected in CH NO. DELETED: Select to delete the channel that you selected in CH NO. ANTENNA AIR: Select to receive television broadcast signal. CABLE: Select to receive cable signal. AUTO Select to start automatic channel search and store.
Using the EXTRA menu CC C1: Select to display Caption 1. C2: Select to display Caption 2. C MUTE: Only after pressing MUTE button, CAPTION will be displayed on the screen. TEXT1: Select it to display TEXT 1. TEXT2: Select it to display TEXT 2. OFF: Turn off the Caption. Tips: CAPTION prepared for TV programs can be pre-recorded (movies, daytime dramas etc.) This type of CAPTION is normally 1 or 2 lines of text.
Troubleshooting VHF/UHF reception The most common types of television interference are as follows: SNOWY PICTURE Snowy picture is usually due to weak signal. Adjust antenna or install an antenna amplifier. DOUBLE IMAGE OR “GHOSTS” Double images are usually caused by reflections from tall buildings. Adjust the direction of the antenna or raise it. RADIO WAVE INTERFERENCE Wavy patterns are moving on the screen, which are usually caused by nearby radio transmitters or shortwave receiving equipment.
Troubleshooting If you have any problem, check the countermeasures for each symptom listed below. The following symptoms may have been caused by inappropriate adjustments rather than actual malfunction of the unit. If the trouble persists, contact the service center.
Specifications TUBE/POWER SUPPLY SIZE ASPECT RATIO POWER SUPPLY 20” 4:3 120V~60Hz TUNER # OF CHANNELS 181 PICTURE CONTROLS PICTURE SETTINGS OSD LANGUAGES TINT, COLOR, BRIGHTNESS, CONTRAST, SHARPNESS PERSONAL, DYNAMIC, STANDARD, SOFT ENGLISH, FRENCH, SPANISH SOUND SPEAKER QUANTITY AUDIO OUTPUT POWER 2 2W*2 CONNECTORS CABLE/ANTENNA INPUT AV INPUT HEADPHONE OUTPUT 1 REAR 1FRONT 1FRONT DIMENSIONS (INCH, WxDxH) 19.7 X 18.4 X 17.4 WEIGHT (LBS) 48.