Progressive Scan DVD Player 20051104 DHX-202
WARNING • TO PREVENT FIRE OR SHOCK HAZARD, DO NOT USE THIS PLUG WITH AN EXTENSION CORD, RECEPTACLE OR OTHER OUTLET UNLESS THE BLADES CAN BE FULLY INSERTED TO RESENT BLADE EXPOSURE. TO PREVENT FIRE OR SHOCK HAZARD. DO NOT EXPOSE THIS APPLIANCE TO RAIN OR MOISTURE. TO PREVENT ELECTRICAL SHOCK, MATCH WIDE BLADE PLUG TO WIDE SLOT FULLY INSERT.
Important Safeguards and Precautions Power cord protection To avoid the unit from malfunctioning, and to protect against electric shock, fire or personal injury, please observe the following: • Hold the plug firmly when connecting or disconnecting the AC power cord. • Keep the AC power cord away from any heating appliances. • Never put any heavy objects on the AC power cord. • Do not attempt to repair or reconstruct the AC power cord in any way.
Table of Contents General Information Features ......................................................................................................................................................................................... 5 DVD region code ............................................................................................................................................................................ 5 Discs that can be playbacked..........................................................
General Information Features Glossary of disc terms • 2 channel audio out. • Compatible with DVD, DVD+R, DVD-R, DVD+RW, DVD-RW, MP3, CD-R, CD-RW, JPEG. • OSD menu display. • Full function remote control. • Title (DVD) The longest sections of a picture or a music piece on a DVD; a movie, etc.., for a picture piece on a video software; or an album, etc., for a music piece on and audio software. Each title is assigned a title number enabling you to locate the title you want.
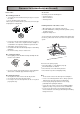
General Information(continued) Accessories Notes on disc Check that you have the following items: • Remote Control x1 • Owner’s Manual x1 • Warranty Card x1 Disc handling precautions • To keep the disc clean, handle the disc by its edge. Do not touch the surface. • Do not stick paper or tape on the disc. If there is glue (or a similar substance) on the disc, remove the glue completely before using the disc. Installing batteries in the remote control 1. Open the battery cover on the back of the remote.
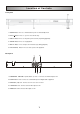
Location of Controls Front panel 1. POWER Button : Press to switch between power on and standby mode. 2. EJECT Button : Press to open or close the disc tray. 3. PREV 9 Button : Press to skip to the previous track (only during playback). 4. STOP < Button : Press to stop playback. 5. NEXT : Button : Press to skip to the next track (only during playback). 6. PLAY/PAUSE ; Button : Press to start or pause disc playback. Back panel 1 5 COAXIAL 2 3 4 1.
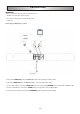
Location of Controls (continued) Remote control 1. POWER: Switch the device to ON or STANDBY. 2. NUMERICAL KEYS: Press to select the items or settings dierectly. 3. ANGLE: Press to access various camera angles on the DVD if the DVD has multiple angle video. 4. ZOOM: Press to enlarge or reduce the picture. 5. A-B: Press to specify a section and plays it repeatedly. 6. PBC/MENU: Press to display the root menu when playing a DVD. 7. SETUP: Press to enter into the SETUP menu. 8.
Connections Connections IMPORTANT! * Before connecting the AC power cord to the wall outlet, ensure that all the other connections have been made. * Never make or change any connections with the power switched on. Connecting your DVD player to your TV * Connect the S-VIDEO OUT jack to the S-Video input jack on the TV using an S-Video cable. * Connect the VIDEO OUT jack to the Video input jack on the TV using a video cable.
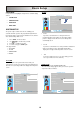
Basic Setup SETUP MENU TV TYPE In top menu move the highlight to Setup menu to set below settings desired. • SYSTEM SETUP • • LANGUAGE SETUP • VIDEO SETUP SYSTEM SETUP TV SYSTEM AUDIO SETUP TV TYPE 4:3 PS SCREEN SAVER 4:3 LB DEFAULT 16:9 EXIT SETUP SYSTEM SETUP TO QUIT PRESS SETUP The system setup is carried out via the TV, enabling you to customize the DVD system to suit your particular requirements.
Basic Setup(continued) AUDIO LANG, MENU LANG DEFAULT If you select this function, all of the functions will restore to the This function allows you to select the desired language. It includes: original settings. • • • • • • SYSTEM SETUP TV SYSTEM TV TYPE SCREEN SAVER DEFAULT RESTORE EXIT SETUP ENGLISH JAPANESE FRENCH SPANISH PORTUGUESE GERMAN The default setting is ENGLISH.
Basic Setup(continued) SUBTITLE LANG DOWN SAMPLE This function allows you to select the desired language. It includes: AUDIO SETUP • ENGLISH • JAPANESE • FRENCH • SPANISH • PORTUGUESE • GERMAN • OFF DIGITAL OUT DOWN SAMPLE DOWNMIX 48K 96K EXIT SETUP The default setting is OFF. OSD LANGUAGE ENGLISH AUDIO LANG JAPANESE SUBTITLE LANG FRENCH MENU LANG TO QUIT PRESS SETUP DOWN MIX To play a DVD disc recorded with surround multi-channel audio correctly.
Basic Setup(continued) VIDEO SETUP 1. 2. 3. 4. VIDEO OUT •YUV •S-VIDEO •P-SCAN Press SETUP on the remote control. Use / / / to select item you want. Press OK to confirm the selection. To exit the setup, press SETUP again. P-SCAN This section includes: VIDEO SETUP •BRIGHTNESS •CONTRAST •HUE •SATURATION •VIDEO OUT YUV S-VIDEO P-SCAN BRIGHTNESS, CONTRAST, SATURATION THEN OK TO SET PRESS VIDEO SETUP TO QUIT PRESS SETUP BRIGHTNESS CONTRAST 12 The default setting for the P-SCAN is OFF.
Playing Discs General operation 1 After all the connections are properly completed, plug the AC power cord of the player to an appropriate wall outlet. Repeat 1. For DVD discs Press REPEAT repeatedly to select the following: REP : [ OFF ] 2 Press POWER to turn ON the main power. 3 Press OPEN/CLOSE on the remote control or EJECT on the front panel to open the disc tray, press again to close the disc tray. REP : 4 Press MUTE to shut off the sound. To restore the volume, press MUTE again.
Playing Discs(continued) Using the menu for DVD When playing back a CD 1 1 Press DISPLAY repeatedly to show the following 3 Press PBC/MENU while playing a DVD disc. The TITLE MENU will appear on the TV screen. The contents of the menu vary from disc to disc. Use the / / / buttons to select the title (or chapter) you want to play. Depending on the disc, you can use the number buttons (0/ 10~9,10+ ) to select the title (or chapter). Press OK to start playback.
Playing Discs(continued) Program play You can play the contents of the disc in a specific order by programming the order of the tracks to be played. 1 While playback is stopped, select or press PROG to enter the program mode. 2 Use the number buttons (0/10 ~ 9,10+) to input the track numbers in the order you want. 3 Repeat step 2 to store other tracks. 4 To start program play, press PLAY 5 To stop playback, press 6 To cancel the program, press CLEAR on the display image again. . once.
Special Functions Picture zooming Angle selection This function allows you to enlarge the picture on the TV screen and to pan through the enlarged image. Some DVD discs contain scenes which have been shot simultaneously from a number of different angles. For these discs, the same scenes can viewed from each of the different angles. 1 Press ZOOM repeatedly to select a zoom factor as below: ZOOM 2 1 Press the ANGLE button to change the scenes from one angle to other angle(s).
Troubleshooting External noise is heard • Check that the connecting cords are away from a transformer or motor. • Move your TV away from the audio components. • The plugs and jacks may be dirty. Wipe them with a cloth slightly dampened with alcohol. • Clean the disc. If you experience any of the following difficulties while using the system, use this troubleshooting guide to help you remedy the problem. Should any problem persist, please call tech support listed on the warranty.
Specifications DVD section Laser type ............................................................................. Signal system ....................................................................... Video output level .................................................................. Video Y output level ............................................................... Video C output level ..............................................................