DVD Player & Recorder DVR-0800 Operation Manual -1-
Table of contents Important Safety Instructions……………………………………………………………………………………… 3 About this manual……………………………………………………………………………………………………… 4 This player supports the following Media Formats…………………………………………………………………….
Important Safety Instructions y y y y y y y y y y y y y y y y y y Read these instructions. All the safety and operating instructions should be read before the equipment is operated. Keep these instructions. The safety and operating instructions should be retained for future reference. Heed all warnings. All warnings on the equipment and in the operating instructions should be adhered to. Follow all instructions. All operating and use instructions should be followed. Do not use this unit near water.
About this manual The operation described here mainly refers to the use of the remote control handset (R/C). Buttons with same or similar marking at the main unit have the same function like those of the R/C. This player supports the following Media Formats: DVD-Video CD-R CD-RW CD Audio Photo CD DVD+RW DVD+R MP3 Important Note: This unit plays CD-R, CD-RW and MP3 disks, although CD-R and CD-RW media will not be indicated in the display.
Features INTRODUCTION Thank you for buying this Polaroid DVD Recorder. We hope you enjoy this quality unit with its fantastic features and easy playback/recording operation. With it, you can watch DVDs, music disks, or watch TV shows from external source devices. The most outstanding feature that attracts you perhaps is that you can record these shows to DVD+RW or DVD+R disks in various ways, as you like.
Before You Switch On Place in Position Choose a location with sufficient air circulation to prevent overheating. Do not expose the unit to direct sunlight or other heat sources. The product must be positioned horizontally. Do not put any heavy objects on its housing. Protect the laser unit against dust and if necessary, use a cleansing disk carefully following its operating instructions. Condensation Condensation may cause the laser lens to malfunction.
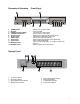
Elements of Operation 1. POWER button 2. Disk tray 3. VIDEO input jack(CVBS2) 4. L-AUDIO-R input jacks 5. Remote sensor 6. Display panel 7. EJECT button 8. PLAY button 9. STOP button 10. MONITOR button 11. RECORD button - Front Panel -Press to turn on/off the power. -Use to load disk. -Connection for a video output. -Connections for audio output. -Receiving the signal from the remote control. -Indicates the current status of the unit. -Press to open/close the disk tray.
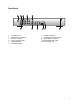
Rear Panel 1. TV TUNER jack 2. VIDEO input jack (CVBS1) 3. 2ch Audio input jack 4. 5.1ch Audio output jacks 5. VIDEO output jack 6. S-VIDEO input jack 7. S-VIDEO output jack 8. Component video output jacks 9. Optical Digital output jack 10. Coaxial Digital output jack 11.
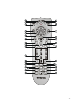
The Remote Control Handset (R/C) 1 2 REC TV/AV Recording start button. Press to shift between CVBS1, CVBS2, S-VIDEO and RF. 3 4 5 POWER Switch between stand-by and working status. Press to search backward. Arrow select. (OSD navigation buttons) Press / to tune the effect of the reception. Press to advance to the next channel or to go back to the preceding channel. Press to confirm the selection. Press to skip to the previous track. Press to activate the setup menu. Press to stop playback.
- 10 -
Connections Connecting to a TV Important Note: - Not all cables shown below are included with this DVD player. - Turning off the power to all equipment involved before making any connections will protect your speakers from possible damage. 1. Connecting to your TV will give you an Analog Audio Connection: Using the supplied audio cables, connect the AUDIO OUT jacks (LEFT/RIGHT) on the DVD Player with the AUDIO IN jacks (LEFT/RIGHT) on your TV. 2.
Connections Analog Audio Connection Using your choice of analog video, S-video, or Component video connection (see page 11), you also have the option to connect your DVD player to your stereo system for incredible stereo sound. Use the audio connection described below: 1. Standard Analog Audio Connection: Using the supplied audio cable, connect the AUDIO OUT jacks (LEFT/RIGHT) on the DVD Player with the AUDIO IN (LEFT/RIGHT) jacks on your amplifier or stereo receiver.
Connections Digital Audio Connection Using your choice of analog video, S-video, or Component video connection (see page 11), you also have two Digital Audio options when connecting your DVD player to your stereo system. It is widely debated which connection (Optical or Coaxial) gives you better performance. However, either connection will give you superior sound. Use the connections described below: 1.
Connections Connecting to Audio/video Sources This DVD player supports two-channel video input and two groups of audio input (one set of each is on the front panel, the other set of each is on the rear panel) for connecting a camcorder. Use these connections for connecting a camcorder. Note: Most prerecorded videocassettes and DVDs are copy protected. If you try to copy them with the DVD recorder, the Recorder display may show “COPY PROTECT”.
The DVR Setup Menu Installation: The DVD-Recorder is equipped with a TV tuner making it possible for you to watch TV or record your favorite shows to DVD for later playback. 1. Connect your cable TV or antenna to the TUNER input jack found on the back of the DVD player. (See page 14) Auto-Channel Scan 1. After you’ve selected the setup menu, return to the Recording Setup menu and select the Channel Setup function.
The DVR Setup Menu Setting The Clock 1. In order for the DVD-Recorder to record using a programmed setting, the internal clock must be set to the correct time. Use the Set Clock function in the Recording Setup menu to set the internal clock of the DVD-Recorder. TV / Media Playback Display 1. From the Setup Menu go to the Video Setup option and select the desired TV display mode you want to use during playback of your recording using the TV Display function.
The DVR Setup Menu Speaker Setup (Stereo Mode) 1. The DVD-Recorder is 6-channel DVD-Audio capable, provided a home theater audio receiver is present. If you are not hooking up the DVD-Recorder to a home theater audio receiver, the 6 (5.1) audio channels will be automatically down-mixed for basic stereo playback. The Speaker Setup menu shown below shows the default setting for basic stereo use. Speaker Setup (Multi-Channel Mode) 1.
The DVR Setup Menu 2. While remaining in the Speaker Setup function, use the arrow buttons on the remote control to select the amount of center and rear speaker delay desired. Press the Enter button on the remote control to establish the final delay distance. Center Delay function (Default=0-5ms): Increasing or decreasing the delay setting in milliseconds changes the virtual distance between the center speaker and the listener.
The DVR Setup Menu Audio Setup 1. The Audio Setup menu is directly below the Dolby menu. Press ENTER to access the Audio Setup menu. The Audio Setup menu allows you to access the Dolby ProLogic Setup The Dolby ProLogic feature is a Dolby surround sound audio format that can enhance standard 2-channel stereo program material. Digital Out, Dynamic Compress, and ProLogic functions.
DVD+RW/DVD+R Disk Recording Starting The Recording Session 1. The quality of the recording to a DVD+RW/+R disc directly depends on the selection of the recording mode. Decide on the quality of the recording you want, taking into account the amount of the playback time each recording mode requires. Note: Most prerecorded videocassettes and DVDs are copy protected. If you try to copy them with the DVD recorder, the Recorder display may show “COPY PROTECT”.
DVD+RW/DVD+R Disk Recording Quick Recording 1. Press the OP/CL button on the remote control to open the DVD loader. 5. Program the start and stop times, the day, and the channel desired, of the recording session. 2. Place a DVD+RW or DVD+R disk in the DVD loader, and press the OP/CL button on the remote again to close it. 3. Press the Setup button on the remote to call up the master Setup menu again. Toggle down to the Record Program function. 4.
DVD+RW/DVD+R Disk Recording 7. The total number of shows that can be recorded onto a DVD+RW/+R disc directly depends on the selection of the quality of the recording. Decide on the quality of the recording you want, taking into account the total amount of storage space that will be available on the DVD+RW/+R disc to be used. 8. Go to Setup Menu and select Recording Setup, and then Auto Chapter to determine how much time should be allotted to each chapter.
Disk Operations Disk Mastering After your disk has been recorded, you may wish to name the tracks after the programs you’ve recorded, or play or delete a title. Basic Disk Options The DVD-Recorder can format, erase, finalize and rename a DVD+RW and DVD+R disc using the Disc Operations menu functions. The Disc Operations menu is accessed using the Edit Disc function.
Disk Playback This section addresses basic playback for DVDs and CDs. Playing Back A Disc (DVD–CD) 1. Press the POWER button on the remote control to turn on the DVD-Recorder for use as a standard DVD player. 2. Press the OP/CL button on the remote control to open the DVD disk tray loader. 3. Place a DVD-ROM disk on the disk tray. 4. To select the desired language subtitles to be displayed during disk playback, return to the Menu and call up the DVD Control Setup menu on the screen.
Disk Playback Fast Forward/Fast Reverse Press the button to jump forward in discrete steps of 2x, 4x, 6x, or 8x normal playing speed. The screen will display the active fast forward speed (FF 2x, FF 4x, FF 6x, or FF8x). Likewise, pressing the button will allow you to jump backward in discrete steps. The screen will display the active fast reverse speed (FR 2x, FR 4x, FR 6x, or FR 8x).
Disk Playback Repeating A Chapter Or Track (DVD–CD) DVD 1. While playing a chapter, press REPEAT. The message CHAPTER REPEAT ON appears. 2. To repeat the entire title, press REPAET again. The message TITLE REPEAT ON appears. 3. Press REPEAT again to resume normal playback. The message REPEAT OFF appears. Zooming A Video And Shifting The View point (DVD) To zoom a video x1.5, x2, or x3: 1. During normal or slow motion play, press ZOOM. The picture is magnified x1.5. 2.
Special Features Parental Controls Use the Parental Control and Choose Rating functions in the DVD Control Setup menu to block playback of DVD disks that are not within the parental settings chosen. From the Setup Menu select DVD Controls then Parental Controls. The factory default password is 3308. In order to use a new password, the default password must first be entered. A new password comprised of a mixture of letters and numbers (ex. GB28MN0) works best.
Helpful Hints If you are having problems with your product, check this list of problems and possible solutions before requesting service. You may be able to solve the problem yourself. If you need to call a customer service representative, please know the model number and serial number of your product before you call. This information is on the rear of the product. Also, please take a moment to identify the problem you are having, and be prepared to explain this to the representative.
Technical Specifications General Specification Player Operating voltage AC 120~ /60Hz Power consumption ≤45W Weight (approx.) 9.92 lbs. Dimensions 2.16” H x 17.06” W x 11.82” D Operating Temperature +2℃~+40℃ Color System NTSC Frequency Response 20Hz~20kHz Audio S/N Ratio ≥ 85dB (1kHz) Audio Distortion + Noise ≤ -70dB (1kHz) Channel Separation ≥ 70dB (1kHz) Dynamic Range ≥ 80dB (1kHz) Output Analog Audio Output Voltage:2V±0.2 1.0 , Impedance:10KΩ Digital Audio Output Voltage:0.