DVD Player / Recorder DVR-0900 Operation Manual -1-
Table of Contents Important Safety Instructions About this manual This player supports the following Media Formats Important Note Copyright Information Regional Management Information Features Before you Switch On Place in Position Condensation Handling Disk’s Cleaning a Disk Using the Remote Control Elements of Operation Front Panel Display Panel Rear Panel Quick Setup Guide The Remote Control Handset Connections Connecting to a TV Analog Audio Connections Digital Audio Connections Satellite Connections Ca
Disc Playback Playing Back a Disc Angle Mark Language Selection Pausing Playback Fast Forward/Reverse Playback (×2 - ×8 Normal Speed) Stop Playback Using the Trick Modes Slow Motion Fast Forward/Fast Reverse Slow Motion Step Frame-By-Frame Repeat a Segment Between Points A and B Zoom In/Out Resuming Playback from the Same Location Locating a specific Title or Chapter Repeating a Chapter or Track Zooming Function and Shift Point Function CD Playback MP3-CD Playback Viewing JPEG Pictures Previewing Contents Z
Important Safety Instructions Thank you for purchasing this Polaroid DVD player/recorder. We strongly recommend that you carefully study the Operation Manual before attempting to operate the recorder and that you note the listed precautions. After you have finished reading these instructions, put them in a safe place for future reference. y y y y y y y y y y y y y y y y y y Read these instructions. All the safety and operating instructions should be read before the equipment is operated.
About this manual The operation described here mainly refers to the use of the remote control handset (R/C). Buttons with same or similar marking at the main unit have the same function like those of the R/C. Safety Precautions WARNING: To reduce the risk of fire or shock hazard, do not expose this DVD player to rain or moisture. To reduce risk of electrical shock, do not remove cover or back, no user serviceable parts inside. CAUTION: This product utilizes a laser.
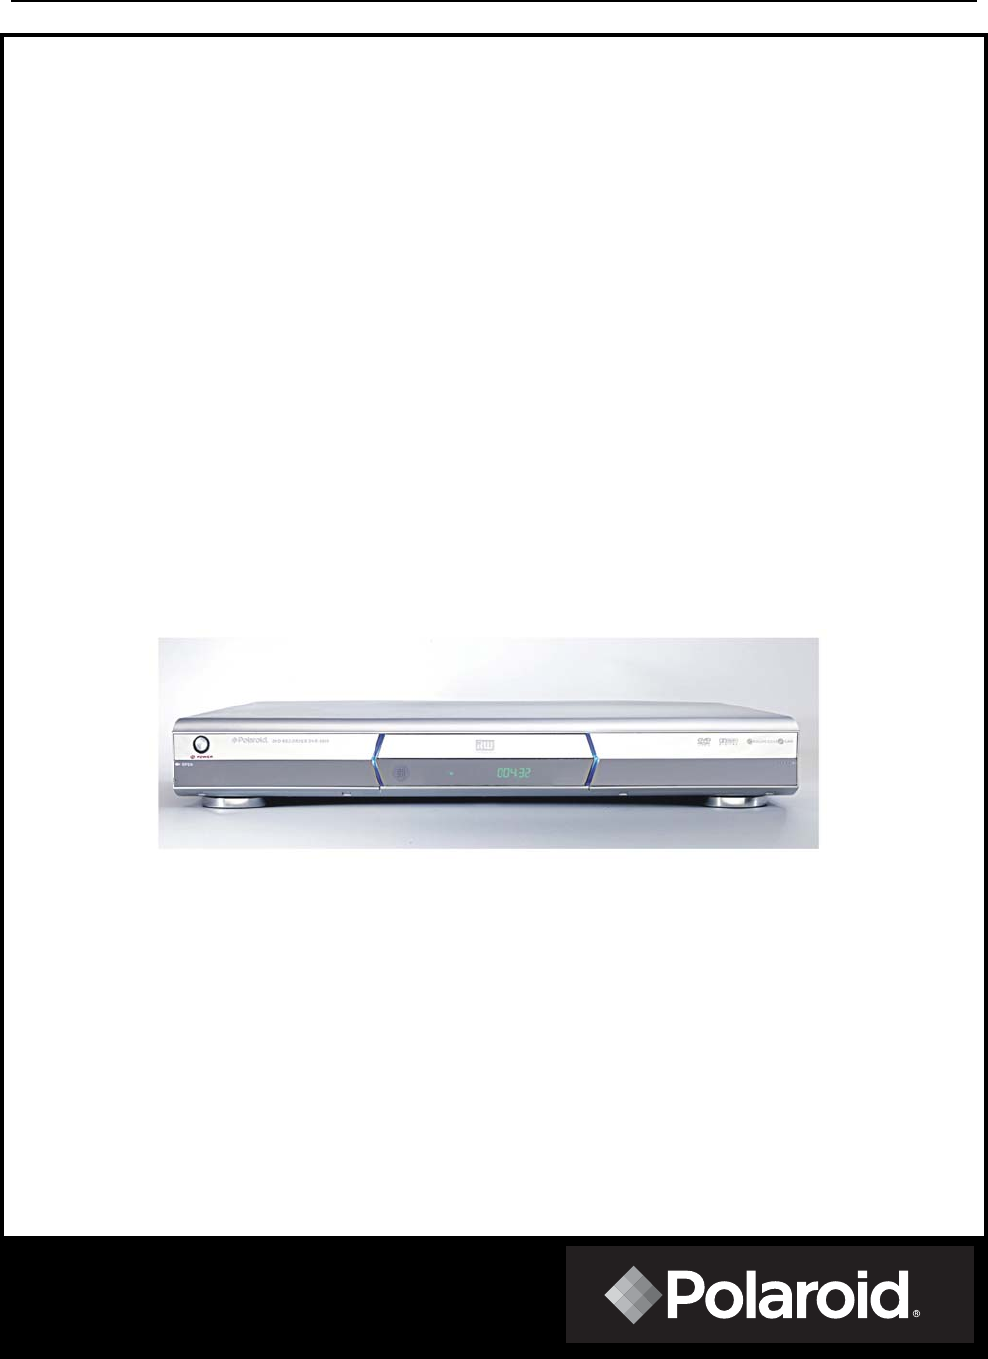
Features INTRODUCTION Thank you for buying this Polaroid DVD Recorder. We hope you enjoy this quality unit with its fantastic features and easy playback/recording operation. With it, you can watch DVDs, music disks, or watch TV shows from external source devices. The most outstanding feature that attracts you perhaps is that you can record these shows to DVD+RW or DVD+R disks in various ways, as you like.
Before You Switch On Place in Position Choose a location with sufficient air circulation to prevent overheating. Do not expose the unit to direct sunlight or other heat sources. The product must be positioned horizontally. Do not put any heavy objects on the housing. Protect the laser unit against dust and if necessary, use a cleansing disk. Be sure to follow the operating instructions. Condensation Condensation may cause the laser lens to malfunction.
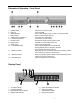
Elements of Operation - Front Panel 1. 2. 3. 4. 5. 6. 7. 8. 9. 10. POWER button Disk tray SOURCE button EJECT button VIDEO input jack (Video 2) L-AUDIO-R input jacks Remote sensor Display panel STOP button PLAY/PAUSE button 11. PREV/CH- button 12. NEXT/CH+ button 13.
Rear Panel 1. 2. 3. 4. 5. 6. 7. ANTENNA jack VIDEO input jack (Video 1) 2CH Audio input jacks 5.1CH Audio output jacks VIDEO output jack TV TUNER jack S-VIDEO input jack 8. S-VIDEO output jack 9. Component video output jacks 10. Optical Digital output jack 11. Coaxial Digital output jack 12. 2ch Audio output jacks 13. Power-supply cord Quick Setup Guide 1. Connecting to TV See pages 13-18 in operation manual for more details.
2. Initial Recorder Setup: Press the SETUP button on your remote and toggle as follows: Channel Setup Auto CH Scan Press the SETUP button on your remote 2 times to get back to main menu. Press the WATCH TV button to watch TV or see #3 to watch a DVD movie 3. Watch a Movie - Insert a DVD movie disk. The DVD will automatically play bringing you to the title menu. NOTE: The DVD Recorder has its default channel list. This function allows you to watch TV without going through the Auto CH Scan process.
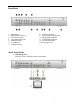
The Remote Control Handset Button Functions 1 2 3 4 5 REC SOURCE POWER 6 7 8 9 10 11 ENTER 12 13 14 PS CLEAR ANGLE 15 16 17 18 19 ZOOM A-B REPEAT MUTE WATCH TV 20 21 22 23 DISPLAY OPEN/CLOSE 24 25 26 27 28 29 30 31 32 33 VOLUME +/- SETUP STOP GOTO Number buttons TITLE STEP MENU +10 SUB-T RESUME SLOW AUDIO Press to start recording. Press to shift between Video 1, Video 2, S-Video and ANT. Switch between stand-by and working status. Press to search backward. Arrow select.
The Remote Control Handset - 12 -
Connections Connecting to a TV Important Note: - Not all cables shown below are included with this DVD player. - Turning off the power to all equipments involved before making any connections will protect your speakers from possible damage. 1. Connecting to a TV will give you an Analog Audio Connection: Using the supplied audio cables, connect the AUDIO OUT jacks (LEFT/RIGHT) on the DVD Player with the AUDIO IN jacks (LEFT/RIGHT) on your TV. 2.
Analog Audio Connections Using your choice of analog video, S-video, or Component video connection (see page 10), you also have the option to connect your DVD player to your stereo system for incredible stereo sound. Use the audio connection described below: Standard Analog Audio Connections: Using the supplied audio cable, connect the AUDIO OUT jacks (LEFT/RIGHT) on the DVD Player with the AUDIO IN (LEFT/RIGHT) jacks on your amplifier or stereo receiver.
Digital Audio Connections Using your choice of analog video, S-video, or Component video connection (see page 10), you also have two Digital Audio options when connecting your DVD player to your stereo system. It is widely debated which connection (Optical or Coaxial) gives you better performance. However, either connection will give you superior sound. Use the connections described below: 1.
Satellite Connections Cable Connections with Converter Box - 16 -
Cable Connections without Converter Box Connecting to Audio/Video Sources This DVD player supports two-channel video input and two groups of audio input (one set of each is on the front panel, the other set of each is on the rear panel). The diagram below illustrates hooking up another DVD player to this DVD. Note: Most prerecorded videocassettes and DVDs are copy protected. If you try to copy them with this DVD recorder, the recorder may display the message “COPY PROTECT”.
Connecting to the TV Tuner TV Signal Input - 18 -
The DVR Setup Menu Installation: The DVD-Recorder is equipped with a TV tuner making it possible for you to watch TV or record your favorite shows to DVD for later playback. 1. Connect your cable TV or antenna to the TUNER input jack found on the back of the DVD player. (See page 17) 2. Make the appropriate Audio/Video connections (see pages 13-18). 3. Plug in your DVD-Recorder. Now you’re ready to configure the DVD-Recorder. Initial Configuration 1. Turn on the TV. 2.
Setting The Clock In order for the DVD-Recorder to record using a programmed setting, the internal clock must be set to the correct time. Clock Time Chart AM/PM 24 HOUR 1:00 AM 1:00 1. From the main menu use the arrow buttons to highlight “Setup Menu” 2:00 AM 2:00 3:00 AM 3:00 2.
5. Press the Right arrow button to select “Down Mix” 6. Press the Up arrow button to highlight “Lt/Rt” or “Stereo”. 7. Press the ENTER button to select “Lt/Rt” or “Stereo” 8. Press the SETUP button to exit. Figure 5. Select Letterbox, Pan-And-Scan or Wide-Screen Picture Mode Resolution This Picture Mode function in the Video Setup menu offers Auto, Film, Video, Smart and Super Smart. TV Type NTSC is the American standard. Video Output The video output allows you to set up the DVD player several ways.
Speaker Setup (Multi-Channel Mode) This DVD-Recorder is 6-channel DVD-Audio capable (requires a home theater audio receiver). If you are connecting the DVD-Recorder to a home theater audio receiver, refer to the owner’s manual that came with your home theater audio receiver in order to select the desired multi-channel audio mode. Note: This option will not be available if the “Down Mix” selection is not set to “OFF”. 1. From the Main Menu use the arrow buttons to highlight “Setup Menu” 2.
Speaker Test On: Plays a single tone in step-wise fashion at each of the speakers in the clockwise direction. Off: Test-Tone feature is not enabled. Audio Setup The Audio Setup menu allows you to access the Digital Out, Dynamic Compress, and ProLogic functions. 1. From the Main Menu use the arrows to highlight “Setup Menu” 2. Press the Right arrow button to select “Setup Menu” 3. Press the Down arrow button to highlight “Audio” 4. Press the ENTER button 5.
the Dynamic Compression Setup function 2. Use the Down arrow to slide the control from Full to Off based on your preference 3. Then press the SETUP button on the remote to exit and save the selection. When set to FULL, the range between the loudest and softest is compressed to the maximum during playback. When set to OFF no compression occurs during playback. 3. Use the Down arrow button to highlight “Record Setup” 4. Press the ENTER button 5. Use the Up and Down arrows to move to the desired function 6.
Figure 9. Selecting Time Length For Each Chapter 1. From the Main Menu use the arrow buttons to highlight “Setup Menu” and press the ENTER button to select 2. Press the ENTER button to select “Record Setup” 3. Use the arrows to highlight “Auto Chapter” 4. Press the ENTER button to select “Auto Chapter” 5. Use the Up and Down arrows to change the setting 6. Once you have highlighted the setting you would like press the ENTER button to save the setting 7.
Figure 12. Selecting The Recording Day Figure 10. Starting The Quick Recording 5. Use the arrows to highlight “Record Time” and press the ENTER button to select “Record Time” 6. Use the Up and Down arrows to change the “Hour” NOTE: This is a 24 hour clock; please see the chart on page 20 for assistance. Figure 11. Selecting The Start and Stop Time 7. Once the “Hour” is set use the Right arrow key to move to “Minute” 8. Continue to use the Up and Down arrows to edit each field.
3. Use the arrows to highlight the programmed recording you would like to view once highlighted press the ENTER to view 4. Press the SETUP to exit Disc Play Operations Basic Disc Play Options The DVD-Recorder can format, erase, finalize and rename a DVD+RW and DVD+R disc using the Disc Operations menu functions. 1. Press the STOP button on the remote control twice. 2. Press the SETUP button 3. Use the arrows to highlight “Play/Edit Disc” and press the Right arrow to select 4.
Figure 15: Formatting a Disc Erasing a Disc NOTE: ERASING ANY DISC IS AN IRREVERSIBLE AND PERMANENT OPERATION! Be sure to back up any and all titles or tracks you want to save onto another disc before erasing the original disc! The Erase Disc function is used to erase all data from a disc. This function is only available on DVD+RW discs. Once any disc is erased, whatever was on it is permanently gone. 1. From the Basic Disc Option menu (See section Accessing Basic Disc Options”) highlight “Erase Disc” 2.
2. Use the arrows to highlight “DVD Control” and press the ENTER to select 3. Use the arrows to highlight “Angle Mark” and press the right arrow to select 4. Use the Up and Down arrows to highlight desired choice and press the ENTER to select Language Selection 1. From the Main Menu highlight “Setup Menu” and press the Right arrow to select 2. Use the arrows to highlight “DVD Control” and b. Once all number and letters are entered highlight Done and press ENTER press the ENTER to select 3.
Stop Playback 1. Press the STOP button. 2. Press the PLAY button to resume playing. 3. Press the STOP again. When stopped, this player returns to chapter 1 or track 1.
Locating A Specific Title Or Chapter Using The MENU Button (DVD) To play a specific chapter from a given title on a DVD you can use the TITLE button to display a menu to make your title and chapter selection. The procedure described here is general in nature. If the steps seem inappropriate for the DVD you are attempting to play, disregard these instructions and follow the instructions that appear on the screen. 1. During normal playback, press the TITLE button.
4. Pressing the button repeatedly steps through 150%, and 200% 5. To resume normal enlargement, press the ZOOM again Panning Around a JPEG 1. Follow usual procedure for playing a disc: Open the disc tray, insert the JPEG disc and close the tray 2. Select a JPEG for viewing 3. Press the ZOOM button 4. Use the direction buttons to pan up, down, left and right. Rotating a JPEG 1. Position the highlight over a desired JPEG. 2. Press the right or left direction button one time.
Helpful Hints If you are having problems with your product, check this list of problems and possible solutions before requesting service. You may be able to solve the problem yourself. If you need to call a customer service representative, please know the model number and serial number of your product before you call. You can find this information on the rear of the product. Also, please take a moment to identify the problem you are having, and be prepared to explain this to the representative.
Technical Specifications General Specification Operating voltage AC 120~ /60Hz Power consumption ≤45W Weight (approx.) 9.92 lbs. Dimensions 2.16” H x 17.06” W x 11.82” D Operating Temperature +2 ~+40 Color System NTSC Frequency Response 20Hz 20kHz ±2.5dB Audio S/N Ratio ≥ 85dB (1kHz) Audio Distortion + Noise ≤ -70dB (1kHz) Channel Separation ≥ 70dB (1kHz) Dynamic Range ≥ 80dB (1kHz) Analog Audio Output Voltage 2V±0.2 1.0 Digital Audio Output Voltage 0.
Frequently Asked Questions 1. How many shows can I record on a DVD? a. The total number of shows that can be recorded onto a DVD disc directly depends on the selection of the quality of the recording. See chart below: Keep in mind; disc recording times vary slightly from DVD to DVD. Recording quality Recording pels Bit rate per second Recording time Best 720x480 MPEG2 8 Mbit/s 70 min High 720x480 MPEG2 6 Mbit/s 90 min Medium 544x480 MPEG2 4 Mbit/s 133 min Basic 352x480 MPEG2 2.
a. The DVR 0800 tuner is not digital. If your system is either digital cable or satellite you’ll need to control channels through the cable box or satellite, not the Polaroid DVR-0800. 6. The DVD I recorded won’t play on another DVD player. a. First, check to verify you finalized the disc after recording. If you did and it still won’t play, it’s likely a format problem. The DVR 0800 records in DVD+. Some DVD players are set up to read only DVD- discs. 7.
Using the supplied audio cables, connect the AUDIO OUT jacks (LEFT/RIGHT) on the unit with the AUDIO IN jacks (LEFT/RIGHT) on your Television set a. Turn on the unit b. Press the SETUP button c. Press the Down arrow button three times to highlight “Setup Menu” d. Press the Right arrow button once e. Press the Down arrow button four times to highlight “Speaker” f. Press the ENTER button g. Press the Right arrow button once to select “Down Mix” h. Press the Up arrow button twice to highlight “Lt/Rt” i.
Glossary Artifacts: An anomaly that occurs on a video image as a result of a problem in the film-to-video transfer. Often occurs when trying to compress too much information on to the disc. Aspect Ratio: The width-to-height ratio of a television screen. Widescreen is 16:9, while the standard television aspect ratio is expressed 4:3. Audio Streams: DVD has the ability to hold a maximum of eight audio streams on a single disc. Usually used for multiple languages and/or the director’s commentary.
Digital Output: The majority of all DVD players will have at least a coaxial or optical output for sending the Dolby Digital bitstream to a Dolby Digital decoder. This decoder may be a stand-alone unit or built into a receiver. Digital video: A video signal represented by computer-readable binary numbers that describe colors and brightness levels. Dolby Digital: This proprietary technology is used to decode high-quality sounds from the DVD. DVD: Digital Versatile Disc, not Digital Video Disc.
The DVD regions are defined as: Region 1 - United States of America, Canada Region 2 - Europe, Greece, Turkey, Egypt, Arabia, Japan and South Africa Region 3 - Korea, Thailand, Vietnam, Borneo and Indonesia Region 4 - Australia and New Zealand, Mexico, the Caribbean, and South America Region 5 - India, Africa, Russia and former USSR countries Region 6 – People’s Republic of China RGB: Red, Green & Blue.