9” HD-Ready LCD TV with NTSC Tuner FLM-1911 20060322
FCC FEDERAL COMMUNICATIONS COMMISSION (F.C.C) STATEMENT 1. 2. 3. 4. Reorient/Relocate the receiving antenna. I ncrease the separation bet ween the equipment and receiver. Connec t the equipment into an outlet on a circuit which is different from what the re ceiver is connec ted to. Consult the dealer or an experienced radio/T V technician for help.
Safety Instructions IMPORTANT SAFETY INSTRUCTIONS WARNING To reduce the risk of fire or electric shock, do not expose this equipment to rain or moisture. CAUTION RISK OF ELECTRIC SHOCK DO NOT OPEN CAUTION: TO AVOID THE RISK OF ELECTRIC SHOCK, DO NOT REMOVE COVER (OR BACK). NO USER-SERVICEABLE PARTS INSIDE. REFER SERVICING TO QUALIFIED SERVICE PERSONNEL.
Safety Instructions IMPORTANT SAFETY INSTRUCTIONS Do not place the equipment on any uneven or unstable carts, stands, tables, shelves etc.. The equipment may fall, causing serious injuries to children or adults and serious damage to the equipment itself. Use only a cart or stand recommended by the manufacturer. This equipment and recommended cart or stand should be handled with care. Quick stops, excessive force, and uneven surfaces may cause the equipment and recommended cart or stand to overturn.
Safety Instructions IMPORTANT SAFETY INSTRUCTIONS Do not attempt to service the equipment yourself. Only use attachments/accessories specified by the manufacturer. Opening and removing the covers may expose you to dangerous voltage or any other hazards and may void your warranty. Refer all servicing to a qualified service personnel.
ANTENNA CONN. ANTENNA CONNECTION If an outdoor antenna is connected, follow the precautions below: An outdoor antenna should not be located anywhere that can be in contact of overhead power lines, or any other electric light or power circuits. When installing an outdoor antenna system, extreme caution should be taken to prevent contact with power lines. Direct contact with power lines may be fatal and should be avoided at all costs.
ANTENNA CONN. ANTENNA CONNECTION Cable TV (CATV) Connection NOTE TO CATV SYSTEM INSTALLER This reminder is provided to call the CAT V system installers atte ntion to Ar ticle 820-40 of the National Elec trical Code (NEC ) that provides guidelines for proper grounding and, in par ticular, specifies that the cable ground shall be connec ted to the grounding system of the building accurately, or as close to the point of cable entr y as possible.
ANTENNA CONN. ANTENNA CONNECTION ANTENNAS ENGLISH The antenna requirements for good color TV reception are more important than those of a black & white TV reception. For this reason, a good quality outdoor antenna is strongly recommended. The following is a brief explanation of the type of connection that is provided with the various antenna systems. F-type connector A 75-ohm system is generally a round cable with NTSC connector that can easily be attached to a terminal without tools (not included).
TABLE OF CONTENTS TABLE OF CONTENTS PREPARATION .................................................................................................................................................... 9 Features ............................................................................................................................................................................................................. 9 Package Contents ..............................................................................
PREPARATION PREPARATION Features Features High Brightness / Contrast Image Brightness: 300 cd/m2 Contrast Ratio: 500:1 VGA Support: 720x400/70Hz~1792x1344/60Hz Supports ED and HD Input Signals 480i/480p/576i/576p/720p/1080i Multimedia Jack S-Video Jack HD Component Video Jack (YPbPr) PC Jack A/V Jack Auto-channel setup 181-Channel CATV Tuner Sleep-Timer User selectable color temperature settings MTS (Multi-Channel Television Sound) V-Chip and Closed Captioning Enhance audio processing Built-In CATV tuner
PREPARATION Package Contents Make sure all of the following contents are included. LC D TV Remote control/ AAA batteries Video Cable Component Cable Power Cord Audio Cable Warranty Card Quick Start Guide User’s Manual These items are all you need to set up and operate the LCD TV in its basic configuration. * Make sure all of the contents are included in the package. If you are missing any items, please contact the Polaroid customer service department at 1-866-289-5168.
PREPARATION LCD TV Front View ENGLISH PHONES VO L. VO L. CH CH ME NU INPUT ITEM DESCRIPTION 1 IR Infrared Receiver (IR) 2 POWER Turns the LCD TV on and off. 3 LED The LED light indicates when the LCD TV is activated (green light indicates on and amber indicates off ). 4 INPUT Chooses from different input signal sources. 5 MENU Press MENU to display the OSD (on screen display). Press again to turn the OSD off. 6 CHANNEL Scans up and down through channels.
PREPARATION LCD TV Rear View ITEM DESCRIPTION 1 AC IN Connects the AC power cord. 2 AUDIO IN 1 Connects to the audio or video equipment with left and right audio output jacks of the component (Y, Pb/Cb, Pr/Cr). 3 COMPONENT Connects to the component (Y, Pb/Cb, Pr/Cr) video jacks on your DVD player, HDTV Tuner source, or video equipment. 4 S-VIDEO Connects to the S- VIDEO output jacks and Audio output jacks on your video equipment.
PREPARATION Remote Control 1 POWER Turns the LCD TV on and into standby mode . PC Press to select PC mode. 3 MTS Selects the Multi-channel TV Sound. Options:Stereo, MTS and Mono. 4 CAPTION To select the C.C. Mode to be ON or OFF. 5 MUTE Mutes and restores your LCD TV sound. 6 SLEEP Sets the sleep timer. 7 ASPECT Selects from the following modes settings:4:3, 16:9. 8 0-9 and ENTER Select and switch to a channel using 0-9 and ENTER buttons.
PREPARATION Remote Control Installing the batteries in your remote control 1 2 3 Pull the tab of the back cover and pull up on the cover to open the battery compartment of the remote control. Insert two AAA size batteries. Make sure to match the (+) and (-) ends of the batteries with the (+) and (-) ends indicated in the battery compartment. Align the lower tabs of the back cover to the remote control and snap the cover into place.
PREPARATION Using your LCD TV 1 You may adjust the tilt angle of the LCD TV about +15 deg. / -0 deg. ENGLISH -0 15 2 o o Always turn the LCD TV off when the LCD TV is not in use for a long period. The Power button is only used for switching the LCD TV into standby mode, it does not disconnect the device from the main voltage. To completely disconnect the main voltage, please switch off the power switch on the rear, or remove the power plug from the socket.
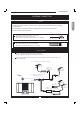
INSTALLATION INSTALLATION Refer to the owner’s manual of the external equipments to be connected.When connecting external equipment, do not connect any AC power cords to wall outlets until you have completed all the connections. Connecting a TV cable or Antenna Basic Connection: Connecting cable or an antenna . Antenn a Connec t to a w al l outlet B A Antenna/75- oh m coaxia l inpu t 1 A: Use a supplied antenna cable to connect the VHF/UHF to your LCD TV.
INSTALLATION Connecting a DVD Player For best picture quality, if your equipment has (Y Pb/Cb Pr/Cr) video output,please use component cable instead of a standard video or S-video cable. B C 1 METHOD A (AV3) (BEST) Use a Component cable to connect the Y/Pb(Cb)/Pr(Cr) jacks on the DVD player to your LCD TV. Use an audio cable to connect the DVD’s audio jacks to your LCD TV. METHOD B(AV2) (VERY GOOD) Use an Audio cable to connect the DVD’s audio output jacks to your LCD TV.
INSTALLATION Connecting a VCR & a Video Camera A B 1 METHOD A (AV2) (BEST) Use an Audio cable to connect the VCR’s/ the VIDEO CAMERA’s audio output jacks to your LCD TV. Use a S-Video cable to connect your LCD TV and VCR player/ VIDEO CAMERA. METHOD B (AV1) (GOOD) Use an A/V cable to connect the VCR’s/ VIDEO CAMERA’S. composite output jacks to your LCD TV. 2 Connect all power sources before turning on the power switch of the LCD TV or other connected equipments.
INSTALLATION Connecting a TV Box and Satellite Receiver A 1 METHOD A (AV4) (BEST) Use a D-SUB cable to connect the TV Cable Box D-SUB connector to your LCD TV. Use an Audio cable to connect the TV Cable Box and your LCD TV. METHOD B(AV3) (VERY GOOD) Use a component cable to connect the Y/Pb(Pb)/Pr(Cr) jacks on the satellite receiver to to your LCD TV. Use an Audio cable to connect the Satellite Receiver audio jacks to your LCD TV.
USING THE FEATURES USING THE FEATURES Basic Operation Turning the TV On and Off 1 After connecting a CATV or antenna to your LCD TV, and turn the POWER SWITCH of rear on, an amber LED light indicates when the LCD TV is activated. 2 Press the POWER button, the LED green light indicates on. 3 Press the POWER button, the LED amber light indicates off. Select Source Press the INPUT button to display the selection signal on the screen.
USING THE FEATURES OSD Menu Operation 1 The main menu provides access to the following menus: Adjust picture setting such as brightness, contrast,saturation and color temp. Audio Adjust sound option and effects. Parental Allows you to set up the TV to block programs according to their content and rating levels. Setup Set up miscellaneous fetures. 2 Press the MENU button on the remote control. The main menu will appear on the screen.
USING THE FEATURES Video OPTION DESCRIPTION Color Temp. Standard:Select to give the white colors a neutral tint. Warm:Select to give the white colors a reddish tint. Cool: Select to give the white colors a bluish tint. Advanced (VGA Mode only) Auto : Allows you to select the image auto adjust to be Yes or No. Position Allows you to move the position of the picture in the window. Phase Increase the focus clarity in the picture and image satbility.(Available only for PC input.
USING THE FEATURES Parental Control The Parental Control settings allows you to set up the TV to block programs according to their content and rating levels. You can set up the TV to block program by entering your four digit password.(The default factory password is “1111”.) Enter PIN After enter the correct PIN , the Parental Controls menu will display “Correct PIN” and “Continue”.If enter incorrect PIN, the menu display “Invalid PIN” and “Back”.
USING THE FEATURES Parental Control OPTION DESCRIPTION Movie Rating NA Allows you to select the Block MPAA Unrated to be OFF or ON. G General Audiences. Movie is appropriate for all ages. PG Parental Guidance Suggested. May contain material not suited for younger viewers PG 13 Contains content that may not be appropriate for viewers under the age of 13. R Restricted. Contains adult content, no one under 17 admitted without parent. NC-17 No one 17 and under admitted. X Only for Adult.
USING THE FEATURES Setup 3 3. to begin auto search. OPTION DESCRIPTION Channel System Allows you to select the tuner input source to be Air,Cable-STD, CableHRC or Cable -IRC. Channel Name Allows you to edit the channel name. Fine Tune Allows you to adjust the fine tune level by hand if signal is too weak or picture is blurry. Skip Allows you to skip the present channel. Language Select to display all on-screen Settings in your language of choice: English,Spanish,French.
USING THE FEATURES Setup OPTION DESCRIPTION Sleep Time Sets up a certain time to shut off automatically:OFF/15/30/45/60/90/120 minutes. Reset Allows you to restore the factory settings. CC Mode Allows you to select the CC mode to be CC1,CC2,CC3,CC4,TEXT1, TEXT2, TEXT3, TEXT4.
TROUBLESHOOTING TROUBLESHOOTING PROBLEM SOLUTION 27 ENGLISH Before consulting service personnel, check the following chart for a possible cause of the problem you are experiencing and for a solution.
SPECIFICATIONS SPECIFICATIONS Model FLM-1911 Panel System 19 inch LCD panel Display Resolution 1440 pixels (horizontal) x 900 pixels (vertical) Television System NTSC Brightness 300 cd/m2 Contrast Ratio 500:1 Inputs/Output Composite Video In 1 S-Video In 1 Component In 1 PC 1 PC Audio In 1 Audio In 3 TV 1 Speaker Out 3 W+3 W Power Source(MAX) Dimension( W x D x H) 100-240 V~, 50/60 Hz, 50 W 22.6 inch x 6.7 inch x 14.6 inch Weight(Net) 12.
SPECIFICATIONS Display Mode For the display modes listed below, the screen image has been optimized during manufacture. VGA TIMING Horizontal Frequency(kHz) Vertical Frequency(Hz) 640 x 480 31.46 59.94 640 x 480 37.86 72.80 640 x 480 37.50 75.00 720 x 400 31.46 70.40 800 x 600 35.15 56.25 800 x 600 37.87 60.31 800 x 600 48.07 72.18 800 x 600 46.87 75.00 1024 x 768 35.52 86.95 1024 x 768 48.36 60.00 1024 x 768 56.47 70.06 1024 x 768 60.02 75.02 1152 x 864 67.50 75.