26” LCD Television FLM-2625 20051021
Table of Contents Important Information..........................................................................................................................................................1 Important Safety Precautions .............................................................................................................................................2 Preparations ....................................................................................................................................
Table of Contents (continued) Setting OSD Timeout .............................................................................................................................................28 PIP Operations ................................................................................................................................................................29 Viewing and Changing the Position of the PIP Frame .........................................................................................
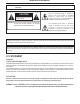
Important Information WARNING: TO REDUCE THE RISK OF FIRE OR ELECTRIC SHOCK, DO NOT EXPOSE THIS APPARATUS TO RAIN OR MOISTURE. The lightning flash with arrowhead symbol, within an equilateral triangle is intended to alert the user to the presence of uninsulated dangerous voltage within the product's enclosure that may be of sufficient magnitude to constitute a risk of electric shock to persons.
Important Safety Precautions Electrical energy can perform many useful functions, but it can also cause personal injuries and property damage if improperly handled. This product has been engineered and manufactured with the highest priority on safety. But IMPROPER USE CAN RESULT IN POTENTIAL ELECTRICAL SHOCK OR FIRE HAZARD. In order to prevent potential danger, please observe the following instructions when installing, operating and cleaning the product.
Important Safety Precautions (continued) 12. Stand---Use only with the cart, stand, tripod, bracket, or table specified by the manufacturer, or sold with the apparatus. Do not place the product on an unstable trolley, stand, tripod or table. Placing the product on an unstable base can cause the product to fall, resulting inserious personal injuries as well as damage to the product. When mounting the product on a wall, be sure to follow the manufacturer’s instructions.
Important Safety Precautions (continued) 22. Power source---This product is intended to be supplied by a listed power supply indicated on the marking label. If you are not sure of the type of power supply to your home, consult your product dealer or local power company. For added protection for this product during a lightning storm, or when it is left unattended and unused for long periods of time, unplug it from the wall outlet and disconnect the cable system.
Preparations Using the Remote Control
Preparation (continued) Antenna Connection CABLE TV (CATV) CONNECTION A 75-ohm coaxial cable connector is built into the set for easy hookup. When connecting the 75- ohm coaxial cable to the set, screw the 75ohm cable to theANT. Terminal. Some cable TV companies offer “premium pay channels”. Since the signals of these premium pay channels are scrambled, a cable TV converter/descrambler is generally provided to the subscriber by the cable TV company.
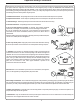
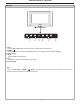
Identification of Controls Main Unit VOL+ VOL 1 INPUT 2 4 3 CH + CH 5 6 1. VOL+/Press the VOL+ or VOL- button to directly increase or decrease the sound volume level; 2. POWER Press this button to turn the unit ON from STANDBY mode. Press it again to turn the set back to STANDBY. 3. Remote Sensor 4. INPUT To access signal source select menu 5. CH+/Press these two buttons to directly change the TV channel; 6.
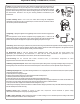
Identification of Controls (continued) Main Unit Press and pull out the Cover carefully as the arrow shows (press and pull the two buttons at the same) Press and pull out the Cover carefully as the arrow shows Before you connect external devices with the unit, please removing the Back Cover. After finishing connecting, aim the insertion tabs toward the locating groove, then carefully push the Cover until the Cover locks in place with a click.
Identification of Controls (continued) Remote Control 1. To select products to be controlled with remote control Note: This remote control is an universal remote control. If your remote control does not work correctly when you operate the TV set, please try to press TV button. 2 2. POWER Turn the unit on or off 1 3. 0~9 number buttons Direct channel select 3 5 6 4. ENTER button Channel enter button 4 7 8 9 10 11 12 5. INPUT To access source input select menu 6.
Identification of Controls (continued) Remote Control 13. ASPECT To select screen aspect ratio 14. DISPLAY To display channel status or signal information 15. STEREO To select stereo mode 16. PIP To activate PIP function 17. SIZE To change the position of the PIP frame and adjust PIP frame size 18. CAPTION To select CCD on/off and CCD mode 19. SLEEP To set Sleep timer 20. PICTURE MODE Picture mode select 21. SOUND MODE Sound mode select 13 14 18 19 15 20 21 22 16 22.
Connections Cautions Before Connecting Carefully check the terminals for position and type before making any connections. The illustration of the external equipment may be different depending on your model. Loose connectors can result in image or color problems. Make sure that all connectors are securely inserted into their terminals. Refer to the operating manual of the external device as well. When connecting an external device, turn the power off to avoid any issues.
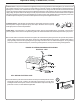
Connections (continued) Connect a Camcorder HDMI AUDIO VGA IN VGA 2 1 Y Y Video cable Audio cable L L AUDIO AUDIO R R W Y Pb / Cb Pr / Cr R COMPONENT IN Pb / Cb Pr / Cr RF S-VIDEO 2 1 VIDEO VIDEO AV IN L L AUDIO AUDIO R R R Y W R Yellow (VIDEO) White (AUDIO L) Red (AUDIO R ) OUT Y W IN R AUDIO L VIDEO How to connect: Connect the Audio/Video cables between the Audio (L/R)/Video jacks on the unit and camcorder. To playback Camcorder 1.
Connections (continued) Connect a DVD player HDMI AUDIO VGA IN G VGA 2 B Video cable 1 COMPONENT IN R Y Y Pb / Cb Pb / Cb Pr / Cr Pr / Cr L L AUDIO AUDIO R R W RF Audio cable S-VIDEO R 2 1 VIDEO VIDEO AV IN L L AUDIO AUDIO R R W R B R G DVD player AUDIO W COMPONENT Pr L AUDIO R Pb white (audio L) R red (audio R, P /Cr ) r Y G Green (Y) AV OUT R AUDIO L VIDEO B Blue (P /C b )b S - VIDEO Rear of the DVD player How to connect a DVD Player using Component Vid
Connections (continued) Connect a product to HDMI HDMI HDMI cable AUDIO VGA IN VGA 2 1 COMPONENT IN Y Y Pb / Cb Pb / Cb Pr / Cr Pr / Cr L L AUDIO AUDIO R R RF S-VIDEO 2 1 VIDEO VIDEO AV IN L L AUDIO AUDIO R R HDMI OUTPUT Product with HDMI jack How to connect: Connect the HDMI cable between the HDMI input jacks on the unit and HDMI output jacks on the product. Note: The HDMI Sources are compatible with DVI displays through the use of a passive cable converter.
Connections (continued) Connect a PC HDMI AUDIO VGA IN VGA 2 COMPONENT IN Audio cable D-Sub cable 1 Y Y Pb / Cb Pb / Cb Pr / Cr Pr / Cr L L AUDIO AUDIO R R RF S-VIDEO 2 1 VIDEO VIDEO AV IN L L AUDIO AUDIO R R How to connect: Connect a D-Sub cable between the VGA interface on the PC and the VGA input on the unit. Connect an Audio cable between the AUDIO output on the PC and AUDIO input jack on the unit. To Watch the PC screen 1.
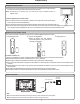
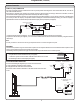
Connections (continued) R Audio cable W AV OUT Connect a VCR for Recording Y Video cable Y ANT OUT Y W R Yellow (VIDEO) White (AUDIO L) Red (AUDIO R ) W R AV OUT VIDEO L AUDIO R S - VIDEO ANT IN AV IN VIDEO L AUDIO R Rear of the VCR VCR for recording How to connect: Connect the Audio/Video cables between the Audio (L/R)/Video jacks on the unit and VCR. To record program 1. Turn on your LCD TV, select a program you wish to record. 2. Turn on your VCR, insert a videotape for recording.
Turning the Unit On and Off Turning the Unit On and Off Turning On Insert the power cord into the wall outlet. Press the Power button on the remote control. The unit will be turned on and you will be ready to use its features. Turning Off With the power on, Press the Power button on the remote control to turn off. Note: You can also use the Power button on the Control panel on the main unit. Viewing the Menus and Displays Your LCD TV has a simple, easy-to-use menu system that appears on the screen.
Memorizing the Channels Your LCD TV can memorize and store all of the available channels for both air and cable channels. After the available channels are memorized, use CH+/- to scan through the channels. Selecting the Signal Source Before your LCD TV can memorize the available channels, you must specify the type of signal source that is connected to the unit. (i.e., an air or cable system) 1 Press MENU to display the menu main page. 2 Press 56 repeatedly to select SOURCE menu.
Memorizing the Channels (continued) Adding and Erasing Channels 1 Use number buttons to directly select a channel that you want to add or erase. 2 Press MENU to display the menu main page. 3 Press 56 repeatedly to select SOURCE menu. 4 Press OK to access the submenu. 5 Press 6repeatedly to select ADD/ERASE item. 6 Press SOURCE OFF PIP MODE TV PICTURE SOURCE VGA SUB PICTURE ERASE ADD/ERASE AIR ANTENNA AUTO SEARCH MOVE to toggle between ADD or ERASE .
Basic Operations Changing Channels Using the Channel Buttons (CH+ or CH-) Press the CH+ or CH- to change channels. When you press the CH+ or CH-, the unit changes channels in sequence. You will see all the channels that the unit has memorized. You will not see channels that were erased. Direct Accessing Channels Press the number buttons to go directly to a channel.
Basic Operations (continued) Select Input Source Signal 1 Press MENU to display the menu main page. 2 Press 56 repeatedly to select SOURCE menu. 3 Press OK to access the submenu. 4 Press 6 repeatedly to select PICTURE SOURCE item. SOURCE PIP MODE PICTURE SOURCE SUB PICTURE ADD/ERASE ANTENNA AUTO SEARCH MOVE 5 Press 6 Press MENU repeatedly to exit. SELECT OFF TV VGA ERASE AIR MENU EXIT to select.
Setting Picture Customizing the Picture 1 2 3 4 5 Press MENU to display the menu main page. The picture menu page will be displayed automatically. PICTURE NATURE PICTURE MODE CONTRAST BRIGHTNESS COLOR TINT SHARPNESS WEAK NOISE REDUCE FULL SIZE MODE Press OK to access the PICTURE submenu. Press 56 to select the item you wish to change. Press to adjust the value of the item. Press MENU repeatedly to exit.
Setting Picture (continued) Adjusting Screen Aspect 1 Press MENU to display the menu main page. The picture menu page will be displayed automatically. 2 3 Press OK to access the submenu. 4 Press to select a desired aspect ratio. You may also use the ASPECT button to select the aspect ratio between FULL, ZOOM1, ZOOM2 and NORMAL. Press 6 repeatedly to select SIZE MODE item.
Setting Timer Setting Clock Time Making use of this function can set the current time for the TV. 1 2 3 Press MENU to display the menu main page. 4 Press OK to access . Use 56to set the hour (1-12) and the minute (00-59), use and minute. FUNCTION AM--:-CLOCK AM--:-TIME ON AM--:-TIME OFF OFF SLEEP TIMER OFF CLOSED CAPTION PARENTAL CONTROL Press 56 repeatedly to select FUNCTION menu. Press OK to access the submenu. The [CLOCK] item will be highlighted automatically.
Setting Timer (continued) Setting Sleep Timer Making use of this function allows you to have the set automatically turn off after a preset time. 1 Press MENU to display the menu main page. 2 Press 56 repeatedly to select FUNCTION menu. 3 Press OK to access the submenu. 4 Press 6 repeatedly to highlight SLEEP TIMER item. 5 6 Press FUNCTION A M 11 : 2 2 CLOCK AM--:-TIME ON AM--:-TIME OFF OFF SLEEP TIMER OFF CLOSED CAPTION PARENTAL CONTROL MOVE repeatedly to select .
Setting Sound Customizing the Sound 1 Press MENU to display the menu main page. 2 3 Press 56 repeatedly to select SOUND menu. 4 5 Press 6 repeatedly to select the option items you want to adjust. Press OK to access the submenu. Press to adjust the value . SOUND SOUND SOURCE SOUND MODE BASS TREBLE BALANCE MTS MOVE SELECT MAIN NORMAL STEREO MENU EXIT Using the Preset Sound Mode 1 Press MENU to display the menu main page. 2 3 Press 56 repeatedly to select SOUND menu.
Setting Sound(continued) Selecting Stereo Mode 1 2 3 4 5 Press MENU to display the menu main page. SOUND SOUND SOURCE SOUND MODE BASS TREBLE BALANCE MTS Press 56 repeatedly to select SOUND menu. Press OK to access the submenu. Press 6 repeatedly to select MTS item. Press to select a desired stereo mode.
Adjusting On-Screen Display Adjusting OSD Position 1 2 3 4 5 Press MENU to display the menu main page. Press 56 repeatedly to select OSD menu. Press OK to access the submenu. Press 6 repeatedly to select H-POSITION or V-POSITION item. Press ENGLISH to adjust the OSD position. MOVE Adjusting OSD Transparency 1 2 3 4 5 OSD LANGUAGE H-POSITION V-POSITION DURATION TRANSPARENCY SELECT MENU EXIT Press MENU to display the menu main page.
PIP Operations Viewing and Changing the Position of the PIP Frame 1 Press MENU to display the menu main page. 2 Press 56 repeatedly to select SOURCE menu. 3 Press OK to access the submenu. The [PIP MODE] item will be highlighted automatically. 4 Press P4S2. 5 SOURCE PIP MODE P1S1 TV PICTURE SOURCE VGA SUB PICTURE ERASE ADD/ERASE AIR ANTENNA AUTO SEARCH repeatedly to select OFF, P1S1, P1S2, P2S1, P2S2, P3S1, P3S2,P4S1 or MOVE MOVE Press MENU to exit.
Viewing Closed Captions The unit decodes and displays the closed captions that are broadcast with certain TV shows. These captions are usually subtitles for the hearing impaired or foreign language translations. All VCRs record the closed caption signal from television programs, so home-recorded video tapes also provide closed captions. Most prerecorded commercial video tapes provide closed captions as well. Check for the closed caption symbol in your television schedule and on the tape’s packaging: .
Adjustment in VGA Mode Adjusting the Picture 1 Press MENU to display the menu main page. The [PICTURE] menu will be highlighted automatically. 2 Press OK to access the submenu. 3 Press 56 repeatedly to select the item you wish to change. 4 Press PICTURE PICTURE MODE NATURE CONTRAST BRIGHTNESS COLOR TEMP. COLOR-R COLOR-G COLOR-B to adjust the value of the item. MOVE 5 NORMAL SELECT MENU EXIT Press MENU repeatedly to exit. Adjusting Image Size 1 Press MENU to display the menu main page.
Adjustment in VGA Mode(continued) Changing the Position of Image 1 2 3 4 5 6 Press MENU to display the menu main page. Press 56 repeatedly to select SCREEN menu. Press OK to access the submenu. Press 6 repeatedly to select H-POSITION or V-POSITION item. Press SCREEN SIZE MODE FULL H-POSITION V-POSITION CLOCK PHASE AUTO ADJUST to adjust the value of the item until the screen is well-aligned. Press MENU repeatedly to exit.
Adjusting Parental Control Settings Parental Control This function allows TV programs to be restricted and TV usage to be controlled based on FCC data. It prevents children from watching violent or sexual scenes that may be harmful. Restriction of TV programs includes two ratings that contain information about the program: the MPAA rating and the TV Parental Guidelines. The MPAArating is restricted by age. TV Parental Guidelines are restricted by age and content.
Adjusting Parental Control Settings (continued) [2] MOVIE RATING (MPAA) Rating age based G GENERAL AUDIENCES. All ages admitted. PG PARENTAL GUIDANCE SUGGESTED. Some material may not be suitable for children. PG-13 PARENTAL STRONGLY CAUTIONED. Some material may be inappropriate for children under 13. R RESTRICTED. Under 17 requires accompanying parent or adult guardian. NC-17 NO ONE 17 AND UNDER ADMITTED.
Adjusting Parental Control Settings (continued) Changing the Password 1 After accessing the PARENTAL CONTROL menu, press 6 repeatedly to select CHANGE PASSWORD item. 2 Press OK to access and then the unit requires you to input your new password. Directly use 0~9 number buttons to input and then confirm again. 3 Press MENU repeatedly to exit. Be sure to write down your password and retain it for future use.
Adjusting Parental Control Settings (continued) Adjusting ENGLISH RATING 1 2 3 4 5 After accessing PARENTAL CONTROL, press 6 repeatedly to select ENGLISH RATING item. FUNCTION U E U C B C8+ G B PG B 14+ B B 18+ [B:BLOCK U:UNBLOCK] USE PIP INPUT KEY TO BLOCK/UNBLOCK MOVE SELECT MENU EXIT Press OK to access submenu. Press 56 repeatedly to select a desired rating you want to set. Press PIP INPUT button to block or unblock this rating . Press the MENU repeatedly to exit.
Troubleshooting Before calling for repair service, check the following items for possible remedies to an encountered symptom. Symptoms Check item “Ghost” or double images =This No power =Check that the AC power cord is plugged into the mains socket. =Unplug the power cord, wait for 60 seconds. Then re-insert may be caused by obstruction to the aerial due to high rise buildings or hills. Using a highly directional aerial may improve the picture. plug into the mains socket and turn on the unit again.
Specification Type: LCD TV Display Size diagonal: 26” Power Supply: AC100-240V 50/60Hz Power Consumption: 140W Dimensions(inch): 35.6 (W) X 21.8 (H) X 9.1 (D) Unit Weight(lbs): 50.6 lb Receiving channel: VHF 2-13 UHF 14-69 CATV 2-69, (A-6)-(A-1), A-W, (W+1)-(W+28) Total 181 channels TV system: NTSC-M Design and specifications are subject to change without notice. For service, support and warranty information, visit www.pwwservice.com or call 1-866-396-6322.
PRINTED IN RECYCLED PAPER 604-L26U253-00 Ver. 1.