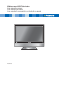
Widescreen LCD Television FLU-2632/FLU-3232/ FLU-2632I/FLU-3232I/ FLU-2632D/FLU-3232D/FLU-3732D/FLU-4232D a 20061005
This TV incorporates High-Definition Multimedia Interface (HDMITM) technology. HDMI, the HDMI logo and High-Definition Multimedia Interface are trademarks or registered trademarks of HDMI Licensing LLC. DISPOSAL OF WASTE ELECTRONIC EQUIPMENT BY PRIVATE HOUSEHOLDS WITHIN THE EUROPEAN UNION This sign indicates that this product may not be disposed of with your regular household waste. The recycling and separate collection of such products is your responsibility.
Warnings and Precautions Warnings and Precautions This symbol is intended to alert the user to avoid the risk of electric shock. This equipment must not be disassembled by anyone except qualified service personnel. WARNING CAUTION This symbol is intended to alert the user to the presence of important operating and maintenance instructions in the literature accompanying the appliance. To reduce the risk of fire or electric shock, do not expose this equipment to rain or moisture.
Warnings and Precautions ▪ Use and handle the power cord with care. Do not place any heavy objects on the AC power cord. ▪ Do not pull the AC power cord. Do not handle the AC power cord with a wet hand. ▪ Do not touch the power cord and antenna cable during lightning. ▪ Remove the plug from the wall outlet, if the equipment will not be used for a long period of time. ▪ Do not place, use or handle this equipment near water. ▪ Never expose the equipment to liquid, rain, or moisture.
Warnings and Precautions Outdoor Antenna Safety Instructions If an outdoor antenna is connected, follow the precautions below: ▪ When installing an outdoor antenna system, extreme caution should be taken to prevent contact with power lines. Direct contact with power lines may be fatal and should be avoided at all costs.
CONTENTS Warnings and Precautions Important Safety Instructions ....................................................................................... 3 Antenna Safety Instructions ......................................................................................... 5 Chapter 1 Introducing the LCD TV Key Features ............................................................................................................... 7 Package Contents ...........................................................
Chapter 1 Introducing the LCD TV Chapter 1 Introducing the LCD TV ENGLISH Key Features Various Audio/Video terminals for external equipment connection ▪ ▪ ▪ ▪ ▪ ▪ ▪ 2 set of composite A/V input terminals 2 SCART input terminals 1 set of component Video input terminals 1 VGA/ Audio input terminal 2 HDMI/Auido input terminals 1 sets of Audio(L/R) output terminals 1 Headphone terminal High Definition Multimedia Interface (HDMI) ▪ High Definition Multimedia Interface (HDMI) is a small, user-friendly interco
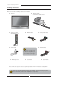
Chapter 1 Introducing the LCD TV Package Contents Make sure all of the following contents are included. LCD TV Bottom Stand / Screw Driver and 6 Screws a Remote Control/ AAA Batteries x 2 VIDEO Cable Component Cable POWER P.MODE SWAP PIP S.MODE MTS MUTE CAPTION SLEEP P.SIZE 1 3 2 5 4 7 JUMP 6 8 9 0 ENT AIR/CABLE CH. VOL. SOURCE EXIT GUIDE OK INFO LIST MENU FAV.
Chapter 1 Introducing the LCD TV Setting Your LCD TV ENGLISH How to install the TV Stand If you prefer to mount your new Polaroid TV on a wall instead of attaching it to the stand, please reference the instructions included in the wall mounting kit(not included). Do not remove the packaging material from the TV before the stand is attached. Read all instructions before continuing with the stand installation. a. b. Lift foam packaging material from the top of the LCD out of the box.
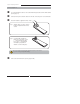
Chapter 1 Introducing the LCD TV How to setup the TV Use a supplied antenna cable to connect the VHF/UHF signal to the LCD TV’s ANT. terminal (refer to page 17). Connect the AC power cord at the back of the TV and connect the power cord to wall outlet. Insert the 2 batteries supplied in remote control. Step1 Slide the back cover up to open the battery compartment of the remote control. Step2 Insert two AAA size batteries.
Chapter 1 Introducing the LCD TV Your LCD TV Front/Right Side View and Controls ENGLISH LED The LED light indicates when the LCD TV is activated. a IR Infrared Receiver VOLUME▲▼ Adjusts the volume up and down. Selects the main-menu item and change values for items when in the OSD mode. VIDEO1 IN VIDEO Connects to the composite Video and Audio output jacks on external video equipment. L AUD IO CHANNEL▲▼ Scans up and down through channels. Selects sub-menu item when in the OSD mode.
Chapter 1 Introducing the LCD TV Rear View and Jacks VIDEO2 IN Connects to the composite VIDEO and AUDIO(L/R) output jacks on external video equipment. HDMI 1/HDMI 2 IN Connects the all digital AV equipment with HDMI connector.HDMI supports enhanced, high-definition video and two-channel digital audio. The AUDIO(L/R) of HDMI IN is for DVI connection. VGA IN Connects the PC, or other AV equipment with VGA and AUDIO(L/R) output jacks.
Chapter 1 Introducing the LCD TV Your Remote Control POWER POWER Turns the LCD TV on and off. 2 SWAP Swaps between the main and sub window in PIP/POP mode. 3 FREEZE Pressing FREEZE to freeze the current picture, press again to restore the picture. 4 PIP Turns PIP/POP on and off. 5 I-II Cycles through the TV sound options (NICAN) : MONO/DUAL/STEREO FAV.CH Pressing FAV.CH displays favorite channels. 11 3 FREEZE SWAP PIP 4 5 FAV.CH 7 6 SLEEP P.
Chapter 2 Installing the LCD TV POWER 17 EXIT Exits the OSD menu. 18 MENU Displays the OSD menu on the screen. 19 ▲▼►◄ Cycles through OSD options and selects individual menu items. OK confirms option settings. OK FREEZE SWAP PIP FAV.CH SLEEP 20 S.MODE Selects sound effect options: Surround/ Live/Dance/Techno/Classic/Soft/Rock/ Pop/Off. 21 P.MODE Selects picture mode: Vivid/High-Bright/ Cinema/Sport/User P.
Chapter 2 Installing the LCD TV Chapter 2 Installing the LCD TV Connecting a TV Cable or an Antenna Antenna Connection The antenna requirements for good color TV reception are more important than those for a black & white TV reception. For this reason, a good quality outdoor antenna is strongly recommended. The following is a brief explanation of the type of connection that is provided with the various antenna systems.
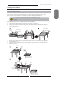
Chapter 2 Installing the LCD TV Use one of the following two diagrams when connecting an outdoor antenna. A: Shows how to use a VHF/UHF combination outdoor antenna. B: Shows how to use a separate VHF and/or UHF outdoor antenna. A. Combination VHF/UHF antenna VHF/UHF Antenna 300/75-ohm adapter (not included) VHF/UHF Antenna 300-ohm twinlead cable 75-ohm coaxial cable B.
Chapter 2 Installing the LCD TV Cable TV (CATV) Connection ENGLISH ■ A 75-ohm coaxial cable connector is built into the set for easy hookup. When connecting the 75-ohm coaxial cable to the set, connect the 75ohm cable into the ANT. terminal. ■ Some cable TV companies offer premium pay channels. Since the signals of these premium pay channels are scrambled, a cable TV converter/descrambler is generally provided to the subscriber by the cable TV company.
Chapter 2 Installing the LCD TV Use a supplied antenna cable to connect the TV signal to the LCD TV’s TV CABLE terminal. TV CABLE Connect the AC power cord at the back of the TV and connect the power cord to wall outlet. TV CABLE VHF/UHF IN This TV is equipped with a safety fuse. In the event of an electrical storm or power outage the safety fuse is designed to protect your TV. If your TV has no power, check the fuse by prying the cover off, following the illustration below.
Chapter 2 Installing the LCD TV Press the SOURCE button on the remote to display the Source List. Use the ▲▼ buttons to select TV, and press the OK button. Main: ENGLISH D TV(CABLE/AIR) VIDEO1 (SIDE) VIDEO2 (REAR) VIDEO3 (SCART1) VIDEO4 (SCART2) VIDEO5 (YPbPr) VIDEO6 (HDMI1) VIDEO7 (HDMI2) COMPUTER (VGA) Press the MENU button on the remote control to display the Main menu, and use the ◄► buttons to select the TV.
Chapter 2 Installing the LCD TV Connecting a VCR Rear of TV HDMI 1 IN VGA /PC IN HDMI 2 IN COMPONENT IN AUD IO OUT AUD IO IN AUD IO IN L R L R L L AUD IO IN R Y Pb Pr L R TV CABLE R VIDEO VHF/UHF IN VIDEO2 IN AUD IO IN SCART 1 SCART 2 AV Cable Use a composite cable to connect the VCR’s composite video/audio jacks to the LCD TV’s VIDEO2 IN jacks. Connect all AC power sources, before turning on the power switch of the LCD TV or other connected equipment.
Chapter 2 Installing the LCD TV Connecting a Video Camera or Game Console Rear of TV ENGLISH Right Side HDMI 1 IN VGA /PC IN HDMI 2 IN COMPONENT IN AUD IO OUT VIDEO L AUD IO IN AUD IO IN AUD IO L R L R L L AUD IO IN Y R Pb Pr L R R TV CABLE R VIDEO VIDEO1 IN VHF/UHF IN VIDEO2 IN AUD IO IN SCART 1 SCART 2 or AV Cable PLAY STATION Use a composite cable to connect the video camera’s or Game Console’s composite video/ audio jacks to the LCD TV’s VIDEO2 IN jacks or VIDEO1 IN jac
Chapter 2 Installing the LCD TV Connecting a DVD Player Rear of TV HDMI 1 IN VGA /PC IN HDMI 2 IN COMPONENT IN AUD IO OUT AUD IO IN AUD IO IN L R L R L L AUD IO IN R Y Pb L Pr TV CABLE R R VIDEO VHF/UHF IN VIDEO2 IN AUD IO IN SCART 1 SCART 2 Pb Pr COMPONENT/AUDIO Cable A/V Cable B A Pb Pr D V D PLA YER METHOD A: Use a composite cable to connect the DVD player’s composite video/audio jacks to the LCD TV’s VIDEO2 IN jacks.
Chapter 2 Installing the LCD TV Connect all AC power sources, before turning on the power switch of the LCD TV or other connected equipment. button on the remote to turn on the LCD TV. To watch a DVD, press the SOURCE button on the remote to select VIDEO2( METHOD A), or VIDEO5 (METHOD B). For best picture quality, if your equipment has component video output, use a component cable instead of a composite video.
Chapter 2 Installing the LCD TV Connecting a Digital TV Cable Box or Digital Satellite Receiver Rear of TV HDMI 1 IN VGA /PC IN HDMI 2 IN COMPONENT IN AUD IO OUT AUD IO IN AUD IO IN L R L R L L AUD IO IN R Y Pb L Pr R TV CABLE R VIDEO VHF/UHF IN VIDEO2 IN SCART 1 AUD IO IN SCART 2 Pb Pr COMPONENT/AUDIO Cable Pb Pr Use a component cable to connect the satellite receiver’s/TV Cable Box’s component (YPbPr) output jacks to the LCD TV’s component input jacks.
Chapter 2 Installing the LCD TV Connecting AV Equipment with HDMI Connector Rear of TV VGA /PC IN HDMI 2 IN COMPONENT IN AUD IO OUT AUD IO IN AUD IO IN L R L R L L AUD IO IN R Y Pb Pr ENGLISH HDMI 1 IN L R TV CABLE R VIDEO VHF/UHF IN VIDEO2 IN AUD IO IN SCART 1 SCART 2 or HDMI Cable AV EQUIPMENT Use a HDMI cable to connect the AV equipment’s HDMI output jack to the LCD TV’s HDMI1/ HDMI2 IN jacks.
Chapter 2 Installing the LCD TV Connecting an AV Equipment with DVI Connector Rear of TV HDMI 1 IN VGA /PC IN HDMI 2 IN COMPONENT IN AUD IO OUT AUD IO IN AUD IO IN L R L R L L AUD IO IN R Y Pb Pr L TV CABLE R R VIDEO VHF/UHF IN VIDEO2 IN AUD IO IN SCART 1 SCART 2 or AUDIO Cable AUD IO L R DVI IN HDMI-to-DVI Cable AV EQUIPMENT Use a HDMI-to-DVI cable to connect the AV equipment’s DVI output jack to the LCD TV’s HDMI1/HDMI2 IN jacks.
Chapter 3 Using the LCD TV Connecting an A/V Device with SCART Connector Rear of TV VGA /PC IN HDMI 2 IN COMPONENT IN AUD IO OUT AUD IO IN AUD IO IN L R L R L L AUD IO IN Y R Pb Pr ENGLISH HDMI 1 IN L R TV CABLE R VIDEO VHF/UHF IN VIDEO2 IN AUD IO IN SCART 1 SCART 2 or D V D PLA YER SCART Cable Use a SCART cable to connect the external A/V device’s SCART socket to the LCD TV’s VIDEO3(SCART1) or VIDEO4(SCART2) jack.
Chapter 3 Using the LCD TV Connecting a PC Rear of TV HDMI 1 IN VGA /PC IN HDMI 2 IN COMPONENT IN AUD IO OUT D IO IN AUD IO IN L R L R L L AUD IO IN Y R Pb Pr L TV CABLE R R VIDEO VHF/UHF IN VIDEO2 IN AUD IO IN SCART 1 SCART 2 AUDIO Cable VGA Cable PC Use a VGA cable to connect the PC’s VGA output jack to the LCD TV’s VGA input jack. Use an audio cable to connect the PC’s audio output jacks to LCD TV’s.
Chapter 3 Using the LCD TV Connecting an Audio Receiver For better sound quality, you may want to play the LCD TV audio through your stereo system.
Chapter 3 Using the LCD TV Chapter 3 USING THE FEATURES Using Picture-In-Picture The PIP/POP feature allows simultaneous viewing of video from two sources (TV, VCR, DVD etc). Only one source’s audio is played at a time; the user may select which source’s audio is heard. Press the PIP button once to enter Picture-in-Picture mode. Main Sub a ▪ Press ◄ ► to toggle the audio source between the main window and the sub window.
Chapter 3 Using the LCD TV Press the PIP button again to view images side by side. ENGLISH Main Sub a ▪ Press ◄ ► to toggle the audio source between the main window and the sub window. ▪ Press the SWAP button to swap the pictures between the main and sub windows. a ▪ Press ◄ ► to activate either the main or sub window, then press the SOURCE button to display the Input List: Press ▲▼ to change input source and press the OK button.
Chapter 3 Using the LCD TV Widescreen Viewing Widescreen function allows viewing of 4:3/16:9 images in wide screen mode, cycling through the following wide screen settings. Press the P.SIZE button repeatedly to select the screen format you want. NORMAL Displays at 4:3 aspect ratio. FULL Stretches the image vertically and horizontally to keeps the image size consistent in the center of the screen and stretches the sides. WIDE Stretches the image vertically and horizontally to fill the screen at 1:1.
Chapter 3 Using the LCD TV Using TELETEXT Functions Press switch on or off teletext display. POWER FREEZE SWAP PIP SLEEP P.SIZE FAV.CH 1 2 1 2 3 4 5 6 7 8 9 JUMP 0 ENT In TELETEXT mode, There are four colour coded subject headings at the bottom of the screen. To access more information about one of these subjects, press the appropriate colored button.
Chapter 3 Using the LCD TV Operating the Menu Press the button to turn the LCD TV on. Press the MENU button on the remote control, the on-screen menu will appear on the screen. Use the ◄► buttons to select your main menu option. VIDEO MENU: Allows you to make adjustments to your picture settings.
Chapter 3 Using the LCD TV TV MENU: Allows you to edit and label channels. ENGLISH Region Selection Searching Manual Scan Update Search Program Edit Favorite UK SETUP MENU: Allows you to set up a variety of features: Language, factory reset, V-Chip, Parental Control, Gamma, etc. Parental Language OSD Transparent Gamma Default English On Middle Use the ▲▼ buttons to select an option of the sub-menu, and press the OK button.
Chapter 3 Using the LCD TV Customizing the VIDEO Settings Press the button to turn the LCD TV on. Press the MENU button on the remote control to display the Main menu, and use the ◄► buttons to select the VIDEO.
Chapter 3 Using the LCD TV Display adjustment Press the OK button to enter the Display adjustment setting: Color temperature 128 20 ▪ H Position Adjusts the position of the picture left and right in the window. ▪ V Position Adjusts the position of the picture up and down in the window.
Chapter 3 Using the LCD TV Customizing the AUDIO Settings Press the button to turn the LCD TV on. Press the MENU button on the remote control to display the Main menu, and use the ◄► buttons to select the AUDIO.
Chapter 3 Using the LCD TV Customizing the SETUP Settings button to turn the LCD TV on. Press the MENU button on the remote control to display the Main menu, and use the ◄► buttons to select the SETUP. Use the ▲▼ buttons to highlight an individual SETUP option, use the ◄► buttons to change the setting, and press the MENU to exit the menu.
Chapter 3 Using the LCD TV Using the Parental Settings The Parental blocking can be set up on the TV to block a Channel or a Video Source. Use the ▼ button to select the Parental, and press the OK to display the Parental menu. Channel Lock Video Lock Change Password 1 VIDEO5(YPbPr) Use the Parental function, must enter a four-digit password. The factory password is 0000.
Chapter 3 Using the LCD TV Customizing the TV Settings button to turn the LCD TV on. Press the MENU button on the remote control to display the Main menu, and use the ◄► buttons to select the TV. Use the ▲▼ buttons to highlight an individual TV option, use the ◄► buttons to change the settings, and press the MENU exits the menu.
Chapter 3 Using the LCD TV Program Edit Allows Swap/Insertion/addition/removal of channels on the channel list. Press the OK button to display the Program Edit menu: Program Edit PR Freq System Name Skip 1 2 3 4 5 6 7 8 9 10 49.
Specifications TROUBLESHOOTING TV will not turn on Make sure the power cord is plugged in, then press the button on the remote. The batteries in the remote control may be exhausted. Replace the batteries. No picture, no sound Check the interface cable between TV and antenna/cable TV. Press the button on the remote. Press the SOURCE button on the remote repeatedly to select the connected video sources. Poor picture, sound OK Check the interface cable between TV and antenna/cable TV.
Specifications DISPLAY MODES The screen resolution has been optimized during production for the display modes listed below. If the signal from the system equals the standard signal mode, the screen adjusts automatically. If the signal from the system does not equal the standard signal mode, adjust the screen resolution by referring to your video card user guide, otherwise there may be no video. Video signal: (VGA Standard) Vertical Frequency(Hz) Horizontal Frequency(kHz) 640 x 350 85 37.
Specifications SPECIFICATIONS FLU-2632/FLU2632I/FLU-2632D FLU-3232/FLU3232I/FLU-3232D Panel Size 27” TFT LCD 32” TFT LCD Brightness 500 500 Contrast Ratio 1200:1 800:1 MODEL LCD Panel Max. Resolution Input Connector 1366x768 1366x768 VIDEO/AUDIO(L/R) 2 2 SCART 2 2 YPbPr/AUDIO(L/R) 1 1 VGA/AUDIO(L/R) 1 1 HDMI/AUDIO(L/R) 2 2 AUDIO OUT(L/R) 1 1 HEADPHONE 1 1 Power Source AC100~240V, 50/60HZ, 3.0A AC100~240V, 50/60HZ, 3.