HD-Ready Widescreen LCD TV with Digital Tuner
This product contains electrical or electronic materials. The presence of these materials may, if not disposed of properly, have potential adverse effects on the environment and human health. Presence of this label on the product means it should not be disposed of as unsorted waste and must be collected separately. As a consumer, you are responsible for ensuring that this product is disposed of properly. To find out how to properly dispose of this product, please go to www.polaroid.
FCC Federal Communications Commission Statement 1. Reorient/Relocate the receiving antenna. 2. Increase the separation between the equipment and receiver. 3. Connect the equipment into an outlet on a circuit which is different from what the receiver is connected to. 4. Consult the dealer or an experienced radio/TV technician for help. Changes or modifications not expressly approved by the manufacturer responsible for compliance could void the user authority to operate the equipment.
Warnings and Precautions Warnings and Precautions To prevent any injuries, the following safety precautions should be observed in the installation, use, servicing and maintenance of this equipment. Before operating this equipment, please read this manual completely, and keep it nearby for future reference. This symbol is intended to alert the user to avoid the risk of electric shock. This equipment must not be disassembled by anyone except qualified service personnel.
Warnings and Precautions ▪ Use and handle the power cord with care. Do not place any heavy objects on the AC power cord. ▪ Do not touch the power cord and antenna cable during lightning. ▪ Remove the plug from the wall outlet, if the equipment will not be used for a long period of time. ▪ Do not place, use or handle this equipment near water. ▪ Never expose the equipment to liquid, rain, or moisture. Seek for service if any of the above is spilled into the equipment.
Warnings and Precautions Outdoor Antenna Safety Instructions If an outdoor antenna is connected, follow the precautions below: ▪ An outdoor antenna should not be located in any area where it could come in contact with overhead power lines, or any other electric light or power circuits. ▪ When installing an outdoor antenna system, extreme caution should be taken to prevent contact with power lines. Direct contact with power lines may be fatal and should be avoided at all costs.
TABLE OF CONTENTS Important Safety Instructions .............................................................................. 1 Antenna Safety Instructions .................................................................................4 Chapter 1 Introducing the LCD TV Package Contents..................................................................................................6 Setting Your LCD TV...............................................................................................
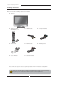
Chapter 1 Introducing the LCD TV Package Contents Make sure all of the following contents are included. LCD TV Remote Control/ AAA Batteries x 2 VIDEO Cable Component Cable Power Cord AUDIO Cable Warranty Card User’s Manual Quick Start Guide POWER CH LIST SUBTITLE GUIDE SLEEP ATV DTV VOL INPUT CH MENU EXIT OK INFO P MODE These items are all you need to set up and operate the LCD TV in its basic configuration. Make sure all of the above contents are included in the package.
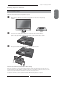
Chapter 1 Introducing the LCD TV Setting Up Your LCD TV ENGLISH How to install the TV Stand Follow the instructions below to install the TV stand: Open the box, and make sure all necessary parts are in the box. The package contains: Stand LCD TV Cover an even stable surface with a soft cloth. Place the LCD TV unit facedown on the cloth. Fit the stand onto the bottom of the LCD TV unit as shown: Then push until the stand clicks into the LCD TV’s stand socket.
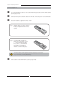
Chapter 1 Introducing the LCD TV How to setup the TV Use a supplied antenna cable to connect the VHF/UHF signal to the LCD TV’s ANT. terminal (refer to page 15-18). Connect the AC power cord at the back of the TV and connect the power cord to wall outlet. Insert the 2 batteries supplied in remote control. Step1 Slide the back cover up to open the battery compartment of the remote control. Step2 Insert two AAA size batteries.
Chapter 1 Introducing the LCD TV Your LCD TV Front/Left /Right Side View and Controls Front View Left Side View IR Infrared Receiver LED The LED light indicates when the LCD TV is activated. VOL.+ VOLUME+Adjusts the volume up and down. Selects the main-menu item and change values for items when in the OSD mode. VOL.- CH. CH. CHANNEL▲▼ Scans up and down through channels. Selects sub-menu item when in the OSD mode.
Chapter 1 Introducing the LCD TV Rear View and Jacks 1 5 6 7 PC/VGA IN VHF/UHF IN 4 ITEM 3 2 8 9 DESCRIPTION 1 AC IN / Power Switch Connects the AC power cord to this socket./ Make sure that this switch is in the ON position (Red LED light will show on the bottom centre of the TV). 2 AV1 SCART Connect to external equipment with scart socket. This scart input allows audio and CVBS/YC/RGB+CVBS. RGB,S-VIDEO from an external devise to be shown on your TV.
Chapter 1 Introducing the LCD TV Your Remote Control ENGLISH 1 POWER Turns the LCD TV on and into standby mode . POWER 11 2 1 CH LIST 2 Mutes and restores your LCD TV sound. 9 SUBTITLE 3 ATV/DTV Pressing enter ATV (analogue) or Digital (DTV) Mode. 4 10 0-9 Select and switch to a channel by using 0-9 buttons. 5 4 GUIDE In DTV mode,pressing GUIDE key displays the electronic program guide on the screen. 6 5 CH. +/- Changes the channels up and down .
Chapter 2 Installing the LCD TV 14 15 ▲▼◄ ► OK POWER CH LIST SUBTITLE 16 INFO Pressing once displays a variety of information such as the current channel and the input source. 17 INPUT Cycles among the different input signal INPUT: TV AV1(SCART) AV2(S-VIDEO) AV3(CVBS) AV4(Y Pb Pr) AV5(VGA) AV6(HDMI) DTV 18 GUIDE SLEEP ATV DTV VOL INPUT CH MENU EXIT 14 OK INFO 29 Accesses the TELETEXT items or corresponding pages.
Chapter 2 Installing the LCD TV Chapter 2 Installing the LCD TV Connecting a TV Cable or an Antenna Antenna Connection The antenna requirements for good color TV reception are more important than those for a black & white TV reception. For this reason, a good quality outdoor antenna is strongly recommended. The following is a brief explanation of the type of connection that is provided with the various antenna systems.
Chapter 2 Installing the LCD TV Use one of the following two diagrams when connecting an outdoor antenna. A: Shows how to use a VHF/UHF combination outdoor antenna. B: Shows how to use a separate VHF and/or UHF outdoor antenna. A. Combination VHF/UHF antenna VHF/UHF Antenna 300/75-ohm adapter (not included) VHF/UHF Antenna 300-ohm twinlead cable 75-ohm coaxial cable B.
Chapter 2 Installing the LCD TV Cable TV (CATV) Connection ■ A 75-ohm coaxial cable connector is built into the set for easy hookup. When connecting the 75-ohm coaxial cable to the set, connect the 75-ohm cable into the ANT. terminal. ■ Some cable TV companies offer premium pay channels. Since the signals of these premium pay channels are scrambled, a cable TV converter/descrambler is generally provided to the subscriber by the cable TV company.
Chapter 2 Installing the LCD TV 1 Use a supplied antenna cable to connect the TV signal to the LCD TV’s TV CABLE terminal. VHF/UHF IN 2 3 Connect the AC power cord at the back of the TV and connect the power cord to wall outlet. Press the POWER button on your remote to turn on your LCD TV. a. After connecting an aerial to your LCD TV and connecting the mains cable to the TV and 230VAC mains socket, turn the POWER SWITCH of rear TV on, a red light will show on the front centre panel of the TV. b.
Chapter 2 Installing the LCD TV Connecting a DVD Player ENGLISH Rear of TV PC/VGA IN VHF/UHF IN Video Audio Audio (R) ( L) Pb A D Video/Audio Cable DVD PLAYER METHOD A (AV4 ) Use a Component cable to connect the (Y Pb Pr ) sockets on the DVD player to your LCD TV. Use an audio cable to connect the DVD’s audio sockets to your LCD TV. METHOD B (AV2) Use an Audio cable to connect the DVD’s audio output sockets to your LCD TV. Use a S-Video cable to connect your LCD TV and DVD player.
Chapter 2 Installing the LCD TV Connecting a VCR&Video Camera Rear of TV PC/VGA IN VHF/UHF IN Video Audio Audio (R) (L ) Video/Audio Cable METHOD A (AV2) Use an Audio cable to connect the VCR’s/ the Video Camera’s audio output sockets to your LCD TV. Use a S-Video cable to connect your LCD TV and VCR player/ video camera. METHOD B (AV3) Use an A/V cable to connect the VCR’s/ video camera’s composite output sockets to your LCD TV.
Chapter 2 Installing the LCD TV Connecting a TV Cable Box or Satellite Receiver Rear of TV ENGLISH PC/VGA IN VHF/UHF IN Video Audio Audio (R) (L) D Video/Audio Cable VGA CABLE Satellite antenna cable Pb Pr A E TVTVCABLE BOX CABEL BOX SATELLITE RECEIVER Method A(AV4) : Use a Component cable to connect the Y/Pb/Pr sockets on the TV Cable Box to your LCD TV. Use an Audio cable to connect TV cable box’s audio output sockets to LCD TV.
Chapter 2 Installing the LCD TV Connecting an Audio Receiver Rear of TV PC/VGA IN VHF/UHF IN Use an audio cable to connect the audio receiver’s audio LINE IN sockets to LCD TV ‘s DIGITAL OUT sockets. Connect all power INPUTs before turning on the power switch of the LCD TV or other connected equipments. Press the POWER button to turn on your LCD TV.
Chapter 3 Using the LCD TV Chapter 3 USING THE FEATURES 2.In a short while you will see the TV programmes briefly as each channel is received and stored in the memory. When APS is completed BBC1 digital TV will show, press CH+/buttons to view the other channels stored.When finished ATV scan.TV will Auto change to DTV do the first installation channel. To view analogue TV press INPUT button and use the up / down arrow buttons to select TV and then Press the OK button.
Chapter 3 Using the LCD TV OSD Menu Operation 1 The main menu provides access to the following menus: Video Adjust picture setting such as picture mode, contrast, brightness,sharpness colour and advanced. Audio Adjust sound option and effects. Setup Adjust colour standard, sound standard, APS, Manual search, Channel setup. Preferences Adjust preferences such as OSD, blue screen, childlock, sleep timer, OSD timer, OSD reset.
Chapter 3 Using the LCD TV The VIDEO Settings OPTION DESCRIPTION Display Mode Allows you to select the display mode to be Wide, 4:3,Original, Zoom. DCE Allows you to adjust the (Dynamic Contrast Enhancemen) to be off, low, mid, high. Blue Stretch Allows you to adjust the blue stretch. Green Stretch Allows you to adjust the green stretch. Color Temp. Allows you to adjust the color temp. to be cool, warm , standard.
Chapter 3 Using the LCD TV The Setup Settings(Analogue TV) Setup menu is only available when viewing Analogue TV. Use this Setup menu to select Colour Standard, Sound Standard, APS, Manual Search, Channel Setup.Use the Up/Down arrow buttons to highlight the required setting. Press the Press OK button to select the function. Use left / right arrow buttons to adjust the settings. Press OK to save the adjustment.
Chapter 3 Using the LCD TV The Preferences Settings OPTION DESCRIPTION OSD Language : Allows you to select the OSD to be English, French, Spanish, German, Italian, Portugese, Dutch, Polish . Transparency: Allows you to adjust transparency from 0 to15. Blue Screen Allows you to select the blue screen to be off or on. Childlock Allows you to select the childlock to be yes or no. (Default password is 0000. golden password is 3796.) Change Pin: Allows you to change the 4-digit password.
Chapter 3 Using the LCD TV Chapter 4 Using the DTV OSD Settings OPTION DESCRIPTION Edit Channel List Lock some channels that are not suited for younger members of the family, skip/add the channel list as you wish. Configuration Add new channel, set audio language, subtitle language, as you wish. Upgrade the system. View the signal information. Parental Control Enable or Disable the menu protection system and allows the PIN code to be changed.
Chapter 3 Using the LCD TV Using the DTV OSD Settings ENGLISH Channel List F AV 1 B B C O NE 1 2 3 4 B B C TWO B B C THR EE 5 6 B B C NEWS 24 BBCi C B B C C hannel L ock Sk ip Sor t M ov e Exit Sk ip A dd A ll Exit Screen By pressing the YELLOW button you can sort the channels in the list. Then you can sort the channels alphabetically by pressing the RED button or sort the channels manually by pressing the BLUE button.
Chapter 3 Using the LCD TV If you skip a channel, it cannot be shown in the list menu ( Press OK button will pop-up the favorite channel list menu when you watch the digital terrestrial television ) unless you add it again. ( In the channel list menu, the skipped channel name is not shown.) MODIFY A FAVOURITE LIST You can modify the favourite list which you have create. The list named “TV / RADIO” is the default list, the rest are created.
Chapter 3 Using the LCD TV Using the DTV OSD Settings Highlight the Configuration option, then press OK button to enter the selected option. The configuration menu is displayed on the screen now. CHANNEL INSTALLATION Use these options If you have moved location or want to rescan for new channels. Press OK button to display the channel installation menu. If you want TV to auto search the channels, press OK button to continue.
Chapter 3 Using the LCD TV Using the DTV OSD Settings If you want to install the channels by yourself, using the▲/▼buttons to highlight the channel installation (manual) option, and press ok to install manually. First you should choose the installation type, then you can see the following menu. Using ◄/► to cycle the channel option, then the bar graphs of signal level and signal quality will indicate whether any channels are likely to be found.
Chapter 3 Using the LCD TV Using the DTV OSD Settings AUDIO LANGUAGE This function select which language soundtrack you will hear when switching to a channel broadcasting with multiple soundtracks. Highlight the audio language line in the user settings menu and use ◄/►buttons to cycle through the language options. SUBTITLE LANGUAGE This function selects the desired subtitle language whenever subtitle information is broadcast.
Chapter 3 Using the LCD TV Using the DTV OSD Settings SYSTEM INFORMATION Highlight the system information item in the system parameter menu, pressing OK button to display the system information menu. You can view the system information in this menu, however, you can modify nothing in this menu, Pressing OK button to quit. SIGNAL INFORMATION Highlight the Signal information item in the configuration menu, pressing OK button to display the Signal information menu.
Chapter 3 Using the LCD TV Using the DTV OSD Settings PARENTAL CONTROL RECEIVER LOCK You should enter the PIN CODE before you can see the DTV program while you power on the TV and select the DTV INPUT. CONFIGURATION MENU If you toggle this option to YES, you must enter the PIN CODE before you can access the configuration menu. CHANNEL LOCK If you toggle this option to YES, the channels you locked in the edit channel list menu can’t be displayed before you enter the PIN CODE.
Chapter 3 Using the LCD TV Using the DTV OSD Settings PIN CODE CHANGE Pressing the ‘RED’ button will popup the PIN code change menu, enter the previous code by using the 0-9 buttons on the remote control, then enter the new code twice to confirm and this menu will disappear (The PIN is factory set to 0000). Pressing EXIT to quit without saving the new code. Press the OK button to quit the parental control menu and save these alterations.
Chapter 3 Using the LCD TV Troubleshooting Before consulting service personnel, check the following chart for a possible cause of problem ENGLISH and for a possible solution. TV will not turn on Make sure the power cord is plugged in The batteries in the remote control may be exhausted. Replace new and same brand batteries. No picture, no sound Check the interface cable between TV and antenna/cable TV. Press the POWER button on the remote.
Specifications Key Features Various Audio/Video terminals for external equipment connection ▪ ▪ ▪ ▪ ▪ ▪ 1 set of composite A/V input terminals 1 SCART input terminals 1 set of component Video input terminals 1 VGA/ Audio input terminal 1 HDMI/Auido input terminals 1 Headphone terminal High Definition Multimedia Interface (HDMI) ▪ High Definition Multimedia Interface (HDMI) is a small, user-friendly interconnect that can carry up to 5 Gbps of combined video and audio in a single cable.
Specifications SPECIFICATIONS MODEL TLU-01541C TLU-01941C Panel Size 15.4” TFT LCD 19” TFT LCD Brightness 200 300 Contrast Ratio 400:1 850:1 1280x800 1440x900 VIDEO 1 1 S-VIDEO 1 1 YPbPr/ AUDIO IN(L/R) 1 1 AUDIO IN(L/R) 1 1 PC/VGA IN 1 1 HDMI IN 1 1 PC AUDIO IN 1 1 DIGITAL OUT 1 1 HEADPHONE 1 1 VHF/UHF IN 1 1 Max. Resolution Input Connector ENGLISH LCD Panel Power Source AC100~240V, 50/60HZ, 1.2A AC100~240V, 50/60HZ, 1.