Rev.
Welcome to the Polaroid PDC 1320 Camera! Congratulations on purchasing the Polaroid PhotoMAX PDC 1320 Complete Digital Camera Kit. This kit contains everything you need to enter the world of digital imaging.
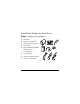
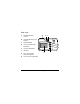
Quick Start: Taking Your First Photo Step 1: Unpack your camera kit a Camera case b Polaroid PDC 1320 camera c Wrist strap (attached to camera) d User’s manual e ArcSoft PhotoMAX Image Maker Software CD-ROM f Four AA batteries g AC power adapter h Camera-to-computer USB cable i Camera-to-TV video cable 2 c a b f e d g Questions? www.PolaroidDigital.
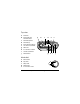
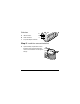
Step 2: Review the camera’s features Front view a Optical viewfinder a b Self-timer indicator c Flash d Focus ring e Focusing distance f Lens g Wrist strap slot h Battery compartment i Tripod mount j CompactFlash memory card compartment f b c d e g h i j Polaroid PhotoMAX PDC 1320 Digital Camera User’s Manual 3
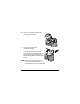
Top view a Mode dial b Photo quality and resolution button c Flash setting button d Flash settings e Photo resolution settings f LCD menu on/off button g Status LCD h PC connection indicator i Camera on/off button j Shutter button a b c d e h g Mode dial a Record mode b Play mode c Setup mode d Delete mode e PC connection mode 4 a b c d Questions? www.PolaroidDigital.
Status LCD a Flash setting pointer b Self-timer indicator (when in use) c Battery power indicator d Photos remaining indicator e PC connection indicator (when in use) f Photo resolution indicator g Photo quality indicator a g bc d Polaroid PhotoMAX PDC 1320 Digital Camera User’s Manual f e 5
Rear view a Camera power/status indicator b CompactFlash memory card indicator c Optical viewfinder d LCD scroll up button/selftimer button e LCD scroll down button f OK button g Color LCD on/off and photo viewing button h Color LCD (menu/viewfinder) 6 a b c d e f OK h Questions? www.PolaroidDigital.
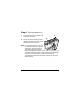
Sideview a USB connection b Video connection c AC power adapter connection a b c Step 3: Install the camera’s batteries a Open the battery compartment cover on the bottom of the camera by sliding the cover out to the side as far as it will go and lifting it.
b Insert four AA batteries with the + and terminals placed as shown. c Close the cover of the battery compartment securely. If you feel resistance, do not force the cover. Slide it out to the side as far as it will go, press it down flat against the camera base, and slide it back into the base to lock it closed. Note: To learn more about batteries, such as which ones to use and how to tell if your batteries are running low, see page 16. 8 Questions? www.PolaroidDigital.
Step 4: Turn the camera on a Press the yellow camera on/off button (a) on the top of the camera. b Wait for the green power/status indicator light (b) on the back of the camera to stop blinking before you take a photo. a b Note: To conserve battery life, the color LCD turns off after 90 seconds and goes into “sleep mode.” While the camera is in sleep mode, the green power/status indicator light (b) stays on. (Be sure to turn off the color LCD when it is not needed.
Step 5: Turn the mode dial to Record The Record mode (a) is on the mode dial on the top of the camera. To learn more about the camera’s modes, see pag e24. Step 6: Turn the focusing ring Turn the focusing ring on the front of the camera to set the correct distance between you and your subject: 2 feet (.6 m) to infinity Use this setting for most subjects. 1 to 2 feet (.3 to .6 m) Use this macro setting for close-up photos. 10 Questions? www.PolaroidDigital.
Step 7: Use the flash (if desired) The camera is pre-set to Auto flash, which means the flash fires when the lighting situation calls for it. If you want to use a different setting, see page 27. Stand 3 to 8 feet (1 to 2.5 m) from your subject for best results with flash. If the flash fires, you cannot take another photo until the power/status indicator (a) on the back of the camera stops blinking. a Step 8: Stand the correct distance from your subject • • Outdoors (no flash): 2 feet (.
Step 9: Frame the photo a You can frame your photo in one of two ways: • Use the framing lines in the optical viewfinder (a). • Use the color LCD (b). To see an image in the color LCD, press the yellow LCD on/off button (c) on the back of the camera. Note: The color LCD uses additional battery power. OK b Step 10: Press the shutter button Press down the shutter button (a) to take the photo. Do not move the camera until you hear a click. 12 Questions? www.PolaroidDigital.
The Next Step Now that you have taken your first photo, spend some time with the next section, “Advanced Features and Settings.” It tells you how to: • Transfer your photos to your computer so you can edit or email them (page 58). • See your photos on a television (page 41).
Advanced Features and Settings This is what you will find in this section: • Using an AC Adapter or Batteries (page 15) • Storing Photos in Memory (page 18) • Formatting Memory (page 22) • Using the Mode Dial and Menus (page 24) • Setting the Focusing Distance (page 26) • Using the Flash (page 27) • Using the Self-Timer (page 29) • Reading the Photos Remaining Indicator (page 30) • Setting the Photo Quality and Photo Resolution (page 31) • Using Digital Zoom (page 34) • Reviewing and Deleting Photos in Quic
Using an AC Adapter or Batteries You can use the camera’s AC adapter or four AA batteries. AC adapter Caution: Always turn your camera off before inserting or removing the AC adapter. To maximize the life of your camera’s batteries, use the AC adapter whenever possible.
1 Press the on/off button to turn the camera off. 2 Connect one end of the AC adapter to the AC connection on the camera. 3 Connect the other end of the AC adapter to a grounded electrical outlet. 4 Press the camera on/off button to turn the camera on. Batteries Use only AA high-capacity super alkaline or lithium disposable batteries or NiCad or NiMH rechargeable batteries. Never mix old batteries with new batteries, different types of batteries, or batteries from different manufacturers.
Moderately charged Low charge—You can still take photos, but if the power drops very low, the flash and color LCD will not function. As battery power drops still lower, the camera eventually shuts down, and you will need to replace all four batteries. Empty— Replace the batteries immediately. Keep a set of extra batteries handy, especially on a trip, when it may be hard to find replacement batteries. When not using the camera, shut it off.
Storing Photos in Memory You can store your photos in the camera’s internal memory or an optional CompactFlash memory card. The camera’s internal memory The Polaroid PDC 1320 camera automatically stores your photos in 8 MB of internal memory. Depending on the camera’s photo-quality setting (page 31), its internal memory normally stores from 17 to 50 photos at 1280 x 960 resolution or 34 to 138 photos at 640 x 480 resolution.
Whenever you insert a CompactFlash memory card into the camera, photos are stored on the card and not in the camera’s internal memory. Photos already in the camera’s internal memory remain there, and you can access them by removing the CompactFlash card. If there is no more space left in the memory card and you try to take a photo, a message on the LCD tells you that the memory card is full. You need to delete photos from the memory card (page 45) or transfer photos to your computer (page 58).
Inserting a CompactFlash card 1 2 Turn the camera off. 3 Insert the card with the raised lip facing up. Push it carefully but firmly into the slot Open the memory compartment cover on the bottom of the camera. The card only fits correctly into the slot one way. When the card is inserted completely, the eject button (a) next to the card pops out. Note: If the card does not seem to fit correctly, do not force it. Turn the card over and retry. 4 20 a Close the memory compartment cover.
Removing a CompactFlash card 1 2 Turn the camera off. 3 Push the eject button (a) next to the memory card. 4 Grasp the edge of the memory card and pull it out. 5 Close the memory compartment cover. Open the memory compartment cover.
Formatting Memory Always format a new CompactFlash memory card before you use it. In fact, format any CompactFlash memory card unless it has been used in your Polaroid PDC 1320 camera before. You may occasionally need to reformat the camera’s internal memory or a CompactFlash memory card to delete stored photos or eliminate corrupted files. Note: When you reformat a CompactFlash memory card that is already in the camera, all photos on the card are deleted.
4 Turn the mode dial to Setup (a). The SETUP MENU appears in the color LCD. 5 Use the LCD scroll down button to highlight FORMAT MEDIA. 6 7 Press the OK button. a Use the LCD scroll buttons to highlight YES and then press OK. A message asks if you are sure you want to format memory. 8 Highlight YES and then press OK. The camera displays the message, FORMAT COMPLETE. 9 Press OK and return to the SETUP MENU. (If you select NO, the camera returns to the SETUP MENU without formatting memory.
Using the Mode Dial and Menus The mode dial on your Polaroid PDC 1320 camera has five modes that you use to perform different functions: Record mode. Take photos and adjust photo settings. Play mode. View photos you have taken. Setup mode. View and set camera options. Delete mode. Delete photos you have taken. PC mode. Transfer stored photos from your camera to your computer. The Record, Play, Setup, and Delete modes each have their own menus.
The steps below are general instructions for changing menu options. They apply to all menus: 1 2 Turn the camera on. 3 Use the LCD scroll up or down buttons to highlight a desired menu option in yellow. 4 Press the OK button to select the highlighted item you want to change. The line at the bottom of the menu turns from blue to green and two small scroll icons appear at the left. 5 Turn the mode dial to a mode, and the mode’s menu appears in the color LCD. (The PC mode does not have a menu.
Setting the Focusing Distance Rotate the distance ring around the camera’s lens, to set the correct camera-tosubject distance when you are not using flash. Distance Icon Distance 2 feet (.6 m) to infinity Use this setting for most subjects. 1 to 2 feet (.3 to .6 m) Use this macro setting for close-up photos. Caution:Do not use flash for macro photos. For best results using the macro • • • 26 setting: Make sure you have adequate lighting. Use the color LCD to frame your photo.
Using the Flash To select a flash setting, turn the mode dial to Record. The flash button (a) on the top of the camera lets you cycle through the flashmode icons (b) in the status LCD. The default setting is Auto flash. a b The optimum camera-to-subject flash range is 3 to 8 feet (1 to 2.5 m). If you use flash, wait until the power/status indicator stops blinking before you take another photo. Flash Icon Flash Setting Auto flash: • The flash fires automatically as needed.
Flash Icon Flash Setting Forced flash: • The flash fires for every photo. • Use indoors in low light. Using this setting in bright light may overexpose the photo. • Use in high-contrast situations to provide filllight. No flash: • The flash does not fire. • Use where flash is prohibited or may be distracting. Also use when shooting toward a reflective surface, such as a window or mirror. • If you do not have enough light when using this setting, your photos will be too dark. • Use for outdoor photos.
Using the Self-timer The self-timer button (the same as the color LCD scroll up button) on the camera back lets you take a photo ten seconds after you press the shutter button. The self-timer works only for the next photo taken, and then it turns itself off. Note: For best results, use a tripod or a stable surface. 1 2 3 Turn the camera on. Turn the mode dial to Record. Press the self-timer button (a). The self-timer icon status LCD.
Reading the Photos Remaining Indicator This indicator in the status LCD shows the number of photos remaining in the camera’s internal memory (or an inserted CompactFlash card). The information varies depending on what mode the camera is in: • In Record mode, the indicator shows the number of photos left to take at the current photo resolution and quality setting. (See page 31 for information about these settings.
Setting the Photo Quality and Photo Resolution In Record mode, pressing the photo quality and resolution button (a) on the top of the camera cycles through settings that affect the quality of your photos, the size of your digital photo files, and the number of photos your camera can store. a b c • The photo quality setting (b) — indicated by the number of stars in the status LCD — refers to the type of image compression used for each photo resolution setting.
These are the high-resolution options and the approximate number of photos you can expect the camera to hold at each setting. Icons Photo Quality and Resolution Approximate Number of Photos 1280 x 960 pixels (default) 17 (Superfine) Low compression. Best quality for printing but largest file size (default). (Fine) Medium compression. 25 (Normal) High compression but smallest file size. 50 Note: The number of photos you can take at each setting is based on the camera’s 8 MB of internal memory.
These are the low-resolution options and the approximate number of photos you can expect the camera to hold at each setting. Icons Photo Quality and Resolution Approximate Number of Photos 640 x 480 pixels (default) 34 (Superfine) Low compression. Best quality for email and web pages but largest file size (default). (Fine) Medium compression. 69 (Normal) High compression but smallest file size.
In Play mode, the status LCD shows the photo quality and resolution of the image currently displayed on the color LCD, as well as the flash mode in which the photo was taken. In addition, if you press the color LCD on/off button while the camera is in Play mode, the photo’s resolution appears at the bottom of the photo. Note: When you press the photo quality and resolution button, the photos remaining indicator changes to show how many more photos you can take at that quality and resolution.
3 4 Frame the photo in the color LCD. Press the OK button on the back of the camera. The central portion of the image enlarges twice to fill the color LCD and 2xZOOM appears in the upper left corner of the LCD. (If you want to return to the original image, press OK again.) 5 Press the shutter button, and the camera photographs the enlarged portion. 6 Press OK to return to the original image. Note: Digital zoom applies to only one photo at a time.
Reviewing and Deleting Photos in Quickview Quickview lets you see and delete photos immediately after you take them. To turn Quickview on, select QUICKVIEW in the RECORD MENU. Then select ON. (For more detailed information about using menus, see page 24.) With Quickview on: 1 2 3 Turn the mode dial to Record and take a photo. The photo you have just taken displays for three seconds on the color LCD (even if the LCD is off).
Single photo without text • Turn the mode dial to Play. The last photo taken appears as a single image in the LCD. • Press the up or down scroll button to see each photo stored in memory displayed sequentially on the color LCD. Single photo with text • With a photo displayed on the color LCD, press the LCD button.
Thumbnails • Press the LCD button a second time to see the photos you have taken as miniature thumbnails, as shown at right. • The last photo that appeared as a single image on the color LCD is highlighted with a red border. • Use the scroll up or down button to highlight a thumbnail photo you want to see enlarged or move through additional groups of thumbnails. • Press OK to see a highlighted thumbnail enlarged to fill the LCD.
Viewing an enlarged area You can look at an enlarged quadrant of a photo: 1 Turn the mode dial to Play. The last photo taken appears in the color LCD. (You can look at an enlarged quadrant of this photo or use the scroll arrows to view a different photo.) 2 Press OK to see the upper-left corner of the photo enlarged two times. 3 Press the color LCD button to see a small blue indicator in the upper left corner of the enlarged area. A red rectangle appears in the indicator.
If you want to see an even more detailed, enlarged area of the same photo: 1 2 Follow steps 1 through 3 above. Press OK. The area you were viewing enlarges an additional two times, and the blue indicator in the upper left corner expands to show 16 segments. (The indicator is enlarged in the illustration.) 3 Press the up or down scroll arrow, and the small red rectangle in the indicator shows you which area of the photo you are viewing. 4 Press OK to return to the original photo.
2 Select a delay from 2 to 10 seconds between photos. The default is 4 seconds. 3 Press OK. The last photo you took appears in the color LCD, and the slideshow begins. 4 To stop the slideshow, press any button on the back of the camera, turn the mode dial, or turn off the camera. You need to select SLIDESHOW in the PLAY MENU each time you want to see a slideshow, even if you do not change the delay. Note: It is great fun to see your slideshow displayed on your television.
Connecting the camera to your television 1 2 3 Make sure your camera and television are off. 4 Turn the TV on and set it to the channel you use to view videos. To conserve batteries, use the AC adapter (a). Plug one end of the video cable into the video port on the camera (b) and the other end into the video input port on your television. b Note: For information about using your TV for video input see the TV’s manual. a 5 6 Turn the TV’s mode to video.
After you have set up your TV to display photos from your camera, you can also take photos using your TV as a viewfinder. Turn the camera to Record mode and press the color LCD button to turn on the camera’s LCD viewfinder. Then aim your camera and frame the image in your TV screen. Printing Photos The Digital Print Order Interface (DPOF) feature lets you “tag” your photos for printing directly from your camera’s CompactFlash memory card to a DPOFenabled printer, such as the Polaroid P500 printer.
5 To exit the DPOF submenu, press the menu button and the PLAY MENU appears. 6 Repeat steps 1 through 5 for each photo you want to tag. Note: If you tag a photo for DPOF printing, a printer icon bottom of the photo when text is displayed (page 37). appears at the When you are ready to print photos, remove the CompactFlash memory card from the camera (page 21) and insert it into your DPOF-enabled printer.
Deleting Photos Caution:Once you delete a photo, it cannot be retrieved. It is gone forever! Also, when you delete one or more photos, the remaining photos are renumbered. Using Quickview Quickview lets you see and delete a photo immediately after you have taken it. To learn how to delete a photo using Quickview, see page 36. Deleting a single photo Note: If you want to delete a photo from a CompactFlash memory card, be sure to insert the card.
4 Press OK and a message appears asking you to confirm that you want to delete the currently displayed photo. The message also tells you the file name and the folder that contains the file, for example: 100_POLA\POL_0003. 5 6 Press the up scroll button to select YES. Press OK and the photo is deleted. The next photo you took appears in the color LCD. (If you select NO, the photo not deleted remains displayed in the LCD.
6 Press OK and all the photos stored in memory are deleted. (If you select NO, the photos are not deleted and the last photo you took appears in the color LCD.) Formatting memory When you format the camera’s internal memory or a CompactFlash memory card, all the photos stored in memory are deleted. For more information, see page 22. Using PhotoMAX Software You can delete photos from the camera when it is connected to the ArcSoft PhotoMAX Image Maker Software.
Using Menu Options This section describes each menu option in alphabetical order according to the name of the option. The first column also tells you the menu in which the option is located. For general instructions on accessing menus and changing options, see page 24. Option Description and Settings COPY TO CF CARD Copies photos from the camera’s internal memory to an optional CompactFlash (CF) memory card. • PLAY MENU • YES (default). Copies all stored photos to the memory card.
Option Description and Settings DELETE ALL? Deletes all photos stored in the camera’s internal memory or a CompactFlash memory card (if one is in the camera). Press OK to select this option. A message asks you to confirm that you want to delete all photos. • DELETE MENU • YES. Deletes all photos. • NO (default). Returns you to the previously displayed photo. DELETE CURRENT? • DELETE MENU Deletes the currently displayed photo. Press OK to select this option.
Option Description and Settings DPOF Lets you “tag” a photo to specify that you want it printed on a Digital Print Order Interface (DPOF)enabled printer. • PLAY MENU Press OK to select DPOF, and the DPOF submenu appears. You can select the number of photos you want to print and their size as well as turn the DPOF function on or off. For more information, see page 43. Note: To exit the DPOF submenu, press the menu button. 50 Questions? www.PolaroidDigital.
Option Description and Settings EV COMPENSATION Sets the exposure-value (EV) brightness, which controls how much light enters the camera. If a photo comes out too dark or too light, use this setting to lighten or darken the next photo. • RECORD MENU • 0.0 (default): no compensation • -0.3 to -1.8: Makes photos progressively darker • +0.3 to +1.8: Makes photos progressively lighter When you turn the camera off, the setting returns to 0.0.
Option Description and Settings LANGUAGE Sets the language to appear in all the menus. • SETUP MENU • ENGLISH (default) • FRENCH • GERMAN • SPANISH • PORTUGESE • JAPANESE • TRADITIONAL CHINESE Press OK and the menus appear in the language you have chosen. The option you select is retained when you turn the camera off. LCD BRIGHTNESS • PLAY MENU • RECORD MENU 52 Adjusts the brightness of the color LCD from -5 to +5. The default is 0. The LCD screen gets lighter or darker as you change the settings.
Option Description and Settings QUICKVIEW Briefly displays the photo you have just taken on the color LCD. A message appears giving you the option to delete the photo (page 36). • RECORD MENU • ON • OFF (default). Use this option to conserve battery power. The option you select is retained when you turn the camera off. RESET TO DEFAULT Restores all camera settings to their factory-default settings.
Option Description and Settings SLIDE SHOW Displays stored photos as a full-screen slide show on the color LCD. You can specify from 2 to 10 seconds as the delay between photos. The default is 4 seconds. • PLAY MENU To start the slide show, go to the PLAY MENU and accept the default delay setting or select another delay setting. The slide show begins when you press OK. To stop the slide show, press any button on the back of the camera or switch to another camera mode.
Option Description and Settings VIDEO MODE Selects either NTSC (default) or PAL as the type of video output for your television. • SETUP MENU WHITE BALANCE • RECORD MENU The setting returns to NTSC when you turn the camera off. Balances lighting so your photos are not tinted with strange colors. For example, photos taken in fluorescent light without white-balance compensation have a green tint. Note: The flash is disabled when you select a white balance setting.
Installing PhotoMAX Software After you take photos with your Polaroid PDC 1320 camera, you will want to transfer them to your computer. To do this, first install the ArcSoft PhotoMAX Image Maker Software included in your kit. Installing the software also installs the driver for your camera. The software lets you print and email your photos and manipulate them in fun and interesting ways.
Now follow these easy steps to install the software: 1 2 Turn your computer on. Insert the software CD in your PC. If the installation program does not start automatically: 3 4 a Select Run from the Windows Start menu. b Click Browse and select your CD-ROM drive. c Select Setup.exe from the CD-ROM. d Click Open. e Click OK. The installation program begins. Follow the instructions on your computer screen. At the final prompt click Finish.
Transferring Photos to Your Computer Caution: Do not connect the camera to your computer until after you install the ArcSoft PhotoMAX Image Maker Software and restart your computer. 1 Turn the camera off and connect the camera to the AC adapter (a). 2 Turn the camera on. b Note: It is important that you keep your camera on during this entire process. 3 Turn the mode dial to PC . PC appears in the status LCD and an arrowhead points to the PC icon.
6 Go to your PC’s desktop and double-click My Computer. Your camera is treated like a separate disk drive with its own icon labeled Removable Disk. The next available drive letter is used for the camera. 7 8 Double-click Removable Disk. If your camera has a CompactFlash memory card inserted in it, Removable Disk contains a folder called Dcim. a b 9 Double-click Dcim to see a folder called 100_Pola. Double-click 100_Pola to see your photo files, such as Pol_0001.jpg, Pol_0002.jpg, and so on.
12 To copy all your photos from your camera to your computer, highlight them and drag them to your desktop or to another folder of your choice. As you drag the photo files to a location on your computer, the power/status indicator light on the back of the camera blinks orange. Polaroid recommends that you copy your files into C:\My Documents\My Pictures because this will make it easy to access your photos using the PhotoMAX Software.
Accessing Photos in PhotoMAX Software Now that you have transferred your photos to your computer, you can have fun with them using the many exciting features of the ArcSoft PhotoMAX Image Maker Software. Caution: Before you work with your photos in the software, be sure that you have copied the photos from your camera to a folder on your hard drive (page 58). Until you do this, your photos are stored only in your camera, not your computer.
2 If you stored your photos in C:\My Documents\My Pictures: a Click the down arrow (a) in the Sample list and then select [New]. b If you like, replace New Album (b) with a new name for the folder that contains your photos. (Rightclick Album to see help.) b c Click the Add button . A window opens showing your photo files in C:\My Documents\My Pictures. d Highlight one or more photo files and click Open. The thumbnail images of the photos you selected appear below the software image tray (c).
e 3 Double-click a thumbnail to open it in the image tray. If you stored your photos in a different folder: a b c Image Tray Click the Add button and browse to find your folder. In the Open window, go to the location on your hard drive where you stored your photos. Double-click the folder containing your photo files and open the photo that you want to work with. The photo appears in the image tray.
Getting Help with PhotoMAX Software • Select the ? button to open the PhotoMAX Online User’s Guide (the software online help). This provides an index and step-by-step procedures for using the software to manipulate and enhance your photos. • You can also get help with any button or feature in the software by moving your mouse cursor over it and clicking the right mouse button. This brings up context-sensitive help that explains the software button or feature.
Camera Troubleshooting Your Polaroid PDC 1320 camera may display the following error messages on its color LCD: LCD Message Meaning and Corrective Action CARD ERROR • The camera is not able to access the CompactFlash memory card. Reinsert the card (page 20) and try again or replace the card. MEMORY ERROR • A problem has occurred with the camera’s internal memory. Turn off the camera and then turn it on again.
LCD Message Meaning and Corrective Action MEMORY FULL • The CompactFlash card or the camera’s internal memory may be full. Delete photos (page 45) or transfer photos to your computer (page 58). After you transfer photos to your computer, delete those photos from the card (page 45). • The CompactFlash card may have become unstable. Install a new card (page 20).
LCD Message Meaning and Corrective Action NO CARD • Insert a memory card (page 20) before you format the card or copy photos to it. NO IMAGES • No photos are stored in the camera’s internal memory or a CompactFlash memory card. USB ERROR • The time allotted to transfer photos from the camera to your computer has been exceeded. Disconnect the camera, being careful to follow the special instructions on page 60. Then reconnect the camera (page 58) and try again.
Camera Precautions • This camera is battery operated. Supervise children when the camera is operated by them or used in their presence. To avoid electrical shock, do not expose the camera to, or immerse it in, any fluids. Do not disassemble or operate the camera if dropped or damaged. Contact a Polaroid Service Center for repair information. • Do not open the camera case or attempt your own repairs. High-voltage internal components create the risk of electrical shock when exposed.
Limited Warranties One Year Limited Warranty Polaroid PhotoMAX PDC 1320 Digital Camera Polaroid will, at our option, repair or replace any unit found defective in manufacture within the warranty period. The warranty period is determined by the date of purchase. Keep the receipt as proof of purchase. Otherwise, the warranty period is determined by the date of manufacture.
FCC Notice This device complies with Part 15 of the FCC rules. Operation is subject to the following two conditions: (1) This device may not cause harmful interference, and (2) this device must accept any interference received, including interference that may cause undesired operation. Warning: Changes or modifications to this equipment not expressly approved by the party responsible for compliance could void the user’s authority to operate the equipment.
Contacting Polaroid Polaroid Corporation provides technical support for digital cameras at www.PolaroidDigital.com, and within the United States by calling 800-897-0356 from 8 a.m. to 8 p.m. EST, 7 days a week. Please note that phone support and repair services are regional and may not be available for a particular product outside the country where it was purchased. To obtain parts for cameras purchased in the United States, call 800-343-4846 from 9 a.m. to 5 p.m. EST, Mon. -Fri.
Digital Camera Tips, Tricks, Terms, and Techniques What kind of batteries should I use? Caution: Never open your camera’s battery compartment door to remove the batteries while the camera is still on. This could damage your camera. • Use only high-capacity super alkaline or lithium disposable batteries or NiCad or NiMH rechargeable batteries with your Polaroid digital camera. • Never mix old batteries with new batteries, different types of batteries, or batteries from different manufacturers.
Note: The AC adapter may become warm to the touch after extended periods of use. This is no cause for alarm. If you are using rechargeable batteries, using the AC adapter will not recharge them. For more information about how to recharge the batteries, see the instructions provided by the battery manufacturer. How many photos does my camera hold? Normally, a photo taken at 640x480-pixel resolution produces a JPEG data file about 100K in size.
Here are more tips for taking better photos: • To take the BEST photos that your camera can produce, use its highest resolution and quality settings. (But be aware that these highest-quality photos will take up much more storage space in the camera and on your computer.) • • • Keep the sun behind you or at your side. Avoid having the sun directly overhead. • • • Avoid extreme temperatures, which can affect battery performance.
How do I get the best printouts of my photos? This is a tough question to answer exactly, since the results you achieve depend very much on the printer you use. In general, laser printers and laser-printer paper do not perform as well as inkjet printers, which can use specially coated papers. Regardless of the printer you use, here are some guidelines for getting the best prints possible: • Remember that you are constrained by your printer’s resolution.
How do I email photos? There are two ways to email photos: • If your email software is MAPI compliant, you can email photos directly from the PhotoMAX Image Maker software. a Open the PhotoMAX software. b Display your photo in the PhotoMAX image tray. c Click Save. d Click Email. e Choose the image size you want to send. (Small is recommended.) f Click Send. g In the Email Server Setup window, choose either AOL email or Other MAPI compliant email. Click OK.
What is “white-balance compensation”? If you are shooting indoors without a flash, or in other unusual lighting conditions, your digital photos may be tinted with strange colors (such as orange, green, or blue). Many Polaroid digital cameras use white-balance compensation to fix this problem. If your camera includes this feature: • • Use the camera’s automatic white-balance setting for most lighting conditions.
How do I connect the digital camera to my PC? See the camera User’s Manual for complete instructions. Can I transfer photos to a Macintosh computer? You can, even though the software that comes with Polaroid PhotoMAX cameras is not Macintosh compatible! Many PhotoMAX digital cameras use Type I CompactFlash memory cards, and you can buy a low-cost CompactFlash card reader from many electronic stores and Web merchants.
Cannot take a photo: • If any LED indicators on the camera blink after you take a photo, wait until they stop blinking before you take another photo. • The camera’s internal memory or optional memory card may be full. Transfer photos to your computer and delete photos from the camera to free up space. • If you are using a memory card, check that it is properly inserted. Turn off the camera, remove and correctly reinsert the memory card, and turn on the camera.
The photo looks blurry: Note: Some digital cameras do not have a flash. • The subject of your photo may have moved while the photo was taken. Have your subject remain still while taking a photo. • The digital camera may have moved while the photo was taken. Hold the camera steady while taking a photo, or use a tripod. There is a tripod mount on the bottom of the camera. • The photo may have been taken in dim light with the flash turned off.
The photo has an unnatural color: Note: Some digital cameras do not have a flash. • The flash may be off or not firing indoors, where the general lighting is either from fluorescent or tungsten bulbs. Try setting the flash to always fire (a setting usually called Forced Flash). If your camera offers white-balance compensation, also try its automatic, fluorescent, or tungsten settings (depending on the source of the prevailing lighting).
PDC 1320 Technical Support Information (This information replaces that found on Page 71) Polaroid Corporation provides technical support for digital cameras at http://www.polaroid.com/, and within the United States by calling 800-897-0356 from 10 A.M. to 7 P.M. EST, (Mon - Fri) and 10 A.M. to 4 P.M. EST (Sat). Please note that phone support and repair services are regional and may not be available for a particular product outside the country where it was purchased.