7” Portable DVD Player PDM-0711 Operation Manual 20050114 1
Safety Instructions Warning: This indicates that "There is a risk of injury or death". Caution: This indicates that "There is a risk of injury or physical damage". Before operation Warning Read and keep the operation manual. Before using the the product, please carefully read this manual and follow all safety and operation instructions Keep this manual for future reference. Power supply: The power supply must correspond to the standard indicated on the product.
Safety Instructions Do not install the product in a position where it will interfere with the operation of an automotive air bag. The air bag may fail to operate properly or the product could become dislodged by airbag operation, causing an accident and/or injury. Do not expose the product to excessive heat. This could cause the product to start smoking or ignite, or cause electrical shock or other malfunction. Unplug all the equipment before connecting.
Safety Instructions This product has been listed as class 1 laser product. The mark is on the rear panel. The apparatus shall be connected to an AC power outlet with a protective grounded connection. Visible laser radiation when open and interlock failed or defeated. Avoid direct exposure to beam. Do not open the top cover while the unit is operating. There are no user serviceable parts inside the unit. Leave all servicing to qualified service personnel. Beware of unit falling or tipping over when moving.
Safety Instructions Caution Notes on discs: Do not play discs that are damaged or warped, including discs with cracks, scratches or parts missing; discs with burrs; poor quality discs. Route all cords so that they do not interfere with driving or with entering or exiting the car. Run the cords so that they do not wrap around the steering wheel, brake pedal, etc. or around your feet. Secure all the cords together. Use the product at the proper volume setting.
Safety Instructions Preservation and Cleaning Warning Do not use any volatile agents such as gasoline or paint thinners to clean the product. Never use any volatile materials to clean the product, because they may damage the surface of the player. Use a soft, dry cloth for cleaning. Store in a proper place Store the product in clean, dry place, avoid direct sunlight and moisture. Caution Unplug the product when not used for a long period of time.
Features High-quality audio and video AV In: External Audio, Video input can be connected to most external AV sources. AV Out: Analog Audio output and video output. Excellent sound: Dolby Digital delivers great sound. Advanced Playing Functions Compatibility: Compatible with DVD, CD and Picture CD disks. On-screen Display: You can choose from English, Spanish or French for the On-screen Display language. Particular Performance: Multi-speed, fast forward, fast backward and slow forward, slow backward.
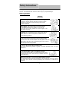
Accessories Accessories List ITEM NAME QTY Operation Manual 1 Power Supply Cord with AC Adapter 1 Audio/Video Cable 1 Rechargeable Battery Pack 1 DC Adapter (Car Adapter) 1 NOTE Accessories and their parts numbers are subject to change without prior notice.
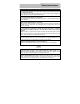
Contents Safety Instructions …………………………………………..2 Features …………………………………………...7 Accessories …………………………………………...8 View of Unit …………………………………………..10 View of Side Panels ………………………………….……….12 View of Unit Bottom …………………………………………..13 System Connections …………………………………………..14 Power Supply Preparation …………………………………………..16 Rechargeable Battery …………………………………………..17 Notes on Discs …………………………………………..20 Playback Operation …………………………………………..21 DVD Playback …………………………………………..
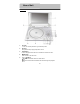
View of Unit Front View 1. TFT LCD 2. Speakers 7” color TFT screen presents a high resolution picture. 3. 4. 5. Two speakers output high quality stereo sound. TITLE button Press to display the disc title menu if the titles are coded in the disc. MENU button Press to enter to the disc menu. / , / buttons / : Press the direction buttons to select items. / : Press to fast search backward and forward during disc playback.
View of Main Unit 6. 7. 8. / , / buttons / : Press the direction button to select items. / : Press to play the previous track or the next track. ENT button Press to confirm your selection. MODE button Press to change the aspect ratio or change the brightness, contrast and color level. (See page 20) PLAY/PAUSE button Press to start playback or pause the playback. 10. STOP button Press to stop playback. Press the button to resume playback. 11. ZOOM button 9.
View of Side Panels Right Side View 1. 2. 3. 4. 5. 6. VOLUME Control For adjusting the sound level of speakers or headphones. Headphone Jack When headphones are plugged into the unit, the speakers automatically turn off. AUDIO input/output Jack For connecting to an external amplifier or audio source VIDEO input/output Jack For connecting to an external monitor or video source DVD/AV IN Switch Switch to AV IN to input the external AV source; switch to DVD to playback the disc DC 9.
View of Unit Bottom View of the bottom 1. Rechargeable Battery Contacts For connecting the rechargeable battery pack. 2. Docking Jack This portable DVD player is designed with a Docking Jack on the bottom. The Docking Jack is designed for connecting to an optional external Docking Station for expanded functions. The Docking Station features an electrical connection interface that enables the portable DVD to effectively serve as a desktop DVD.
System Connections z z Always ensure that the DVD player, TV and any other electrical equipment to be connected with are switched off and unplugged from the power supply. Ensure that you observe the color coding when connecting audio and video cables. Connecting to TV Audio/Video connections Follow the drawings below to connect the DVD player to a TV's Audio/Video inputs with Audio/Video cables. Connecting to Amplifier Refer to your Audio equipment's manual before connection.
System Connections Connecting to External AV Source The player supports an AV signal input function. Use the audio/video cable to connect the unit to an external AV signal source such as a DVD, VCR etc. After connecting, switch the DVD/AV IN to AV IN. Connecting to Headphone Connect headphones to the headphone jack on the right side of the unit. When headphone is connected, the speakers will automatically turn off.
Power Supply Preparation Using the AC Adapter The player is supplied with an AC adapter for powering the unit and charging the battery. 1. Connect AC adapter to the right side of the DVD player in the jack marked DC 9.5V IN, as shown on the right. 2. Plug the two-prong end of the power cord into a grounded electrical outlet. The power indicator lights red. Note: Turn player's power off before unplugging.
Rechargeable Battery About Rechargeable Battery Pack Your portable DVD player comes with a lithium ion rechargeable battery that attaches to the rear of the DVD player. Charge the battery fully before initial use. Charging time is normally about 5 hours. A fully charged battery delivers about 3 hours of use, but playing time varies from disc to disc. If the battery will not be used for a long period of time, fully charge the battery prior to storage.
Rechargeable Battery Attaching the Battery Pack Refer to the following steps for attaching the Battery Pack: 1. Make sure the player is off and the AC or car adapter is disconnected. 2. Place the DVD player on a soft and smooth surface with the bottom of the unit facing up. 3. With one hand on the DVD player to prevent it from moving, take the battery and align the plastic tabs on the battery pack with holes on the player, and push the battery pack into the DVD player. 4.
Rechargeable Battery Detaching the Battery Pack If the DVD Player is not going to be used for long periods of time, the battery pack should first be fully charged and then detached. When the DVD Player is turned OFF, the DVD Player is still consuming some power in STANDBY mode. This will eventually discharge the battery. Make sure the power is turned OFF and the AC or car adapter is disconnected before detaching the Battery Pack. To detach the Battery Pack: 1.
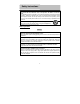
Notes on Discs Compatible Disc Formats DISC LOGO DIAMETER 12cm DVD 8cm PLAYBACK TIME/ PLAYABLE SIDES 133 min (SS-SL) 242 min (SS-DL) 266 min (DS-SL) 484 min (DS-DL) 41 min (SS-SL) 75 min (SS-DL) 82 min (DS-SL) 150 min (DS-DL) 12cm 74 min 8cm 20 min CD 12cm JPEG Operation methods of some DVD discs are specified by the software manufacturer. Please follow the instructions for the disc. Care of Discs Handling Discs When loading or removing discs, do not touch their playing surfaces.
Playback Operation READ THE FOLLOWING INSTRUCTIONS CAREFULLY BEFORE USING YOUR DVD PLAYER FOR THE FIRST TIME. WARNING: Do not play poor-quality discs to avoid damaging the lens. Pre-operation 1. 2. 3. 4. 5. 6. Connect the unit to power supply through the provided AC adapter. Switch “POWER ON/OFF” to “ON” on the left panel to turn on the DVD player. The main unit power indicator lights green and screen displays the logo.
Playback Operation Basic Operation (continued) ZOOM button For DVD discs, press the ZOOM button to display the image 2x, 3x, 4x, 1/2, 1/3, 1/4, normal size in sequence. For JPEG discs, press the ZOOM button first, then press the button to enlarge the picture as follows: 125%-150%-200%-normal size; press the button to reduce the picture as follows: 75%-50%-normal size. This function is not available for CD discs.
Playback Operation DVD Playback (continued) MENU button & buttons Press the MENU button during playback to display the on screen menu. Press the MENU again to resume the normal playback. Press the (direction buttons) to select the desired title or disc menu item and press the ENT button on the front panel to confirm. In the root menu, press the MENU button again to resume the normal playback. Menu function is only available for DVD discs.
Playback Operation CD Playback Play/Pause button STOP Press the button to pause during playback, press it again to resume normal playback. During playback, press the button once to stop playback, then press the button to resume normal playback from the place where it was stopped. Press it twice repeatedly to stop playback completely. & buttons Press the button to start fast forward playback. Press it repeatedly to fast forward at the speed of 2X, 4X, 8X, 16X, 32X in sequence.
Playback Operation Picture CD Playback Pre-operation 1. 2. 3. 4. Load a Picture CD and the player will search and play the disc automatically. The screen displays the root folder with several subdirectories/subfolders. (see page 33) Use the , buttons on the front panel to select desired folder. Then you can press any of the buttons below to confirm your selection: , , ENT buttons on the front panel. The screen enters the selected subfolder. Use the , buttons on the front panel to select desired file.
Playback Operation Picture CD Playback (continued) Picture Rotate During browsing a picture, you can press direction buttons , , , to rotate the current picture.
System Setup You can change the default settings of this unit to customize its performance to your own preferences. Note: Set the system up while play is stopped or there is no disk in the player. To set up your system: 1. Press the SETUP button on the front panel. 2. The setup menu will appear on the screen. It includes General Setup Page, Speaker setup page, Dolby digital setup, Video setup page and Preference page. You can exit the setup menu by pressing the SETUP button again at any time. 3.
System Setup General Setup Page (continued) 2.Angle Mark This item is used to turn the Angle Mark on or off. Press the or button to highlight this item. Press the ENT or to enter the item. Press the or button to choose angle mark on or off. Press the ENT button to confirm your selection. Press the direction to exit this item. 3.OSD Language This item is used to set the OSD (on-screen display) language. Press the or button to highlight this item.
System Setup General Setup Page (continued) 6. Last Memory This item is used to set last memory state. Note: The last memory refers to resume playback from the point that you stopped last time. Press the or button to highlight this item. Press the ENT or to enter the item. The default setting of this item is off. Press the or button to choose on or off. Press the ENT button to confirm your selection. Press the direction button to exit this item.
System Setup Dolby Digital Setup (continued) 1. Dual Mono This item is used to set the channel output mode. Press the or button to highlight this item. Press the ENT or to enter the item. It includes stereo, L-Mono, R-Mono and Mix-Mono, Stereo by default. Press the or button to choose the proper one. Press the ENT button to confirm your selection. Press the direction button to exit this item. 2.
System Setup Video Setup Page (continued) 2. Brightness This item is used to adjust brightness level of the Screen. Press the or button to highlight this item. Press the ENT or to enter the item. Press the or button to adjust to desired level. The default level is 00. Press the ENT button to confirm your selection. 3. Contrast This item is used to adjust contrast level of the Screen. Press the or button to highlight this item. Press the ENT or to enter the item.
System Setup Preference page (continued) 2. Subtitle This item is used to set the subtitle language. Press the or button to highlight this item. Press the ENT or button to enter the item. The available languages are English, French, Spanish, Chinese, Japanese, Korean, Russian and Thai, English by default. Press the or button to choose the preferred Language. Press the ENT button to confirm your selection. Press the direction button to exit this item. 3.
Definitions Dolby Digital Dolby Digital is a technology developed by Dolby Laboratories. Audio tracks encoded in Dolby Digital can reproduce from one to 5.1 discrete channels of excellent quality audio. Letterbox screen This refers to a screen on which the playback picture of wide-screen DVDs appears with black bands running along the top and bottom. Pan & Scan screen This refers to a screen on which the playback picture of wide-screen DVDs is cut off at the left and right sides.
Troubleshooting If you suspect there is something wrong with the DVD player, immediately turn the power off. Disconnect the power connector and check that there is no smoke or excessive heat coming from the unit. Never open or try to repair the unit yourself. There are no user serviceable parts inside. PROBLEM The player cannot play. There is no sound. POSSIBLE CAUSE POSSIBLE SOLUTION The disc cover may not be closed. Close the disc cover. There may not be a disc in the DVD drive.
Troubleshooting PROBLEM There is no picture. Poor AV performance. POSSIBLE CAUSE POSSIBLE SOLUTION The LCD may be off or not be in correct video mode. Turn on the LCD and choose the correct video mode. The system connection may be not correct. Connect correctly. The unit may not be in DVD mode. Switch the DVD/AV IN switch to DVD. The disc may be dirty or warped. Clean or change the disc.
Specifications TFT screen size 7 inches Laser Wavelength 780/650 nm Video System NTSC Frequency Response 20Hz~20kHz Audio Signal-to-noise Rate ≥85dB Audio distortion+noise ≤-70dB (1kHz) Channel Separation ≥70dB (1kHz) Dynamic Range ≥80dB (1kHz) ±2.5dB 0.2 Audio Out Analog Audio Out Out Level: 1.5V±1.0 , Load: 10KΩ Video Out Video Out Out Level: 1VP-P±0.1, Load: 75Ω Unbalanced Negative Power AC 100-240V ~ Power Consumption 50/60Hz < 25W Dimensions 195mmX149mmX38.
For service, support and warranty information, visit www.polaroidelectronics.com or in the US call 1-866-289-5168, in Canada call 1-866-301-7922 and in Mexico call 01-800-400-2443. “Polaroid” is a registered trademark of Polaroid Corporation of Waltham, MA USA and licensed for use on the PDM-0711 to Petters Consumer Brands, LLC.