7” Portable DVD Player PDV-0700K Operation Manual 20041012 -1-
Table of Contents Important Safety Instructions............................................................ 3 Precautions with Moisture ................................................................ 5 Function Features ............................................................................ 6 Disc Formats Supported................................................................... 7 Description .......................................................................................
Important Safety Instructions CAUTION: TO REDUCE THE RISK OF ELECTRIC SHOCK, DO NOT REMOVE COVER (OR BACK). NO USER SERVICEABLE PARTS INSIDE. REFER SERVICING TO QUALIFIED SERVICE PERSONNEL. The lightning flash with arrowhead symbol, within an equilateral triangle, is intended to alert the user to the presence of uninsulated “dangerous voltage” within the product’s enclosure that may be sufficient to constitute a risk of electric shock to persons.
Important Safety Instructions IMPORTANT FOR LASER PRODUCTS 1. Read these instructions. 1. CLASS 1 LASER PRODUCT 2. Keep these instructions. 2. DANGER: Visible laser radiation when open and interlock failed or defeated. 3. Heed all warnings. Avoid direct exposure to beam. 4. Follow all instructions. 3. CAUTION: Do not open the top cover. There are no user service-able parts inside the unit. Leave all servicing to qualified service personnel. 5. Do not use near water.
Precautions with Moisture Under the following circumferences, moisture may appear on the lens of the product, which is the most sensitive part of the DVD player. - The DVD player is suddenly moved from a cold place to a warm place. - A room is heated while the DVD player starts operating, or the DVD is placed by an air-conditioner. - In the hot summer season, the DVD player is moved from an air-conditioned room to a hot, damp place to be used. - The DVD player is being operated in a damp place.
Function Features 6. LAST MEMORY PLAYBACK 1. EXCELLENT SOUND Memorizes and continues playing Dolby Digital delivers great sound. from place stopped. 2. HIGH RESOLUTION MPEG2 decoding format achieves 7. AUDIO OUT more than 500 lines of horizontal Audio output terminal for connection resolution. to audio amplifiers. 8. EARPHONE OUTPUT 3. SPECIAL FUNCTIONS Convenient for listening to movies or Supports excessive language caption. music in private. 4. COMPATIBILITY 9.
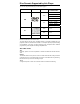
Disc Formats Supported by this Player The unit can play discs bearing any of the following logos: DISC LOGO DIAMETER PLAYBACK TIME/ PLAYABLE SIDES 133 min(SS-SL) 12cm 242 mi n(SS-DL) 266 mi n(DS-SL) 484 min(DS-DL) DVD 8cm 41 min ( SS-SL ) 75 min ( SS-DL ) 82 min (DS-SL) 150 min 12cm 74 min 8cm 20 min 12cm 600 min (DS-DL) CD MP3 The operating method of some DVD discs is specified by the software maker. Please refer to the instruction manual of the disc.
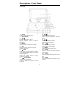
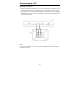
Description - Front Panel Front View 8. / Press to select menu items. Press to go to beginning of previous track. 9. / Press to select menu items. Press to search forward. 10. / Press to select menu items. Press to go to next chapter. 11. MENU Press to select the disc menu. 12. SETUP Press to access the DVD player’s setup menu. 13. TITLE Press to display titles if present on the disc. 14. SLOW Press to activate slow forward or slow rewind. 1. OPEN Press to open the disc cover. 2. DISC COVER 3.
15. MODE During playback, press to change the aspect ratio on the screen. 16. ZOOM Press to cycle through zoom function. 17. 18. 19. 20. Description Right View 1. EARPHONE/SPEAKER VOLUME KNOB 2. EARPHONE JACK 3. AUDIO IN/OUT 4. VIDEO IN/OUT 5. AV IN/OUT SWITCH 6. DC 9.5V IN Left View 1.
Connecting to a TV Audio/video connections 1. Always ensure that the DVD player, TV and any other electrical equipment you are connecting the DVD player to is switched off and unplugged from the power supply. 2. The easiest way to connect the DVD player to a television is via the supplied Audio/Video connections. Connect the audio/video cable from the DVD player to the TV’s audio/video inputs. Note If you wish to view video on your TV only, close the display panel of your DVD player.
Connecting to an Amplifier The DVD player can be connected to an AV amplifier. Please refer to your Audio equipment’s manual before connecting. Note: When connecting to an audio amplifier, set the “Dynamic” to “Off”.
Using the AC adapter Usage of Adapter The player is supplied with a switching power adapter. 1. Connect AC adaptor to the side of the DVD player in the slot marked “DC 9.5V IN”. 2. Connect the rabbit joint end of the AC adaptor to the power cord. 3. Plug the two-prong end of the power cord to a grounded electrical socket. Note: Please turn player’s power off first and then unplug the power to prevent malfunction. Pre-operation 1. Connecting to power. 2. Lift the main cover up to open the disc tray house.
Using the Battery Pack Using and Charging the Battery Pack Charge the Battery Pack before using it the first time. Charging time is normally between 4-5 hours. Do not charge the Battery Pack more than 8 hours as it could reduce service life. Normally, the Battery Pack can be charged approximately 300 times. When fully charged, the Battery Pack delivers 3 hours of continuous power. Battery Pack should be fully charged before initial use! 1.
Using the Battery Pack 3. Charging the Battery Pack Plug the Power Adapter into the Player’s DC 9.5V IN Jack (located on Right Side of Player). Plug the other end of the Power Cord into a household wall Power Outlet. Recommended Recharging and Charging Times Your new battery should be fully charged before it is used for the first time. Charging time is normally between 4-5 hours. A fully charged battery delivers 3 hours of use.
Detaching Battery Pack Detaching Battery Pack from the unit: If the player is not going to be used for a long period of time, we recommend that you detach the Battery Pack. Even if the unit is powered down, the unit is still consuming some power in STANDBY mode. This could lead to over discharging the battery. Make sure the power is turned off before detaching the Battery Pack. After detaching the battery pack, take care when handling the unit. 1. Slide and hold in position.
Using Headphones Using Headphones while you are in a quiet area: Connecting Headphone Connector into right side of the unit’s Headphone Jack: Quick Tips • Excessive loud usage of headphones could damage your hearing. • Turn down the Volume before you connect the headphones, then raise the volume to suit your level. • Sound from the unit’s external speaker will cease when headphones are connected.
Disc Playback Please read these instructions carefully before using your DVD player first time. 1. Turn on the player’s power by switching the POWER switch on the side of the player to “ON”. 2. Press OPEN button on front panel to open the disc cover. 3. Load disc with the label facing up to prevent damage to the player or disc. 4. Close the disc cover. The player will automatically search for the disc and when it finds it, play will begin.
Disc Playback Previous and Next Press the button on the control panel, and playback will start from the previous track. Press the button on the control panel, and playback will start from the next track. Fast Forward & Rewind Press the and buttons to fast forward or rewind. Slow Forward & Rewind Press the SLOW button to slow forward or rewind. Repeat A-B You can temporarily mark your own section of a DVD that you would like to play repeatedly.
Disc Playback Picture CD Playback Previewing Contents Of A Folder 1. Open the disc tray, insert the JPEG disc and close the tray. 2. The disc contents are displayed (JPEG may be in a folder). 3. To preview a picture, use the direction button to move the highlight over a folder entry. The small preview window reveals the contents of a clip when the highlight is positioned over the clip title. 4. 5. To see a full screen view of the selected clip, press the ENT button.
System Setup GENERAL SET-UP You can change the default settings to customize performance to your own preference. 1. Remove the disc from the DVD drive and press the SETUP button on the control panel, the settings menu will appear. It includes General Setup, Speaker Setup, Dolby Digital Setup, Video Setup and Preference Setup. 2. Press (direction buttons) on the remote control to select a category. 3. All the items in the category will appear on the TV screen.
System Setup 3. Captions You can choose captions on or off on screen during playback. 4. Screen Saver When activated the screen saver automatically works if there has been no operation for a period of time. Speaker Setup 1. Down Mix Select “LT/RT” in DOWNMIX, then the player will output mixed audio in a way prescribed by Dolby. Select “Stereo”, then the player will output a stereo signal. Dolby Digital Setup 1.
System Setup Preference Page 1. Audio, Subtitle, Disc Menu This setting allows you to hear or read subtitles of a DVD in your choice of English, Spanish or French etc. 2. Default Reset Use this function to reset all the settings. 3. Version Displays software version information. NOTE: This menu function is not available while a disc is playing.
Care of Discs How to hold discs When loading or removing discs, try not to touch their playing surfaces. Cleaning Fingerprints or other dirt on the disc may affect sound and picture quality. To clean your discs, use a soft clean cloth to wipe them. If necessary, moisten a soft cloth with diluted neutral detergent to remove heavy dirt or fingerprints. Do not wipe in a circular direction (Concentric scratches in the disc groove tend to cause noise.) Gently wipe from the inside to the outer edge.
About Rechargeable Battery Your portable DVD player comes with a lithium ion rechargeable battery that attaches to the bottom of the player. 1. Under normal working conditions, the battery can be charged and discharged over 300 times. 2. The properties of the rechargeable battery are: 7.4 Volts, interior lithium ionic electric circuit protection for recharge and discharge. 3. If the battery is not used it will automatically discharge gradually within one month. 4.
Carrying Case INSTRUCTIONS FOR ATTACHING YOUR PORTABLE DVD PLAYER CASE IN A VEHICLE Please read and follow these instructions carefully when attaching this case inside your vehicle. For ease of installation, do not place the DVD player into the case until after the case is attached inside the vehicle. CAUTION 1. Do not use this DVD Player Case as a swing, car seat, or for any other purpose except to hold a DVD payer and accessories. 2. The DVD Player Case is intended for viewing only from the rear seats.
To attach the DVD Player Case to a seat back (Photos 1 & 2): 1. 2. 3. 4. 5.
Troubleshooting SYMPTOM WHAT TO CHECK The player cannot play. - make sure the disc cover is closed. - make sure a disc is loaded. - make sure the disc isn’t loaded upside down. - disc should be clean, not dirty or warped. - player’s region code should be the same as region code of DVD disc. - has water condensation occurred? If it has, remove the disc and keep the player powered up for at least two hours. There is no sound. - make sure system connection is correct.
Specifications TFT screen size 7 inches Laser Wavelength Wavelength: 780/650nm Video System NTSC Frequency Response 20Hz~20kHz ±2.5dB Audio Signal-to-noise Rate ≥ 85dB Audio distortion + noise ≤ -70dB (1kHz) Channel Separation ≥ 70dB (1kHz) Dynamic Range ≥ 80dB (1kHz) 0.2 Audio Out Analog Audio Out Out Level: 2V±1.0 , Video Out Video Out Power AC100-240V~50/60Hz Power Consumption <25W Dimension 195.5mm x 143mm x 25mm Weight 1.154kg Out Level:1VP-P±0.
For service, support and warranty information, visit www.polaroidelectronics.com or in the US call 1-866-289-5168, in Canada call 1-866-301-7922 and in Mexico call 01-800-400-2443. “Polaroid” is a registered trademark of Polaroid Corporation of Waltham, MA USA and licensed for use on the PDV-0700K to Petters Consumer Brands, LLC.