4GB Music & Video Player with 4.
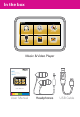
In the box music video photos record browser settings Music & Video Player 4GB Music & Video Player with 4.
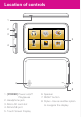
Location of controls 1 2 3 music video photos 5 4 record 6 browser settings Reset 7 8 1. [POWER] Power on/off Play/pause 2. Headphone jack 3. Micro SD card slot 4. Mini-USB port 5. Touch Screen Display 6. Speaker 7. RESET button 8.
Basic operation Charging: 1. Connect the player to your computer using the included USB cable. 2. Charge the battery between 3-5 hours (do not charge for more than 8 hours). PC USB cable Player Turning on/off: Make sure the player is fully charged before turning it on. • To turn the player on/off, press and hold the [POWER] button until the display turns on or off. Power Resetting the player: If the player malfunctions or freezes, you can use the reset function to restart it.
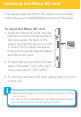
Inserting the Micro SD card The player supports Micro SD cards (not included), which allow you to add additional memory to the player. To insert the Micro SD card: 1. Insert the Micro SD card into the card slot with the metal contacts facing towards the back of the player, and gently push it in until it clicks. Do not apply excessive force, as this may damage the player and Micro SD card. Micro SD 2. To view files on your Micro SD card, select “Browser”, from the main menu and select “SD CARD”. 3.
Transferring media files to the player 1. Find music, picture, or video files on your computer. It is also possible to delete files on the player while connected to the computer. Select the file and press the delete key of the computer’s keyboard.
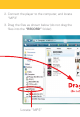
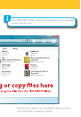
2. Connect the player to the computer, and locate “MP3”. 3. Drag the files as shown below (do not drag the files into the “RECORD” folder).
The “RECORD” folder stores and organizes all your recorded voice memos only. *Screenshots above may be slightly different than your computer’s operating system.
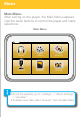
Music Main Menu: After turning on the player, the Main Menu appears. Use the touch buttons to control the player and make selections.
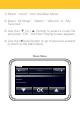
1) Select “music” from the Main Menu. 2) Select ”All Songs”, “Artists”, “Albums” or “My Favorites”. 3) Use the [ ] or [ ] button to select a music file and press “OK”, the Now Playing screen appears. 4) Use the [ back] button to go to previous screens or return to the Main Menu.
Now Playing Screen (music) Artist/Album/Song Elapsed time counter back 00:00 Volume level 25 -03:38 Sade/Soldier of Love Be That Easy Repeat All Repeat mode Previous In Order Next Volume down Play/Pause Repeat Mode: Normal Repeat Repeat All Play all songs once and stop Play current song and repeat Play all songs and repeat Play mode Volume up Play Mode: In Order Shuffle Play songs in order Play songs randomly
Create your own favorite playlist 1) Select your favorite songs and press the “Add to Favorite” button to make a custom playlist. “Add to Favorite” back Add to Favorites Now Playing Album 01 Album 02 Album 03 Album 04 Album 05 2) To listen to songs added to the favorites list, select “My Favorites” from the Music Menu.
Video 1) Select “video” from the Main Menu. 2) Use the [ ] or [ ] button to select a video file and press “OK”. 3) Use the [ back] button to go to previous screens or return to the Main Menu. Video Menu back Movie 01.avi Movie 02.avi Movie 03.avi Video 01.wmv Video 02.
Video Screen Elapsed time Back to counter previous screen back 00:00 -03:38 Play/Pause Volume down Previous Next Volume level 25 Volume up Fullscreen Touch the screen to make the video interface appear or disappear.
Photos 1) Select “photos” from the Main Menu. 2) Use the [ ] or [ ] button to select a photo file and press “OK”. 3) Use the [], [], [] to view the next or previous photo and start/pause the slideshow. Photos Screen back 4) Use the [ Rotate Rotate] button to adjust the image. 5) Use the [ back] button to go to previous screens or return to the Main Menu.
Fullscreen Touch the screen to make the photo interface appear or disappear.
Record To record voice memos, select “record” from the Main Menu. Recorder Screen back Recorder Save recording/ Main Menu 1) Press [ Memos 03:38 / Save recording/ Playback ] to start/pause recording recording. 2) Press the [Memos ] button to save the recording and enter the Memos Screen where you can playback the recorded voice memos. or Press the [ back] button to save the recording and return to the Main Menu. Memos Screen back VREC000.WAV VREC001.WAV VREC002.WAV VREC003.WAV VREC004.
Browser Select “browser” from the Main Menu to view or delete files on the player or Micro SD card (if inserted). Browser (Player) back Player Delete IMG_01.jpg IMG_02.bmp Movie 03.avi Track 01.mp3 Track 02.wmv If a Micro SD card is inserted in the player, the following screen appears - select “SD card” Browser (SD card) back Browser Player SD card Use the [ ] or [ ] button to browse files, and press “OK” to select.
Deleting files on the player or SD card To delete a file, use the [ ] or [ ] button to select, and press the “Delete” button. back Player Delete Delete files IMG_01.jpg IMG_02.bmp Movie 03.avi Track 01.mp3 Track 02.wmv On the “Delete file?” screen that appears, select “YES” to delete the selected file, and return to the Browser Screen. or Select “NO” to return to the Browser Screen.
Settings In the settings menu you can customize various player settings, such as: power usage, language, display settings and more. back Settings Music Settings Display Power Options Language Default Settings Adjust the “Display” and “Power Options” to extend and optimize battery performance.
Legal information FCC Part 15: This equipment has been tested and found to comply with the requirements for a Class B digital device under Part 15 of the Federal Communications Commission (FCC) rules. These requirements are intended to provide reasonable protection against harmful interference in a residential installation.
Troubleshooting Can not power on • The battery may be exhausted, please recharge the battery. Files can not be transferred to the player • Check if the driver is installed correctly in the computer by disconnecting and then reconnecting the player to the computer • Check the connection between the player and PC, and confirm the USB cable is properly connected. No sound from the headphones • Please ensure the volume is turned up, and the headphones are properly connected.
Limited Warranty This Product as supplied and distributed new by AIT, Inc. (“AIT”) to the original consumer purchaser and is warranted by AIT against defects in material and workmanship for a period of one year from your date of purchase (“Warranty”). In the unlikely event that this product is defective, or does not perform properly, you may within one year from your original date of purchase return it to the authorized service center for repair or exchange.