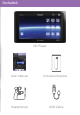
5” Digital Media Player PMP500-4 USER MANUAL Questions? Need some help? This manual will help you enjoy your new product If you still have questions, call our help line: 1-877-768-8483 or email us at: polaroidsupport@ southerntelecom.
Included HD Player User Manual Kickstand bracket Headphones USB Cable
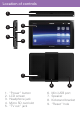
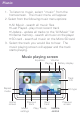
Location of controls 1 3 2 4 5 6 7 8 1. 2. 3. 4. 5. “Power” button LCD screen Headphone jack Micro SD card slot “TV out” jack 6. 7. 8. 9.
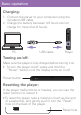
Basic operation Charging: 1. Connect the player to your computer using the included USB cable. 2. Charge the battery between 3-5 hours (do not charge for more than 8 hours). PC USB cable Player Turning on/off: Make sure the player is fully charged before turning it on. • To turn the player on/off, press and hold the “Power” button until the display turns on or off. Power button Resetting the player: If the player malfunctions or freezes, you can use the reset function to restart it.
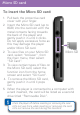
Micro SD card To insert the Micro SD card: 1. Pull back the protective card cover with your finger. 2. Insert the Micro SD card (up to 8GB) into the card slot with the metal contacts facing towards the back of the player and gently push it in until it clicks. Do not apply excessive force as this may damage the player and/or Micro SD card. 2. To view files on your Micro SD Micro SD card, select “browser”, from the main menu, then select “SD Card”. 3.
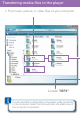
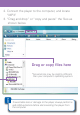
Transfering media files to the player 1. Find music, picture, or video files on your computer. Locate “MP3” It is also possible to delete files on the player while connected to the computer. Select the file and press the delete key of the computer’s keyboard.
2. Connect the player to the computer, and locate “MP3”. 3. “Drag and drop” or “copy and paste” the files as shown below. Drag or copy files here *Screenshots may be slightly different than your computer’s operating system. To avoid data loss or damage to the player, always perform a safe USB extraction before disconnecting the player from the computer.
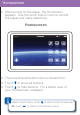
Homescreen 1. After turning on the player, the Homscreen appears. Use the touch button icons to control the player and make selections. Homescreen 2. There are 9 touch button icons to choose from. 3. Touch to show all buttons. 4. Touch to hide buttons. For a better view of your Homescreen wallpaper. When in sub menus, touch Or, touch to return to the homescreen to return to the previous menu.
Music 1. To listen to music, select “music” from the homescreen. The music menu will appear. 2. Select from the following music menu options: • All Music - search all music files • Last Played - play most recent track • Update - update all tracks to the “All Music” list • Internal memory - search all music on the player • SD card - search all music on the Micro SD card 3. Select the track you would like to hear. The music playing screen will appear and the track starts playing.
Music controls 1. 2. 3. 4. 5. 6. Touch the button to pause the track. Touch the button to play the track. Touch the button to skip to the next track. Press and hold the button to fast foward. Touch the button to skip to the previous track Press and hold the button to rewind.
Saving to favorites You can add your favorite tracks to 1 of 5 playlists. 1. While your track is playing touch the button. The music settings menu will open. 2. Select “Favorities”. The playlist menu will open. 3. Choose from 1 of the 5 playlists to save your track to. Playing Favorites 1. To access your favorites playlists, select “music” from the homescreen. 2. Select “All Music”. 3. Select “Favorites” 4. Choose from 1 of the 5 playlists. 5. Choose the track you would like to play. 6.
Video This player supports high defenition video up to 720p. 1. To watch videos, select “video” from the homescreen. The video menu will appear. 2. Select from the following video menu options: • Internal memory - search all videos on the player • SD card - search all videos on the Micro SD card 3. Select the video you would like to watch.
Video controls While a video is playing swipe your finger from the bottom to the top of the screen to access the video controls. 1. 2. 3. 4. 5. 6. Touch the button to pause the video. Touch the button to play the video. Touch the button to skip to the next video. Press and hold the button to fast foward. Touch the button to skip to the previous video. Press and hold the button to rewind.
Volume 1. While video is playing touch the button to open the volume control bar. 2. Touch the button to raise the volume. 3. Touch the button to lower the volume. Volume control bar Resuming video 1. When you play a video that you have viewed earlier but not finished, you will get a message asking if you would like to resume the video. 2. To play the video from the point where it was stopped, select “Resume Playing”. 3.
TV out R AUDIO Video AUDIO L It is possible to watch videos on your TV by using a TV out cable (not included). If you would like to purchase a TV out cable, please contact our customer service department at: 1-877-768-8483 (Toll Free) or by email at cs@southerntelecom.com VIDEO 1. Connect the pin of the TV out cable (not included) to the “TV out” jack on the player. 2. Connect the 3 A/V cables to the corresponding colors of an available input on your TV. 3.
Photos 1. To view photos, select “photos” from the homescreen. The photo menu will appear. 2. Select from the following photo menu options: • Internal memory - search all photos on the player • SD card - search all photos on the Micro SD card 3. Select the photo you would like to view. The photo viewing screen will appear. 4. Slide your finger up on the screen to open the photo control bar.
Photo settings Touch the button to access the photos settings menu where you can choose from the following options: • Slide interval - turn on and set slideshow playback • View - pan, rotate and zoom the picture • Thumbnails - show picture thumbnails on screen • Slideshow - Set slideshow viewing mode • Wallpaper - Set current picture as background Thumbnails 1. While viewing photos, slide your finger on the screen to open the photo controls bar. 2. Press the button. 3. Select “Thumbnails”.
Photo controls 1. While viewing photos, slide your finger on the screen to open the photo controls bar. 2. Press the button. 3. Press the “View” button. The photo viewing screen will appear.
Slideshow 1. While viewing photos, slide your finger on the screen to open the photo controls bar. 2. Press the button. 3. Press the “Slideshow” button. The slideshow option menu will appear. 4. Choose the type of slideshow you would like to view your pictures with. 4. Tap the picture to close the slideshow option menu and return to the photo settings menu. 5. If you would like to change the slideshow interval time, press “Slide interval” and choose a interval option. 6.
ebooks This player supports ebooks in .TXT and .LRC formats. 1. To view ebooks, select “ebook” from the homescreen. The ebook menu will appear. 2. Select from the following ebook menu options: • Internal memory - search all ebooks on the player • SD card - search all ebooks on the Micro SD card 3. Select the ebook you would like to view. The ebook playback screen will appear. 4. Slide your finger on the screen to turn ebook pages.
ebook settings Touch the button to access the ebook settings menu where you can choose from the following options: • Auto pageturn - turn on and set interval time of automatic page turning • Rotate - rotate screen 90 degrees • Add bookmark - bookmark the current page • Open bookmark - revert to bookmarked page • Font size - set screen font size • Font color - set color of font • Backrground - change reading background ebook control bar 1.
Record 1. To record audio files, select “record” from the homescreen. The recording screen will appear. Recording screen Recorind quality Good Quality Recording name 11011.MP3 Volume Battery display Recording format MP3 Recorded file browser Record settings Previous screen Recod status Start / Pause recoding Volume control Record controls 2. Press to start a voice recoding. 3. Press to pause a voice recoding. 4. Press to stop and save a recording. 4.
Record settings 1. While on the recording screen, press to open the record settings menu. 2. Select “Quality” to change the quality of the recording. 3. Choose from the following record quality options: • Good quality - high bitrate • Normal quality - medium bitrate • Poor qualitiy - low bitrate Recorded file browser 1. To listen to recorded voice files, press the button to open the recorded file browser. 2. Select the file you would like to hear. The recording will start playing. 3.
Browser 1. To view files or delete files on the player or micro SD card (if inserted), select “browser” from the homescreen. 2. Select from the following browser menu options: • Internal memory - search all files on the player • SD card - search all files on the Micro SD card 3. Select the file you would like to open. 4. Please refer to the instructions of the media’s file type in this manual for proper media controls. Deleting files 1.
Settings 1. To change various settings and customize the player, select “Settings” from the homescreen. 2. Run your finger up or down on the screen to scroll through various settings options. 3.
Theme & Display Theme 1. To change the wallpaper on the homescreen, select “theme” from the homescreen. The wallpaper will automatically change to the next available option. 2. There are 2 preset wallpapers to choose from. 3. To set your own photo as wallpaper, open the desired photo file, press the button and select “Wallpaper”. Your photo will now be saved as the current wallpaper and one of the available “theme” options. Brightness 1.
Kickstand bracket This player comes equipped with a removable bracket which can function as a kickstand. This can be very useful for veiwing media on a level surface. 1. Snap the bracket into place by sliding its teeth into the grooves located on the top and bottom of the player. 2. Use your thumb or forefinger to pull out the kickstand.
Safety precautions to prevent fire or shock hazard, do not use the plug with an extension cord, receptacle or other outlet unless the blades can be fully inserted to prevent blade exposure. to reduce the risk of fire or electric shock, do not expose this appliance to rain or moisture. to prevent electrical shock, match wide blade plug to wide slot, fully insert.
Legal information FCC Part 15: This equipment has been tested and found to comply with the requirements for a Class B digital device under Part 15 of the Federal Communications Commission (FCC) rules. These requirements are intended to provide reasonable protection against harmful interference in a residential installation.
PLR IP Holdings, LLC, its licensees and affiliates, fully support all electronic waste initiatives. As responsible stewards of the environment, and to avoid violating established laws, you should properly dispose of this product in compliance with all applicable regulations, directives or other governances in the area where you reside. Please check with local authorities or the retailer where you purchased this product to determine a location where you can appropriately dispose of the product.
Limited Warranty This Product as supplied and distributed new by AIT, Inc. (“AIT”) to the original consumer purchaser is warranted by AIT against defects in material and workmanship for a period of one year from your date of purchase (“Warranty”). In the unlikely event that this product is defective, or does not perform properly, you may within one year from your original date of purchase return it to the authorized service center for repair or exchange.