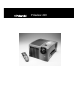
Polaview 220
FCC Statement Warning: This equipment generates, uses and can radiate radio frequency energy and, if not installed and used in accordance with the instruction manual, may cause interference to radio communications. It has been tested and found to comply with limits for a Class “A” computing device pursuant to Subpart B of Part 15 of the FCC Rules, which are designed to provide reasonable protection against such interference when operated in a commercial environment.
Table of contents 1 Introduction What’s in the box? 2 Computer/video compatibility 3 Quick start 4 2 Detailed setup Your Polaview Model 220 Projector 7 Getting started 9 Connector panel 10 Computer and VCR connections 11 Supplying power to the projector 15 3 Using the projector Turning on the projector and lamp 17 Control-panel keys 20 Using the remote control 23 Using the remote control 24 Image optimization 25
ii Table of contents 4 Maintenance Storage, cleaning and care 29 Replacing the lamp 30 5 Troubleshooting Troubleshooting guide 33 Where to get help 34 Polaroid Offices and Service Centers 35 One Year Warranty 37 Appendix A: Parts 39 Appendix B: Standards 41
1 Introduction Thank you for purchasing the Polaview Model 220 Digital Light Processing (DLP) Projector, one of an innovative line of advanced presentation products from Polaroid. Your Polaview Model 220 Projector is a valuable presentation tool that can project images from a computer or video source onto a large screen or wall, in a range of 16.7 million true, saturated colors with unprecedented image quality.
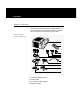
2 Introduction What’s in the box? The Polaview Model 220 Projector is shipped with the following accessories. See Appendix A: Parts for a complete list of accessories and corresponding part numbers.
Introduction 3 e Mac monitor redrive f VGA/Mac II reversible cable g 1/8 in. phono-to-RCA adapter cable h 1/8 in.
4 Introduction Quick start The following steps outline the basic setup procedure for connecting the projector to your computer. Detailed information about connections for various computer sources is described in Chapter 3, Detailed setup. 1 Aiming the projector lens at the projection screen, place the projector on a solid, flat surface, at a right angle (perpendicular) to the projection screen and parallel to the floor. Place the projector the proper distance from your viewing screen.
Introduction 5 4 To supply power to the projector, connect the power cable to the power port on the rear panel of the projector. Then connect the power cord to an appropriate power outlet. Turn on the power switch located on the rear panel of the projector, beside the power port. After approximately 30 seconds after the power is on, a solid-colored image is projected onto your screen. Note: You may detect a high-pitched sound as the colorwheel and fans are reaching operating speed.
6 Introduction Note: Whenever you connect the projector to a computer or video source for the first time, the projector defaults to the factory settings. Due to operational differences between computers and video sources, it may be necessary to make minor adjustments to the settings. See Image optimization in Chapter 4, Using the projector for more information. The projector stores any modified settings, even when the power is turned off.
2 Detailed setup Your Polaview Model 220 Projector This chapter describes setup procedures for connecting your Polaview Model 220 Projector to a compatible computer. It also provides instructions on how to set up the projector for use with various video sources. Before you begin, examine the components of the projector.
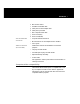
8 Detailed setup The Polaroid Polaview Model 220 Projector – rear view g SOURCE 1 L R SOURCE 2 L R SOURCE 3 STEREO MAC / PC VIDEO INPUTS SOURCE 4 STEREO PC / MAC OUTPUTS STEREO L REDRIVE COMPUTER INPUTS R RS 232 h i j g Connector panel h Green LED power indicator i AC power switch j Power-cord receptacle
Detailed setup 9 Getting started Positioning the projector Place the projector on a solid, flat surface at a right angle (perpendicular) to the projection screen and parallel to the floor. If you use a media cart, make sure the wheels are locked to prevent it from moving. Opening the casing of your projector could damage the components inside and will void your warranty. Dropping or mishandling the projector can damage the optical path.
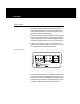
10 Detailed setup Connector panel All connections between the projector and your computer or video source are made on the rear connector panel. The connector panel SOURCE 1 L R SOURCE 2 L R VIDEO INPUTS SOURCE 3 SOURCE 4 STEREO STEREO MAC / PC PC / MAC OUTPUTS STEREO REDRIVE L R RS 232 COMPUTER INPUTS Input: 120/230V~ 60/50Hz,5.0/2.5A CAUTION ! For continued protection against the risk of fire, replace only with the same type and rating of fuse.
Detailed setup 11 Computer and VCR connections Connecting IBM PCs and compatibles Place the projector on a tabletop or other level surface with the lens facing the projection screen. 1 Connect your computer to the projector with the VGA/Mac II reversible cable (part number CA18). Plug the end labeled “To VGA” into the monitor port of your computer. Plug the other end into the “PC/MAC” port of the projector (see the illustration below).
12 Detailed setup Connecting Mac II, Quadra, LC, and Powerbook and compatibles Place the projector on a tabletop or other level surface with the lens facing the projection screen. 1 Connect your computer to the projector with the VGA/Mac II reversible cable (part number CA18). Plug the end labeled “To Mac” into the computer monitor port. Plug the end labeled “To VGA” into the projector “MAC/PC” port (see the illustration below).
Detailed setup 13 NTSC/PAL/SECAM video connections Place the projector on a tabletop or other level surface with the lens facing the projection screen. 1 Connect one of the yellow RCA composite video cable (part number CA19) plugs into the VIDEO OUT jack of your video source. Connect the yellow plug at the other end of the cable to either of the SOURCE 1 or SOURCE 2 videoinput composite jacks (yellow) on the projector connector panel (see the illustration below).
14 Detailed setup 3 Connect the white RCA audio-video cable plug to the AUDIO L (left) jack of your audio source. Then connect the white plug at the projector end of the cable to a white audio jack (either SOURCE 1 or SOURCE 2 L) on the projector rear panel.
Detailed setup 15 Supplying power to the projector After you connect the projector to your computer or video source, connect the power cord to the projector. The powercord receptacle and AC power switch are located below the connector panel on the rear side of the projector. Power receptacle and AC power switch VIDEO INPUTS a Input: 120/230V~ 60/50Hz,5.0/2.
3 Using the projector Turning on the projector Turn on the power switch located on the rear panel of the projector, beside the power port. After approximately 30 seconds after the power is on, a solid blue image is projected onto your screen. Whenever the power is on, the green LED power indicator on the rear panel of the projector glows a steady green. Note: You can detect a high-pitched sound as the colorwheel and fans are reaching operating speed.
18 Using the projector Focusing and zooming the image Focus the projected image with the FOCUS control either on the control panel or remote control. Adjust the image size by using the ZOOM control on the control panel or remote control. Keystone correction A keystone correction of 17 degrees is built into the projector to compensate for image distortion. You may want to adjust the rear feet of the projector to position the image on the screen. Image size The projector 20–30mm (1.
Using the projector 19 Control-panel keys The control-panel keys are used to adjust the projected image and to display and hide the menus. Control-panel keys IMAGE SOUND SET UP ENTER ENTER – MUTE VOLUME + CURTAIN – ZOOM + POSITION – FOCUS + – PICTURE + SOURCES 1 2 3 4 LAMP Key Function IMAGE Provides access to menus for control of brightness, contrast, tint, phase, and sharpness of the projected image.
20 Using the projector Key Function ENTER L & R Nonfunctional keys, reserved for future product development. Cursor pad Controls on-screen menus and increases or decreases setting levels. MUTE Turns the audio on or off. CURTAIN Toggles between a displayed image and a blank blue screen. POSITION Allows positioning of the displayed image, when used with the cursor pad. VOLUME +/- Decreases or increases the volume. ZOOM +/- Zooms in and out. Press + to make the picture larger.
Using the projector 21 Standby mode Use the Standby mode to prolong the life of the projector lamp. When you select the Standby mode by pressing the LAMP key, the green LED power indicator on the rear panel of the projector begins to blink and continues to do so for 3 minutes, to allow the projector to cool down. The projector must complete this 3-minute cool-down period before it can resume normal operation. The green LED resumes its normal steady glow at the end of 3 minutes.
22 Using the projector The remote control a h SET b c SOU IM UP i ND ENT AGE ER ENT LA ER d – MUT VOL E IN P + ZOO – IO OSIT N k l m n + UME – TA CUR e j SER M FOC US + PICT – + URE SOU RCE 44 S 22 11 o 33 LAM P f p g Key Function a Laser pointer Serves as a pointing device. b SOUND Controls the volume, balance, treble, and bass of the source connected to the projector.
Using the projector 23 Key Function h SET UP Controls front, rear, table-top, ceiling-mount modes of projection; language; factory-setting defaults; and video mode. i ENTER L & R Performs previous or next functions, when used with the computer IR receiver kit. j Cursor pad Controls on-screen menus and increases or decreases setting levels. k VOLUME +/- Decreases or increases the volume. l ZOOM +/- Zooms in and out. Press + to make the picture larger. Press - to make the picture smaller.
24 Using the projector Menu selections IMAGE menu SOUND menu Select the IMAGE menu to control the brightness, contrast, tint, phase, and sharpness of the projected picture. Option What it does BRIGHTNESS Increases or decreases the intensity level of the projected image. CONTRAST Adjusts the contrast of the projected image. TINT Adjusts the red or green color balance of the projected image. SHARPNESS Eliminates horizontal disturbance from the computer video signal.
Using the projector 25 SETUP menu Select the SETUP menu to make adjustments to the following settings: Option What it does PROJECTION (FRONT/REAR) Selects the projected display orientation for front or rear projection mode. LOCATION (TABLE/CEILING) Inverts the projected image orientation for use with a ceiling mount. LANGUAGE Converts the on-screen menus from English to French, German, Spanish. FACTORY SETTINGS Resets all adjustments to the factory-default settings.
26 Using the projector Image optimization Making adjustments to settings Use the projector SETUP and IMAGE menus to adjust the settings to fine-tune your projected image. Your projector factory-default settings are designed to configure it with your computer and video sources automatically to provide a high-quality projected image. Because of operational differences between the projector and computer and video sources, you may want to make minor setting adjustments to optimize your displayed image.
Using the projector 27 Eliminating horizontal noise Examine the projected image for horizontal noise bars or jittering around text or icons. Use the SHARPNESS option to eliminate them: 1 From the projector control panel or remote control, press the IMAGE menu key. 2 Using the cursor pad, scroll through the menu selections and highlight SHARPNESS on the on-screen menu display. 3 Use the left (<) or right arrow (>) key on the cursor pad to eliminate the horizontal noise bars.
28 Using the projector True-to-life color rendition Examine the projected image for true-to-life color rendition. Use the TINT option to make the adjustments: 1 From the projector control panel or remote control, press the IMAGE menu key. 2 Using the cursor pad, scroll through the menu selections and highlight TINT on the on-screen menu display. 3 Use the left (<) and right (>) arrow keys on the cursor pad to adjust the color balance of the projected image.
4 Maintenance Storage, cleaning and care Store the Polaview Model 220 Projector either in its original shipping container or carrying case to guard it against dust and lint. Use a non-abrasive, lint-free cloth and non-abrasive cleaning solution, such as an eyeglass or camera-lens cleaning solution, on the lens to keep it clean. Spray the cleaning solution directly on the cleaning cloth, never on the lens.
30 Maintenance Replacing the lamp assembly When you notice that the output from the projector lamp starts to weaken, you need to replace the lamp assembly (part number 623374). Caution: Replace the lamp assembly at the first sign of the bulb weakening. Do not wait for bulb to burn out as it is possible for the failing bulb to burst. 1 Turn off the projector. 2 Unplug the projector power cord from the wall socket and from the power receptacle.
Maintenance 31 Remove the lamp assembly Unlock the lamp assembly by rotating the locking key on the right side of the lamp assembly counter-clockwise onehalf revolution. Grasp the wire handle and gently pull the lamp assembly straight out of the unit. Replace the lamp assembly Align the lamp-assembly slide rails with the slide-rail channels inside the projector and gently slide the lamp assembly into the projector.
5 Troubleshooting Troubleshooting guide Symptom Cause Solution Projector does not turn on; no lights or fan Lamp-assembly door not closed correctly Refer to lamp assembly replacement procedure and verify proper installation No power to unit Try another electrical outlet Blown input power fuse(s) Call Polaroid Technical Support Vertical bars appear across the image Nonstandard computer clock rate Press the IMAGE key and scroll to PHASE; press < > cursor keys to remove the bars Image is upside d
34 Troubleshooting Symptom Cause Solution Solid-color screen is displayed Projector is initializing If screen is displayed for more than 15 seconds, press a source button associated with an active source Lamp does not light, green LED on rear control panel is flashing Unit is in Standby mode and bulb-restrike timer has not elapsed Wait approximately 3 minutes, if bulb does not light press the LAMP key Image is not in color Incorrect computer video Reboot your computer No projected image Improp
Troubleshooting 35 Polaroid Offices and Service Centers Australia Polaroid Australia Pty. Ltd. 13–15 Lyonpark Road P.O. Box 163 North Ryde, N.S.W. 2113 Tel.: (02) 9 950 7000 Fax: (02) 887 2209 Belgique/België Polaroid (Belgium) N.V.–S.A. Rue Colonel Bourg 111 Kolonel Bourgstraat 111 1140 Bruxelles–1140 Brussel Tel.: 32 2 702 86 20 Fax: 32 2 726 92 99 Toll free: 32 78 155 905 Brasil Polaroid do Brasil Ltda. Av. Paulista, 1776–11º andar Cerqueira Cesar São Paulo–Capital 01310-921 Tel.: 55.11.285.
36 Troubleshooting New Zealand Polaroid New Zealand Ltd. Camera Services 24-26 Anzac Avenue Auckland Tel.: (09) 377 3773 Norge Polaroid (Norge) A/S Industriveien 8B, 1473 Skårer Postboks 80, 1471 Skårer Tlf: 67 90 47 10 Fax: 67 90 51 73 Österreich Polaroid Ges.m.b.H. Eitnergasse 5A 1231 Wien Tel.: 869 86 27 Fax: 869 81 00 Portugal Polaroid (España) S.A. Sucursal em Portugal Edificio Monumental Avenida Praia da Vitória, 71-A 4º B 1050 Lisboa Tel.: (01) 316.10.
Troubleshooting 37 One Year Warranty Polaroid Corporation warrants your Polaview Projector equipment against defects in manufacture for a period of one year from the date of purchase. To verify the warranty period, you should keep the sales slip or other proof of the purchase date.
38 Maintenance SOME STATES DO NOT ALLOW THE EXCLUSION OR LIMITATION OF INCIDENTAL OR CONSEQUENTIAL DAMAGES OR THE DURATION OF IMPLIED WARRANTIES SO THE ABOVE LIMITATIONS MAY NOT APPLY TO YOU. THIS WARRANTY GIVES YOU SPECIFIC LEGAL RIGHTS, AND YOU MAY ALSO HAVE OTHER RIGHTS WHICH MAY VARY FROM STATE TO STATE. Outside the U.S.A. and Canada THIS WARRANTY EXCLUDES ALL INCIDENTAL AND CONSEQUENTIAL DAMAGES AND DOES NOT AFFECT YOUR STATUTORY RIGHTS.
Appendix A: Parts Listed below are all standard accessories available from Polaroid for use with the Polaview Model 220 Projector. These standard items are shipped with each model. The appropriate Polaroid part number is listed with each item. Replacement product Part No. Instruction manual OG45 US power cord or EC and UK power cord PC01 or PC02 and 03 Mac monitor redrive adapter AD06 Mac multiscan redrive adapter AD08 VGA/Mac adapter AD07 Phono -to-RCA adapter cable CA26 1/8 in.
40 Appendix A You can order accessories and replacement parts through your local dealer or by contacting Polaroid (see pages 35 and 36).
Appendix B: Standards The Polaview 220 Model Projector is compatible with the following computer and video sources: Source Resolution Mac 12 in. 512 x 384 (60, 60.15hz) VGA Text 720 x 400 (70hz) VGA Hi Res Graphics 640 x 480 (60, 72, 75hz) VGA Lo Res Graphics 640 x 400 (70) Mac II, Quadra, LC, Powerbook 640 x 480 (60, 66.67hz) NEC PC 98011 640 x 400 (56.4 hz) VESA 640 x 480 (72hz) VDMT 640 x 480 (75hz) SVGA 800 x 600 (56-75hz) Mac 16 in. monitor 832 x 624 (75hz) NTSC 3.
“Polaroid” and “Polaview” are trademarks of Polaroid Corporation, Cambridge, MA, U.S.A. Inc. “Digital Light Processing” and “DLP” are trademarks of Texas Instruments. “Apple” and “Macintosh” are registered trademarks of Apple Computer, Inc. “IBM” is a registered trademark of International Business Machines, Inc. Other trademarks may be the property of their respective owners. U.S. patent numbers 4,763,993, 4,976,536, 5,153,621, and 5,150,238 apply to the Polaview Model 220. Other U.S.