7” Swivel Screen Portable DVD Player PDM-0743M Operation Manual 20060620
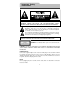
Important Safety Instructions CAUTION: TO REDUCE THE RISK OF ELECTRIC SHOCK, DO NOT REMOVE COVER (OR BACK). NO USE-SERVICEABLE PARTS INSIDE. REFER SERVICING TO QUALIFIED SERVICE PERSONNEL. The lightning flash with arrowhead symbol, within an equilateral triangle, is intended to alert the user to the presence of uninsulated “dangerous voltage” within the product’s enclosure that may be of sufficient magnitude to constitute a risk of electric to persons.
Important Safety Instructions CAUTION: These servicing instructions are for use by qualified service personnel only. To reduce the risk of electric shock, do not perform any servicing other than that contained in the operating instructions unless you are qualified to do so. Refer to service manual for servicing instructions. 1) 2) 3) 4) 5) 6) 7) 8) 9) 10) 11) 12) 13) 14) 15) Read these instructions. Keep these instructions. Heed all warnings. Follow all instructions. Do not use near water.
Important Safety Instructions Copyright Protection This product incorporates copyright protection technology that is protected by U.S. patents and other intellectual property rights. Use of this copyright protection technology must be authorized by Macrovision, and is intended for home and other limited viewing uses only unless otherwise authorized by Macrovision. Reverse engineering or disassembly is prohibited. IMPORTANT FOR LASER PRODUCTS 1. CLASS 1 LASER PRODUCT 2.
Features High-quality audio and video AV input: External Audio, Video input can be connected to most external AV sources. AV Output: Analog audio output can be connected to external amplifier. Excellent sound: Dolby Digital Decoder delivers great sound. Advanced Playing Functions Compatibility: Compatible DVD, CD and JPEG discs, etc. On-Screen Display: You can choose from multiple languages for the On-Screen Display language.
Accessories Accessories List ITEM NAME QTY Remote Control (with battery) 1 Power Supply Cord with AC Adapter 1 Rechargeable Battery Pack 1 DC Adapter (Car Adapter) 1 Audio/Video Cable 1 Earphone 1 Bag 1 Operation Manual 1 NOTE: Accessories and their parts numbers are subject to change without prior notice.
Contents Important Safety Instructions ……………………………………………..2 Features ………………………………………….….5 Accessories ………………………………………….….6 View of Front Panel ………………………………………..…...8 View of Side Panels …………………………………….… ….10 View of Bottom Panel …………………………………………....11 Revolving LCD Screen …………………………………………....12 Remote Control …………………………………………....13 System Connections ……………………………………..……..16 Power Supply Preparation …………………………………..………..18 Rechargeable Battery ………………………………………..…..
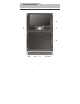
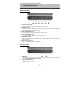
View of Front Panel 8
View of Front Panel 1. 2. 3. 4. 5. 6. 7. 8. 9. 10. 11. 12. 13. 14. 15. 16. 17. LCD screen / /+ Button : Press to select different items. : Press to pause the playback. +: Press the Mode button and then press this button to increase the level of brightness, contrast and color. / /- Button : Press to select different items. : Press to stop playback. Then press the (PLAY) button to resume playback from the stopped spot. Press this button twice to stop playback completely.
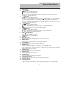
View of Side Panels Right Side View 1. Volume Control knob Used to adjust the volume of the headphone and speaker. 2. Headphone Jack Used to connect to headphones for private listening. When headphone is plugged, the speakers will turn off automatically. 3. Audio Input/Output Jack For connecting to an external amplifier or audio source. 4. Video Input/Output Jack for connecting to an external monitor or video source. 5. AV IN/OUT Switch Switch to “IN” to input external Audio/Video signal.
View of Bottom Panel 1. Rechargeable Battery Contacts For connecting the rechargeable battery pack.
Revolving LCD Screen Revolving Steps The revolving LCD screen is one of the outstanding features about this product. We’d like to suggest you to take the following steps for proper operation. 1. Open the screen cover to position (A) as shown in left figure at which the screen is vertical to the operation panel. Pos. A 2. Revolving the screen horizontally about it’s axis in the clockwise only. The maximum revolving degree is 180 (position C).
Remote Control 1. 2. 3. 4. 5. 6. MUTE button Press to turn off or on the speaker output. INFO button Press repeatedly to display or cancel the detailed information of the disc during playback. TITLE button Press to display title menu if it exits in the disc. Direction button Press to select different options. ENTER button Press to access playback or confirm your selection. SETUP button Press to enter the player’s setup menu.
Remote Control 7. 8. 9. 10. 11. 12. 13. 14. 15. 16. 17. 18. 19. 20. 21. 22. 23. 24. 0-9 number buttons Select numbers by pressing these buttons. NEXT button Press to skip to the next list, track or chapter. PREV button Press to return to the previous list, track or chapter. SUBT button When playing a DVD coded with multi-subtitles, press to select a subtitle language or to turn subtitles off. ANGLE button Press to access various camera angles if the DVD disc contains multiple camera angles.
Remote Control Preparation of Remote Control Follow the steps below to install the battery. 1. Pull the battery holder out from the remote control in the direction of the arrow. 2. Load a new battery properly with the (+) sided up. 3. Insert the battery holder back into the remote control. Battery type: CR2025 3V Battery service life: approximately 1 year under normal use (at room temperature).
System Connections z z Always ensure that the DVD player, TV and any other electrical equipment to be connected with are switched off and unplugged from the power supply. Ensure that you observe the color coding when connecting audio and video cables. Connecting to TV Follow the drawing below to connect the DVD player to TV's Audio/Video input with Audio/Video cable. Connecting to An Amplifier Refer to your audio equipment's manual before connection.
System Connections Connecting to External AV Source The player supports an AV signal input function. Use the audio/video cable to connect the unit to an external AV signal source such as a DVD, VCR etc. After connecting, switch the DVD/AV IN to AV IN. NOTE: Noise may occur in speakers when there is an external audio signal input while playing a DVD disc. Unplug the audio cord to clear the noise. Connecting to the Headphones Connect the headphones to the headphone jack on either side of the player.
Power Supply Preparation Using the AC Adapter The player is supplied with an AC adapter for powering the unit and charging the battery. 1. Connect AC adapter to the left side of the DVD player in the jack marked DC 9.5/12V IN as shown on the right. 2. Plug the two-prong end of the power cord into a grounded electrical outlet. The power indicator lights red. Note: 1. Turn player's power off before unplugging. 2.
Rechargeable Battery About Rechargeable Battery Pack Your portable DVD player comes with a lithium ion rechargeable battery that attaches to the bottom of the DVD player. Charge the battery fully before initial use. Charging time is normally about 5 hours. A fully charged battery delivers about 3 hours of use but playing time varies from disc to disc. If the battery will not be used for a long period of time, charge the battery fully before storage.
Rechargeable Battery Attaching the Battery Pack Refer to the following steps for attaching the Battery Pack: 1. With one hand on the DVD Player to prevent it from moving, take the battery and align the plastic tabs on the battery pack with holes on the player, and push the battery pack into the DVD Player. 2. Slide the Battery Pack until you hear it click and lock into place.
Rechargeable Battery Detaching the Battery Pack When being turned off, the DVD Player still consumes some power in standby mode. This will eventually discharge the battery. If the DVD Player is not going to be used for long periods of time, the battery pack should be detached. Make sure the power is turned off before detaching the Battery Pack. 1. Press and hold the Battery Release Tab in the direction of the arrow ① as shown in Fig.1 below. 2.
Notes on Discs Compatible Disc Formats DISC LOGO DIAMETER 12cm DVD 8cm PLAYBACK TIME/ PLAYABLE SIDES 133 min (SS-SL) 242 min (SS-DL) 266 min (DS-SL) 484 min (DS-DL) 41 min (SS-SL) 75 min (SS-DL) 82 min (DS-SL) 150 min (DS-DL) 12cm 74 min 8cm 20 min CD JPEG 12cm Operation methods of some DVD discs are specified by the software manufacturer. Please follow the instructions of the disc.
Playback Operation PLEASE READ THE FOLLOWING INSTRUCTIONS CAREFULLY BEFORE USING YOUR DVD PLAYER FOR THE FIRST TIME. WARNING: Do not play poor quality discs to avoid damaging the lens. Pre-operation 1. 2. 3. 5. 6. Connect the unit to power supply through the provided AC adaptor. Switch “POWER ON/OFF” to “ON” to turn on the DVD player. Push the OPEN switch on the unit to open the disc tray cover. Put a disc in the disc tray with printed side up. Close the disc cover. (See below) 4.
Playback Operation DVD Playback ENTER/ENT button PAUSE/ button STOP/ button Load a disc in, the player will search the disc and play it automatically. Press the direction buttons ( ) to highlight the item that you want to play and press the ENTER/ENT button to confirm. Press the PAUSE/ button to pause during playback and press the PLAY/ (PLAY) button to resume normal playback.
Playback Operation DVD Playback (continued) & buttons Press the button to go to the previous chapter. Press the button to play the next chapter. & buttons Press the / button (and hold it for several seconds) to start fast forward/rewind playback. Press it (and hold it for several seconds) repeatedly to fast forward/rewind at the speed of 2X, 4X, 8X, 16X, 32X and normal in sequence. Press the PLAY/ (PLAY) button to return to normal playback.
Playback Operation DVD Playback (continued) INFO button AUDIO button SUBT button Press to display or cancel the detailed information of the disc during playback. DVD discs can contain up to 8 audio bit streams. For example: English, French etc. To select the audio bit stream you prefer, press AUDIO button during playback. The DVD player will play the next audio bit stream every time you press the AUDIO button in succession.
Playback Operation CD Playback PAUSE/ button Press the PAUSE/ button to pause during playback. Press the PLAY/ (PLAY) button to resume normal playback. STOP/ button During playback, press the STOP/ button once to stop and then press the PLAY/ (PLAY) button to resume normal playback from the place where the STOP/ button is pressed. Press the STOP/ button twice repeatedly to stop playback completely. & buttons Press the / button (and hold it for several seconds) to play fast forward/rewind.
Playback Operation JPEG Playback Pre-operation 1. Load a JPEG in the disc tray, and the player will search and play disc automatically. 2.The screen displays the root folder with several subdirectories/subfolders. Use the , buttons to select desired folder. Then press the ENTER/ENT or PLAY/ (PLAY) button to confirm your selection. 3.The screen enters the selected subfolder with several files. Use the , buttons to select desired file.
Playback Operation JPEG Playback (continued) GOTO button During playback, press the GOTO button to select the desired file. Press the 0-9 buttons directly to select according to your preference. REPEAT Function Under folder status, press the button to enter REPEAT setup. Then press the ENTER/ENT button repeatedly to set the repeat mode and the screen will display as follows in sequence: DISC NORMAL DISC REPEAT SHUFFLE SINGLE TRACK REPEAT TRACK FOLDER NORMAL FOLDER REPEAT Press the button to exit.
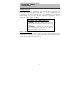
System Setup You can change the default settings of this unit to customize its performance to your own preference. Read this section to learn how to set up the system. Note: the system should better be set up in the state that no disc is in the DVD drive or the unit is on the stop mode. Follow the steps below to set up your system: 1. Press the SETUP button. 2. The setup menu will appear on the screen.
System Setup General Setup Page 2.Angle Mark This item is used to turn the Angle Mark on or off. Press the or button to highlight this item. Press the ENT or to enter the item. Press the or button to choose angle mark on or off. Press the ENT button to confirm your selection. Press the direction to exit this item. 3.OSD Language This item is used to set the OSD (on-screen display) language. Press the or button to highlight this item. Press the ENT or to enter the setup of this item.
System Setup Speaker Setup Page The item included in this sub-menu is shown as the left. 1.Downmix This item is used to set downmix mode. Press the or button to highlight this item. Press the ENT or to enter the item. It includes Lt/Rt and stereo, stereo by default. Note: The function of Lt/Rt is to output mixed audio in the format provided by Dolby. The function of stereo is to output stereo signal. Press the or button to choose the proper one. Press the ENT button to confirm your selection.
System Setup Dolby Digital Setup 2.Dynamic This item is used to adjust linear dynamic compression rate to get different signal compression Effects. Press the or button to highlight this item. Press the ENT or to enter the setup of this item. Then the item will show as the left. Press the or to choose the proper level. Press the ENT button to confirm your selection. Press the direction button to exit this item. Video Setup Page The items included in this sub-menu are shown as the left. 1.
System Setup Video Setup Page 3. Contrast This item is used to adjust contrast level of the Screen. Press the or button to highlight this item. Press the ENT or to enter the item. Press the or button to adjust to desired level. The default level is 00. Press the ENT button to confirm your selection. Preference Page The items included in this sub-menu are shown as the left. NOTE: This sub-title can only appear in the state that no disc is in the DVD player. 1.
System Setup 2. Subtitle This item is used to set the language of subtitle. Press the or button to highlight this item. Press the ENTER or button to enter the setup of this item. The available languages are French, Spanish, etc. Press the or button to choose the preferred Language. Press the ENTER button to confirm your selection. 3. Disc Menu This item is used to set the language of disc menu. Press the or button to highlight this item.
Definitions Letterbox screen This refers to a screen on which the playback picture of wide-screen DVDs appears with black bands running along the top and bottom. Pan & Scan screen This refers to a screen on which the playback picture of wide-screen DVDs is cut off at the left and right sides. Title, Chapter (DVD) DVDs are divided into some large sections (titles) or some small sections (chapters). Each section is numbered: these numbers are called Title number or Chapter number.
Troubleshooting If you suspect there is something wrong with the DVD player, immediately turn the power off. Disconnect the power connector and check that there is no smoke or excessive heat coming from the unit. Never open or try to repair the unit yourself. There are no user serviceable parts inside. PROBLEM The player cannot play. POSSIBLE SOLUTION POSSIBLE CAUSE The disc cover may not be closed. Close the disc cover. There may be no discs in the DVD drive. Put a disc in to the DVD drive.
Troubleshooting PROBLEM There is no picture. Poor AV performance. The remote control does not work POSSIBLE CAUSE POSSIBLE SOLUTION The LCD may be not in correct video mode. Choose the correct video mode. The system connection may be not correct. Connect correctly. The unit may be not in AV out mode. Switch AV IN/OUT on the right panel to OUT. The disc may be dirty or warped. Clean or change the disc. There may be some obstructions between the remote control and the player.
Specifications TFT screen size 7 inches (16:9) Screen resolution 480x234 Laser Wavelength 780/650nm Video System NTSC Frequency Response 20Hz-20kHz Audio Signal-to-noise Rate ≥85dB Audio distortion + noise ≤ -70dB Channel Separation ≥70dB (1kHz) Dynamic Range ≥80dB (1kHz) Audio Out Out Level 2V±0.2 1.0 , Load 10kΩ Video Out ±2.5dB (1kHz) Out Level 1VP-P±0.2, Load 75Ω Unbalanced Negative Power AC100~240V(50/60Hz) Dimensions 202mm x 150mm x 40mm Weight Approximate 0.
For service, support and warranty information, visit www.polaroid.com or in the US call 1-866-289-5168 or in Canada call 1-866-301-7922. "Polaroid" and “Polaroid and Pixel” are trademarks of Polaroid Corporation, Waltham, MA, USA.