x530 Digital Camera User Guide www.polaroid-digital.
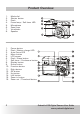
Product Overview 1. 2. 3. 4. 5. 6. 7. 8. Mode dial Shutter button Flash Focus lamp / Self-timer LED Microphone Zoom lens Viewfinder Speaker 1. 2. 3. 4. 5. 6. 7. 8. 9. 10. 11. 12. 13. 14. 15. 16. Power button Flash / Battery charge LED Auto-Focus LED Menu button LCD screen Flash / Erase button Self-timer / Continuous button Display button Down button Function button Right button OK button Up button Left button Zoom in button Zoom out / Thumbnail button 2 Polaroid x530 Digital Camera User Guide www.
1. 2. 3. 4. USB port TV OUT socket DC IN jack Neck strap holder 1. 2. Battery / SD card door Tripod mount 1. 2. 3. Status LED SD card slot USB port CA RD RE AD ER Polaroid x530 Digital Camera User Guide www.polaroid-digital.
Table of Contents 1 Getting Started ...................................................................... 7 • • • • • • • • Camera Package Contents......................................................... 8 Attaching the Neck Strap .......................................................... 9 Installing and Removing the Battery............................................ 9 Connecting the AC Adaptor (Included) ...................................... 10 Charging the Battery ...................................
• • • • Changing the ISO Speed ......................................................... 49 Setting White Balance for Pictures ........................................... 50 Setting Photo Effect ............................................................... 51 Setting Light Metering ............................................................ 52 4 Recording Video Clips ........................................................... 53 • • • • Recording Video Clips............................................
10 Getting Help ...................................................................... 81 • • • Polaroid-digital Online Services ................................................ 81 Card Reader Help ................................................................... 81 ArcSoft Software Help............................................................ 81 11 Appendix........................................................................... 82 • • • • • • • • 6 Technical Specifications......................
1 Getting Started Designed as the flagship of the Polaroid products, the x530 digital camera has a Foveon X3 direct image sensor, 2.0 inch colour LCD for reviewing images, and a host of pre-set controls. Working with the Foveon X3 Fill Light scenerecognition technology, the x530 is the perfect camera for the photographer looking for point & shoot simplicity with excellent performance. This camera features: • Glass lens system for exposure from 0.
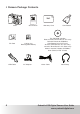
• Camera Package Contents x530 First Class Postage Required Post Office will not deliver without proper postage Digital Imaging Products 201 Burlington Road Bedford, MA 01730-1434 CA R DR EA DE R Quick Start Guide Guide de Démarrage rapide Schnellanleitung Guida Rapida Guía Rápida de Inicio Guia de Início Rápido ML 0904 Part no.
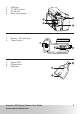
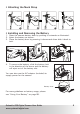
• Attaching the Neck Strap AUTO AUTO AUTO AUTO • Installing and Removing the Battery 1. Open the camera battery door by pushing it outwards as illustrated. 2. Insert the battery as shown. 3. Close the battery door by pressing it downwards then slide it back to lock. 4. To remove the battery, slide the battery lock in the direction of the arrow and the battery will eject out of the battery slot. You can also use the AC adaptor (included) to supply power for the camera.
• Connecting the AC Adaptor (Included) Turn off the camera before connecting or disconnecting the adaptor. Connect the adaptor as shown to power the camera and charge the battery from a household power outlet. The camera will automatically switch over to AC adaptor powered operation when connected. The AC adaptor can be used with or without the battery in place. IMPORTANT! • Only use the included adaptor.
• Using the SD (Secure Digital) Card Your camera comes with a 32MB external SD memory card for storing pictures and video clips. You can expand the memory using a commercially available SD card. The camera automatically detects whether a memory card is inserted, and saves pictures and video clips accordingly. Memory Card Precautions 1. Use only an SD memory card with this camera. 2. Electrostatic charge, electrical noise, and other phenomena can cause data corruption or even loss.
IMPORTANT! • Make sure you turn off the camera before inserting or removing a memory card. • Be sure to orient the card correctly when inserting it. Never try to force a memory card into the slot when you feel resistance. • SD memory cards have a write protection Protection switch that you can use to protect files Switch from accidental deletion. However, you must remove the write protection whenever you want to record new files onto it, format it, or delete its files.
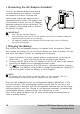
Removing the SD Card 1. Turn off your camera and open the SD card door. 2. Gently push the SD card inwards and then release it. The SD card will eject out of the SD card slot. IMPORTANT! • Never insert any other objects into the camera’s card slot. Doing so will create the risk of damage to the camera and card slot.
Formatting a SD Card Formatting a memory card erases all data stored on it, including protected data. 1. Turn the Mode Dial to . 2. Follow the guidelines in “Setup Menu” on page 20 to access the SETUP menu. 3. Press the down button to select the FORMAT CARD option. SETUP LANGUAGE DATE STAMP LCD BRIGHTNESS FORMAT CARD SEQUENCE No. 4. Press the right button. SETUP 5. Select OK or CANCEL using the left or right button. Press the button to confirm your choice and exit from the menu window.
• Turning the Camera On and Off Fully press the button until the LCD screen turns on. The zoom lens will extend , when the Mode Dial is positioned to , , , , or . Press the button again to turn off the camera, and the zoom lens will retract. The Auto-Focus LED blinks during powering off and will turn off after the camera is fully powered off. The camera will prompt the interface for setting the current date and time when it is initially powered on after your purchase.
2 Camera Setting • Checking Camera Status Turn on the camera and view the camera LCD screen to check which camera settings are active. Those particular features whose icons are not displayed are not activated. Still Image Mode Scene Shooting Mode 2-SEC. Self-timer Automatic 10-SEC.
Exposure Compensation Value ISO Sensitivity Auto 100 200 400 White Balance Auto Daylight Cloudy Tungsten Fluorescent Light metering Matrix Centre Spot Polaroid x530 Digital Camera User Guide www.polaroid-digital.
Video Mode Recording Indicator Elapsed Time Video Mode Exposure Compensation Value Video Resolution 640 x 480 320 x 240 White Balance Auto Daylight Cloudy Tungsten Fluorescent Playback Mode File Type Picture Video Clip PIMG0004.JPG File Number Locked File 2004/09/05 13:05:12 4/4 18 Date and Time File number/total number of files in the current memory Polaroid x530 Digital Camera User Guide www.polaroid-digital.
• Camera Modes The camera has eight modes for recording and playing pictures and video clips. Different modes can be selected by positioning the Mode Dial to the one you prefer. Functions can be accessed by pressing the button to customize capture and play or settings.
• Setup Menu The setup menu can be accessed in all eight working modes to customize mode for an example. your camera settings. Here we take the 1. Press the menu. button to access the main MENU RESOLUTION COMPRESSION DIGITAL ZOOM AF-ASSIST BEAM QUICK REVIEW 2. Press the up or down button to select the SETUP option. 1/2 MENU FOCUS MODE SETUP 20 Polaroid x530 Digital Camera User Guide www.polaroid-digital.
3. Press the right button to access the SETUP submenu. 4. Use the up and down buttons to select a setup option and then press the right button to enter the next submenu for that particular option. SETUP page 22 DATE/TIME AUTO POWER OFF BEEP SOUND VOLUME VIDEO SYSTEM page 23 page 24 page 24 page 65 1/3 SETUP page 25 LANGUAGE DATE STAMP LCD BRIGHTNESS FORMAT CARD SEQUENCE No.
• Setting the Current Date and Time The camera will prompt you for setting the current date and time when it is initially powered on after your purchase, or whenever the integrated backup battery’s power is low. 1. Follow the guidelines in “Setup Menu” on page 20 to access the SETUP menu. 2. Press the right button to access the DATE TIME submenu. SETUP DATE/TIME AUTO POWER OFF BEEP SOUND VOLUME VIDEO SYSTEM 1/3 3.
• Setting Auto Power Off The camera is equipped with a power saving operation to conserve battery power. You can change the power saving setting with the following steps: 1. Follow the guidelines in “Setup Menu” on page 20 to access the SETUP menu. 2. Select the AUTO POWER OFF option using SETUP the down button. DATE/TIME 3. Press the right button to access the AUTO POWER OFF submenu. AUTO POWER OFF BEEP SOUND VOLUME VIDEO SYSTEM 1/3 4. Specify the automatic power off period using the up or down button.
• Setting the Beep Sound On / Off The beep sound can be turned on and off in the SETUP menu. When the beep sound is turned on, the camera will beep when you press the buttons. 1. Follow the guidelines in “Setup Menu” on page 20 to access the SETUP menu. SETUP 2. Select the BEEP SOUND option using the DATE/TIME down button. AUTO POWER OFF BEEP SOUND VOLUME VIDEO SYSTEM 1/3 3. Press the right button to access the BEEP SOUND submenu. BEEP SOUND 4.
• Setting the Display Language Different languages can be selected for the menu to suit your preference. 1. Follow the guidelines in “Setup Menu” on page 20 to access the SETUP menu. SETUP 2. Select the LANGUAGE option using the LANGUAGE down button. DATE STAMP LCD BRIGHTNESS FORMAT CARD SEQUENCE No. 3. Press the right button to access the LANGUAGE submenu. 4. Select the language you prefer using the button to up or down button. Press the confirm your choice and exit from the menu window.
• Adjusting the LCD Brightness This setting enables you to adjust the brightness for the LCD screen. 1. Follow the guidelines in “Setup Menu” on page 20 to access the SETUP menu. SETUP 2. Select the LCD BRIGHTNESS option using the down button. LANGUAGE 3. Press the right button to access the LCD BRIGHTNESS submenu. 4. Adjust the brightness for the LCD screen using the left or right button. Press the button to confirm your choice and exit from the menu window.
• Turning Sequence Number On / Off Below shows how to select the way file numbers are assigned. 1. Follow the guidelines in “Setup Menu” on page 20 to access the SETUP menu. 2. Select the SEQUENCE No. option using the down button. 3. Press the right button to access the SEQUENCE No. submenu. 4. Select ON or OFF using the up or down button to confirm button. Press the your choice and exit from the menu window. ON OFF SETUP LANGUAGE DATE STAMP LCD BRIGHTNESS FORMAT CARD SEQUENCE No. SEQUENCE No.
• Cancelling the Startup Image A startup animation image appears on the LCD screen for a few seconds when the camera is turned on. You may cancel displaying the startup image according to the following steps: 1. Follow the guidelines in “Setup Menu” on page 20 to access the SETUP menu. 2. Select the OPENING option using the down SETUP button. DEFAULT SETTING OPENING 3. Press the right button to access the OPENING submenu. 4. Select ON or OFF using the up or down button to confirm button.
• Switching the Information Display and LCD Screen On and Off The LCD Screen can be changed by pressing the shows what are displayed in the different modes. In , , , , or button. The following mode: LCD screen on with detailed information displayed and a histogram LCD screen on with basic information display Press Press Press Press LCD screen off Polaroid x530 Digital Camera User Guide www.polaroid-digital.
In mode: LCD screen on with basic information display LCD screen on with detailed information display Press Press Press Press LCD screen on with information display off LCD screen off In mode: LCD screen on with basic information display LCD screen on with detailed information display and a histogram PIMG0004.JPG PIMG0004.JPG Press 2004/09/05 13:05:12 4/4 F3.
3 Taking Pictures Before you take pictures, please read this note first: NOTE: Never remove the battery, disconnect the AC adaptor from the camera, or unplug the adaptor while the Auto-Focus LED is blinking, indicating the camera is processing data. Doing so will prevent the current picture being saved and may corrupt other pictures already stored on the camera’s memory card.
When shooting under these conditions: Select this mode For general picture-taking. Automatic exposure and point-and-shoot operation and manual adjustment on flash mode, image size, ISO sensitivity, etc. Auto Freeze the subject in motion by using the possibly fastest shutter speed in combination with ISO 100 sensitivity for a particular exposure. Sport Capture a dimly lit background by using slow shutter speeds and illuminate a foreground subject with a brief flash fire.
Auto Mode Use this mode for general picture taking. 1. Turn the Mode Dial to . 2. Frame your subject using the viewfinder or LCD screen. 3. Align the auto focus frame or the viewfinder optical centre on the subject you want to capture. Press the Shutter button halfway to set the exposure and focus. NOTE: icon will appear when the shutter speed is slow, which reminds you • The of holding the camera steady or use a tripod.
Sport Mode Use this mode to freeze subjects in motion. 1. Turn the Mode Dial to . 2. Capture procedures are the same as for mode. Please see “Auto Mode” the on page 33. Night Scene Mode Use this mode for night scenes or dimly lit conditions. 1. Turn the Mode Dial to . 2. Capture procedures are the same as for mode. Please see “Auto Mode” the on page 33. NOTE: In the • mode, (Flash Off) is the default flash mode. To shoot a night scene without a subject in the foreground, set the flash off.
Landscape Mode Use this mode to capture distant subjects. 1. Turn the Mode Dial to . 2. Capture procedures are the same as for mode. Please see “Auto Mode” the on page 33. NOTE: mode, In the flash mode. (Flash Off) is the default Portrait Mode Use this mode to capture sharp subjects with a blurred background. 1. Turn the Mode Dial to . 2. Capture procedures are the same as for the mode. Please see “Auto Mode” on page 33. Polaroid x530 Digital Camera User Guide www.polaroid-digital.
Macro Mode Use this mode to capture subjects close to the lens at the distance of 0.4 to 9 in. (1 to 23 cm). 1. Turn the Mode Dial to . 2. Capture procedures are the same as for mode. Please see “Auto Mode” the on page 33. NOTE: In the mode, flash mode. (Flash Off) is the default • Taking Pictures with the LCD Screen Off You can also take a picture with the LCD screen off. The capture procedures are the same as for the Auto mode but frame your subject using the viewfinder instead.
• Setting Flash Mode Use the flash when you take pictures at night, indoors, or outdoors in heavy shadows. Flash Range: • Normal: • Macro: Wide: 3 ~ 10 feet (0.9 ~ 3 metres) Telephoto: 3 ~ 8 feet (0.9 ~ 2.4 metres) 0.4 ~ 9 in. (1 ~ 23 cm) . 1. Turn the Mode Dial to 2. Press the button to cycle through the flash options and select the one you need. NOTE: When you press the button, the Flash LED blinks, which indicates the flash is charging.
The camera has four flash modes (default setting is Flash Off). When shooting under these conditions: Select this mode The flash does not fire. Use this setting for outdoor pictures, or where flash is prohibited or may be distracting, or when shooting towards a reflective surface, such as a window or a mirror. If there is not enough light when using this setting, your pictures will be too dark. Flash Off The flash fires automatically as needed. Use this setting to take most pictures.
• Setting Self-timer Your camera is designed with a self-timer function which allows you to take pictures with the 2-second or 10-second built-in timer. 1. Turn the Mode Dial to . 2. Press the button repeatedly until the icon appears on the LCD screen. or 2-SEC. Self-timer 2-second self-timer indicates a countdown of two seconds. The Selftimer LED will blink for two seconds before the picture is taken. 10-second self-timer indicates a countdown of 10 seconds.
• Taking Continuous Pictures Continuous shooting function lets you take up to a certain number of pictures in quick succession. 1. Turn the Mode Dial to Continuous mode . 2. Press the button repeatedly until the icon appears on the LCD screen. 3. Press and hold the Shutter button and the camera will take pictures continuously. The camera will stop shooting once you release the Shutter button. NOTE: • The number of continuous pictures you can take depends on the memory available and resolution setting.
• Zoom Feature Your camera is designed with optical and digital zoom features that allows you to zoom in the central area of an image and photograph only the enlarged portion of the picture. Optical zoom alters the focal distance of the zoom lens, and its factor range is 1X to 3X. Digital zoom is activated after the camera reaches the maximum optical zoom (3X). It enlarges the part of the image up to four times at the centre of the image screen.
Zoom In or Out the Image 1. Turn the Mode Dial to . 2. Press the or button to zoom in or out the subject. While you press the and buttons, a white square will show on the zoom status bar as illustrated. The white square in the bar indicates the zoom status. Digital Zoom Status White Square Optical Zoom Digital Zoom 3. Keeping the button pressed lets the camera switch from optical zoom to digital zoom when it reaches the maximum optical zoom. The digital zoom status is shown on the LCD screen. 4.
• Setting the Picture Resolution and Compression Picture resolution refers to the number of pixels in a digital picture. Picture quality depends on the JPEG file compression that the camera applies when the picture is taken. Higher resolution and less compression makes better quality they occupy more memory space. Smaller size and normal quality pictures are easier to email while larger size and fine quality pictures are better for printing.
Compression setting . 1. Turn the Mode Dial to 2. Press the button to access the main menu. MENU RESOLUTION COMPRESSION DIGITAL ZOOM AF-ASSIST BEAM QUICK REVIEW 3. Press the down button to select the COMPRESSION option. 4. Press the right button to access the COMPRESSION submenu. 1/2 5. Select the compression you prefer using the up or down button. Press the button to confirm your choice and exit from the menu window.
• Specifying the Quick Review Period A quick review of pictures is available to set with options of 2 seconds and 5 seconds. Below shows to change the option. . 1. Turn the Mode Dial to 2. Press the button to access the main menu. 3. Press the down button to select the QUICK REVIEW option. 4. Press the right button to access the QUICK REVIEW submenu. MENU RESOLUTION COMPRESSION DIGITAL ZOOM AF-ASSIST BEAM QUICK REVIEW 1/2 5. Specify the quick view period using the up or down button.
• Turning the Auto-Focus Assist Beam On and Off Under this setting, you can turn the Auto-Focus assist beam on or off. When it is turned on, the focus lamp gives out a strong beam and helps the camera easily focus on the subject. 1. Turn the Mode Dial to 2. Press the . button to access the main menu. 3. Press the down button to select the AF ASSIST BEAM option. MENU RESOLUTION COMPRESSION DIGITAL ZOOM AF-ASSIST BEAM QUICK REVIEW 4. Press the right button to access the AF ASSIST BEAM submenu. 1/2 5.
• Selecting Focus Mode 1. Turn the Mode Dial to 2. Press the . button to access the main menu. 3. Press the down button to select the FOCUS MODE option. MENU FOCUS MODE SETUP 4. Press the right button to access the FOCUS MODE submenu. 2/2 5. Select AUTO or MANUAL using the up or down button. FOCUS MODE AUTO MANUAL button to confirm your choice 6. Press the and exit from the menu window.
• Setting Exposure Compensation for Pictures You can adjust the exposure compensation value (EV) within the range of –2EV to +2EV in order to compensate for current lighting conditions. This setting can be used to obtain better result when shooting with backlighting, indirect indoor lighting, a dark background, and so on. 1. Turn the Mode Dial to . button to access the 2. Press the function bar. 3. Adjust the exposure compensation value using the left or right button. EXPOSURE 4.
• Changing the ISO Speed This function enables you to change the camera’s sensitivity to light by selecting different ISO values. ISO is a measure of how quickly your camera reacts to light. The higher the ISO value, the less light needed to make an exposure, allowing the same exposure to be achieved with higher shutter speeds or smaller apertures. In a digital camera, higher ISO value allows higher shutter speed, at the expense of mottle or grain appearing in the final picture. . 1.
• Setting White Balance for Pictures Selecting the right type of white balance can help make the colours of a subject appear more natural under the type of lighting environment. 1. Turn the Mode Dial to 2. Press the . button to access the function bar. 3. Press the down button to select the WHITE BALANCE option. WHITE BALANCE 4. Select the right type of white balance using the left or right button. 5. The currently selected option will be accessed and takes effect immediately.
• Setting Photo Effect You can control the colour tones and moods of a picture in this setting. 1. Turn the Mode Dial to 2. Press the . button to access the function bar. 3. Press the down button to select the PHOTO EFFECT option. PHOTO EFFECT 4. Select the photo effect setting using the left or right button. 5. The currently selected option will be accessed and takes effect immediately. Press the button to exit from the function bar.
• Setting Light Metering Use the light metering setting to ensure that the proper amount of light enters into the camera lens. 1. Turn the Mode Dial to 2. Press the . button to access the function bar. 3. Press the down button to select the LIGHT METERING option. LIGHT METERING 4. Select the metering method using the left or right button. 5. The currently selected option will be accessed and takes effect immediately. Press the button to exit from the function bar.
4 Recording Video Clips • Recording Video Clips Use the Video mode to record video clips with audio. 1. Turn the Mode Dial to . 2. Frame your subject using the viewfinder or LCD screen. 3. Press the Shutter button all the way to starting recording. Elapsed Time Recording Indicator 4. Press the Shutter button again to stop recording. Recording automatically stops when the maximum recording length is reached or the current memory is full.
• Setting Video Resolution Video resolution refers to the number of pixels in a digital video clip. Video clip quality depends on the file resolution that the camera applies when the video clip is recorded. Higher resolution makes better quality while occupying more memory space. 1. Turn the Mode Dial to . 2. Press the button to access the main menu. The RESOLUTION option is highlighted. 3. Press the right button to access the RESOLUTION submenu. MENU RESOLUTION SETUP 1/1 4.
• Setting Exposure Compensation for Video Clips You can adjust the exposure compensation value (EV) within the range of –2EV to +2EV in order to compensate for current lighting conditions. This setting can be used to obtain better result when shooting with backlighting, indirect indoor lighting, a dark background, and so on. 1. Turn the Mode Dial to 2. Press the . button to access the function bar. 3. Adjust the exposure compensation value using the left or right button. EXPOSURE 4.
• Setting White Balance for Video Clips Selecting the right type of white balance can help to make the colour of a subject in the video clip appear more natural under the type of lighting that is available. 1. Turn the Mode Dial to . button to access the function bar. 2. Press the 3. Select the right type of white balance using the left or right button. WHITE BALANCE 4. The currently selected option will be accessed and takes effect immediately. Press the button to exit from the function bar.
5 Managing Pictures and Video Clips • Reviewing Pictures Reviewing Pictures in Full Screen . 1. Turn the Mode Dial to 2. Use the left and right buttons to view the pictures taken. icon is shown on the LCD screen when a The picture is selected. Reviewing Picture and Video Clip Files in Thumbnail You can view up to four pictures and video clip files at a time on the LCD screen by using the thumbnail function. 1. Turn the Mode Dial to . button once and four thumbnail files will be shown on the 2.
Running a Slide Show The slide show function enables you to view all picture and video clip files stored in the current memory repeatedly one by one on the LCD screen. 1. Turn the Mode Dial to 2. Press the menu. . button to access the main 3. Press the down button to select the SLIDESHOW option. 4. Press the right button to access the SLIDESHOW submenu. button to confirm your choice 5. Press the and exit from the menu window.
• Rotating the Currently Displayed Picture The currently displayed JPEG picture can be rotated for a better review angle on the LCD screen. 1. Turn the Mode Dial to . 2. Press the left or right button to select the picture you want to manage. button to access the 3. Press the function bar. 4. Press the button to rotate the picture 90°. button each time will 5. Pressing the rotate the picture 90° clockwise. NOTE: icon on the function bar • The original file may be retrieve by selecting the button.
• Image Cropping Under this setting, the currently displayed JPEG picture can be cropped to the size or location on the image. . 1. Turn the Mode Dial to 2. Press the left or right button to select the picture you want to crop. button to access the 3. Press the function bar. 4. Press the down button to select the button and a cropping icon. Press the rectangle will appear. 5. Use the button to enlarge the rectangle and use the button to return it to the normal size. 6.
• Enhancing the Image . 1. Turn the Mode Dial to 2. Press the left or right button to select the JPEG picture you want to manage. button to access the 3. Press the function bar. 4. Press the down button to select the icon. 5. Press the button. 6. Press the left or right button to select the option you want. Option 1 Option 1 Colour enhancement. To find the average lightest and darkest pixels in an image and uses them to maximize contrast while minimizing clipping. Option 2 Contrast enhancement.
• Red-eye Removal Under this setting, red-eye glare in your subject’s eyes may be removed from the image. 1. Turn the Mode Dial to . 2. Press the left or right button to select the JPEG picture you want to manage. button to access the 3. Press the function bar. 4. Press the down button to select the button and a small icon. Press the frame will appear. 5. Use the use the size. button to shrink the frame and button to return it to the normal 6.
• Playing the Video Clip . 1. Turn the Mode Dial to 2. Use the left and right button to select the video clip you want to play. Movie PIMG0008.AVI button to start playing the 3. Press the selected video clip, and press again to stop. icon is shown on the LCD screen when The a video clip is selected. 2004/09/05 13:05:12 4/4 • Protect or Unprotect the Selected Picture or Video Clip Use the left or right button to select the picture or video clip you want to protect or unprotect. 1.
• Deleting Picture(s) and Video Clip(s) 1. Turn the Mode Dial to 2. Press the . button to access the ERASE submenu. 3. Select THIS IMAGE or ALL IMAGES using the up or down button. PIMG0004.JPG ERASE THIS IMAGE ALL IMAGES THIS IMAGE ALL IMAGES 2004/09/05 13:05:12 4/4 Erase the selected picture or video clip. Please select the picture or video you want to delete before pressing the Erase button. Erase all pictures and video clips stored in the current memory. PIMG0004.JPG 4. Press the right button.
• View Pictures and Video Clips on a TV Setting Video System The video output signal (NTSC or PAL) can be switched to accommodate different signal systems. For example, NTSC for U.S.A., Canada, Taiwan, Japan, and so on, and PAL for Europe, Asia (excluding Taiwan), and so on. You can choose the video output system according to the following steps: 1. Follow the guidelines in “Setup Menu” on page 20 to access the SETUP menu. 2. Select the VIDEO SYSTEM option using the down button. 3.
Connecting to a TV When the camera is connected to a TV, the LCD screen is not active and the TV screen now performs as the LCD screen. 1. Connect the camera to a TV via the video cable (supplied) as illustrated. 2. Select the correct video system. and 3. Turn the Mode Dial to you can review all the pictures and video clips stored in the current memory on the TV. NOTE: • It is recommended to use AC adaptor when the camera is connected to a TV.
Printing Setting 1. Turn the Mode Dial to 2. Press the . button to access the main menu. 3. Press the down button to select the DPOF option. MENU PROTECT SLIDESHOW DPOF SETUP 4. Press the right button to access the DPOF submenu. 5. Select SELECT IMAGE or ALL IMAGES using the up or down button. 1/1 DPOF SELECT IMAGES ALL IMAGES SELECT IMAGES The selected picture in the memory card will be printed up to 50 copies.
7 Installing the Software Onto a Computer • Installing the Software For Windows® Users: PC IMPORTANT! • Please backup all the necessary data before any driver and software installation. • The CD-ROM is tested and recommended to use under English Windows OS. • Please restart the computer after installing the software. IMPORTANT! (For Windows® 98SE) Windows® 98SE needs to install the x530 Camera Driver for Mass Storage function.
1. Before you begin, close all other software applications open on your computer. 2. Insert the CD supplied into the computer CD-ROM Drive. Open & Close 3. The CD User Interface Screen will automatically launch. 4. With the mouse, click on each software interface button in turn and follow the on-screen instructions.
• Software Included with Your Camera x530 Camera Driver Plug & Play removable disk (For Windows® 98SE) Easy to use, just plug the camera to a computer and use it as a removable disk. Use the ArcSoft® PhotoStudio® to edit and print the pictures. Only install for Windows® 98SE. Polaroid PhotoLab Picture Editing Software Polaroid PhotoLab featuring with the Foveon X3 Fill Light.
• Computer System Requirements For acceptable picture transfer and editing performance, we recommend the following minimum requirements; For Windows® Users: • • • • • • • • • • Compatible with Microsoft® Windows® 98SE, Me, 2000 or XP Pentium III 800 MHz or higher 256 MB RAM (512 MB DDR RAM recommended) 400MB of available hard disk space DirectX 9.
8 Transferring Pictures and Video Clips to a Computer • Before you Transfer Pictures IMPORTANT! (For Windows® 98SE Only) Before you transfer your pictures make sure you have installed the Polaroid x530 Camera Driver from the CD. Please refer to “Installing the Software onto a Computer” on page 68.
Connect the Card Reader to Your Computer CA R DR EA DE R Connect the USB port on the card reader to the marked socket on your computer as illustrated. 1. The Status LED will light up and remains steady on, indicating a successful connection with the computer. 2. An interface “Found New Hardware” will show on the computer desktop. 3. A removable disk drive will be installed onto your computer automatically.
Transferring Pictures and Video Clips via the Card Reader NOTE: • ArcSoft PhotoStudio software does not support the X3F file. Please use the Polaroid PhotoLab to open the X3F file and save it in the JPEG or TIFF format. Then it can be edited by the ArcSoft PhotoStudio software. • ArcSoft PhotoStudio is a photo-editing software for a wide range of image formats (JPEG, TIFF, BMP, GIF, and so on), but not for the X3F format.
• Connecting the Camera to Your Computer via USB Cable Connecting with the USB cable. USB Series “A” plug connects to your computer USB Series “Mini B” plug connects to your camera 1. Turn the camera off. marked socket labelled end of the USB cable into the 2. Plug the on your computer. 3. Plug the other end of the USB cable into the port on your camera. 4. Turn on the camera and an interface “Found New Hardware” will show on the computer desktop. 5.
• Transferring Pictures and Video Clips via USB Cable NOTE: ArcSoft PhotoStudio software does not support the X3F file. Please use the Polaroid PhotoLab to open the X3F file and save it in the JPEG or TIFF format. Then it can be edited by the ArcSoft PhotoStudio software. For Windows® Users: NOTE: You can transfer pictures and video clips in any mode. PC 1. Connect the camera to a computer via the USB cable. 2. Double click on “My Computer” on your PC desktop and you will see a “Removable Disk” drive. 3.
9 Troubleshooting Problems • Troubleshooting The troubleshooting guide is designed to help you. If problems continue, please contact customer support. Details are provided under “Getting Help”. PC For Windows® Users: Symptom I receive an error message when I am installing “Polaroid x530 Camera Driver”. Problem “Polaroid x530 Camera Driver” does not load. Solution Shut down all other applications and attempt to reinstall the driver. Check to see if the USB controller in your BIOS if it is activated.
Symptom Problem Solution I cannot run the “Polaroid Conflict with another camera If you have another camera installed x530 Camera Driver”. driver or capture device. on your computer, remove it and its driver completely from your system to avoid conflicting with your x530. My CD Installation Wizard The auto installation file is Go to the computer desktop. does not work. switched off or the CD-ROM Right click on “My Computer”. is disconnected. Click “Properties”. Select “Device Manager”.
PC For Windows® and Macintosh Users: Symptom I cannot activate my digital camera by button. pressing the Problem Solution Insufficient battery power or Recharge your battery or place your battery into the camera. battery is missing. Battery door is not closed. Make sure the battery door is securely closed. Camera suddenly powers off. Auto Power Off function is Turn the camera on. activated. Or Or Recharge your battery. The battery is exhausted.
Symptom Problem Solution Recorded pictures are not Camera powers off before saved in memory. the save operation is completed. Or Removing the memory card before the save operation is completed. If the battery is exhausted, recharge your battery. Or Do not remove the memory card before the save operation is completed. The camera cannot take pictures. Wait until completing recharging the flash. Or The SD card may be damaged. Please use a new card. Or The flash is recharging.
10 Getting Help • Polaroid-digital Online Services Web site: http://www.polaroid-digital.com • Card Reader Help Contact Person: Venson Hsiao Phone number: +886 2 2698 9222 Fax number: +886 2 26989 9228 e-mail address: venson@a-tecsubsystem.
11 Appendix • Technical Specifications Picture Resolution • Sensor - 1/1.8 inch - 4.5 Mega Pixels CMOS • Resolution & Storable Images (based on 32 MB SD card) Compression Super Fine Fine Normal 2432 x 1824 10 pictures 24 pictures 42 pictures 2048 x 1536 13 pictures 34 pictures 43 pictures Resolution 1420 x 1060 24 pictures 59 pictures 90 pictures 640 x 480 107 pictures 215 pictures 324 pictures X3F 3 pictures --- --- Lens • • • • Type: 7 groups, 10 elements Aperture: F 1:2.6 ~ 3.
File Format • Still Image - RAW (X3F format), EXIF 2.2 compatible format (JPEG compression) • Video Clip: AVI format Power Supply One lithium ion rechargeable battery (Model No.
• Capacity of SD Card Super Fine Pictures can be taken Fine Pictures can be taken Normal Pictures can be taken 512MB 2432 x 1824 2048 x 1536 1408 x 1056 640 x 480 X3F 20 pictures 26 pictures 48 pictures 214 pictures 6 pictures 40 pictures 52 pictures 96 pictures 428 pictures 12 pictures 80 pictures 104 pictures 192 pictures 856 pictures 24 pictures 160 pictures 208 pictures 384 pictures 1712 pictures 48 pictures 48 pictures 68 pictures 118 pictures 430 pictures --96 pictures 136 pictures 236 pictures
• Uninstalling Polaroid x530 Camera Driver (PC Only) For Windows® 98SE Users: PC NOTE: The following driver uninstall procedure is for Windows 98SE users only because only Windows 98SE needs to install the x530 driver. 1. Open Add / Remove Program Properties in Control Panel and select “Polaroid x530" program, then click “Add / Remove” . 2. The following dialogue box appears, click "OK" to confirm removing the camera driver. 3.
• Uninstalling Card Reader Driver (PC Only) 1. Open Add / Remove Program Properties in Control Panel and select the “USB Storage Driver” program. Then click “Add / Remove”. 2. The following dialogue box appears. Click “OK” to confirm removing the card reader driver. 3. The uninstallation program runs automatically. Please restart your computer when it is finished. 86 Polaroid x530 Digital Camera User Guide www.polaroid-digital.
• Camera Default Settings Camera Mode , , , , , Setup Mode Default Description Image Resolution 1408 x 1056 Compression Super fine Digital Zoom Off AF Assist Beam On Quick Review 2 seconds Focus Mode Auto Exposure Compensation 0 ISO Sensitivity Auto White Balance Auto Photo Effect Off Light Metering Matrix Resolution 640 x 480 Exposure Compensation 0 White Balance Auto Date Format YY/MM/DD Auto Power Off 1 minute Beep Sound On Video System NTSC Language English Da
• Using Your Battery Limit the following activities that reduces battery life: • • • Reviewing your pictures on the LCD screen. Using the LCD screen to take pictures (Use the optical viewfinder to frame pictures). Excessive use of the flash. WARNINGS! • • • • • • • Battery should be replaced by an adult. Insert the battery with the correct polarity. Remove exhausted battery from the camera immediately. Do not short the supply terminals. Do not dispose the battery in fire.
• Regulatory Information FCC Notice This device complies with Part 15 of FCC Rules. Operation is subject to the following two conditions: (1) This device may not cause harmful interference, and (2) This device must accept any interference received, including interference that may cause undesired operation. Warning: Changes or modifications to this unit not expressly approved by the party responsible for compliance could void the user’s authority to operate the equipment.