
Instructions / Assembly

Instructions for Installing Pole-Wrap®
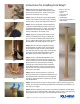
Step 1: Measure the length of the pole to be
covered. Roll up Pole-Wrap and mark your length
measurement with a pencil. Cut the roll on your
mark with a ne tooth saw. (see Fig. 1).
Step 2: Take time to ex each panel of Pole-Wrap
so that it will conform to the pole surface. Folding
panels against a sharp table edge works well here.
Step 3: Using a utility knife, cut the width along
a v-groove so Pole-Wrap just overlaps when test
wrapped around the pole (see Fig. 2). The adhesive
applied later will take up space, eliminating this
overlap and produce an invisible seam.
Step 4: Apply any quality brand of construction
adhesive around the pole using a caulking gun.
Space ” beads around the pole about every 10
inches. Add two full length vertical beads to hold
the Pole-Wrap ends evenly together (see. Fig 3).
Step 5: After the adhesive is applied, promptly
wrap Pole-Wrap around the pole. Start with the
inside middle and pull the ends around toward
you until they meet (see. Fig 3). Wrap masking tape
around the outside of the nished pole to hold
Pole-Wrap in place until the adhesive is dry.
Step 6: (Steps 6-8 for optional Cap & Base) Start
with the bottom layer of the base and apply con-
struction adhesive to the underside of both halves.
Position the halves around the pole and wrap
masking tape around the perimeter to hold the
halves rmly together. Do the same with the top
layer of the base. Press both layers rmly against
the carpet or bare oor.
Step 7: Position the halves for the cap (same as
top layer of base, but inverted) around the pole and
tape the perimeter to hold the two halves together
(see Fig. 4). Apply construction adhesive to the top
side of both halves.
Step 8: Slide the taped cap unit up along the pole and press it rmly against the
ceiling. Use two strips of masking tape (blue for painted surfaces) to hold the cap
unit in place (see Fig. 5).
Step 9: After the adhesive is dry, remove all tape from Cap & Base and Pole-Wrap.
Trim away any excess adhesive with a utility knife. Paint or stain as you would any
other wood surface. Three light coats of polyurethane looks great.
Copyright © 2005 Pole-Wrap® is a registered trademark of Pole-Wrap, Inc.
Things you will need:
1. Tape Measure
2. Pencil
3. Fine Tooth Saw
4. Utility Knife
5. Caulking Gun
6. Tube Construction Adhesive
7. Masking Tape
Fig. 1
Fig. 2
Fig. 3
Fig. 4
Fig. 5
www.polewrap.com