DP-1 DVD PLAYER INSTRUCTION MANUAL
IMPORTANT SAFETY INSTRUCTIONS INTRODUCTION CAUTION: PLEASE READ AND OBSERVE ALL WARNINGS AND INSTRUCTIONS IN THIS OWNER’S MANUAL AND THOSE MARKED ON THE UNIT. RETAIN THIS BOOKLET FOR FUTURE REFERENCE. This set has been designed and manufactured to assure personal safety. Improper use can result in electric shock or fire hazard. The safeguards incorporated in this unit will protect you if you observe the following procedures for installation, use and servicing.
PRECAUTIONS Handling Your CD/DVD Player •When shipping the DVD player, always use the original shipping carton and packing materials. For maximum protection, repack the unit as it was originally packed at the factory. •Do not use volatile liquids, such as insect spray, near the DVD player. Do not leave rubber or plastic products in contact with the DVD player for a long time. They will leave marks on the finish. •The top and rear panels of the DVD player may become warm after a long period of use.
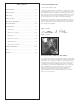
Table of Contents A Word from Matthew Polk Dear Home Entertainment Buff, Safety Warnings......................................................................2-3 Carton Contents ........................................................................5 Basic Setup ................................................................................5 Thank you for purchasing the Polk Audio DP-1 CD/DVD player.
GETTING STARTED Carton Contents The following items should be in the box with the DP-1 DVD player. If any of these items are missing, contact your Polk Audio retailer or Polk Audio Customer Service.
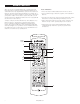
REMOTE CONTROLS There are two remotes included with the DP-1 CD/DVD player. The large, black DR-3 is a unified system programmable/learning remote control that has been pre-programmed to operate the most-often used functions of both the Digital Solution preamp/processor and the DP-1 CD/DVD player. You can also program it to operate other components in your system to reduce “remote clutter” on your coffee table.
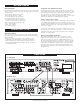
DR-3 REMOTE GUIDED TOUR We will only describe here the DR-3 remote functions as they pertain to the Polk Audio Digital Solution preamp/processor and DP-1 CD/DVD player. See the separate DR-3 Owner’s Manual for instructions on how to program and use this remote for other devices. 1. These buttons serve two functions: to select the device that the remote will control and to change inputs on the Digital Solution preamp/ processor.
REMOTE CONTROLS 12. Use this button to put the CD/DVD player into the play mode or use it to select a menu choice. When the MULTI source/device button gets pressed, this button acts as the Enter button for the on screen display (OSD) for the Digital Solution preamp/processor. 13. Each time you depress this button, the Polk DP-1 fast-forwards a little faster. The first push fastforwards at 2X normal speed.
14. Push this button once to pause playing the DVD in the Polk DP-1 CD/DVD/MP3 player. Press it a second time to totally stop the DVD. With a CD in the player, this button simply stops the CD. When the MULTI source/device button gets pressed, enabling multi-zone remote speaker use with the DS System, this button acts as the down arrow navigation for the on screen display (OSD) for the Digital Solution preamp/processor. 15. This button acts as the Clear command for the DP-1 CD/DVD player.
DP-1 SET UP MENUS Your DP-1 player has been preset to work perfectly with your Polk Audio Digital Solution system and a standard 4:3 aspect ratio TV. If you have a 16:9 widescreen TV you will have to reset the TV Aspect Ratio in the “Other” section of the DVD setup menu. No matter what gear you have it is always a good idea to check all of these settings to make sure they are correct. How to navigate and select choices 1. Press the button on either the DR-3 or DR-4 remotes.
DP-1 SET UP MENUS Setting Digital Audio Output Sample Frequency Menu Language Options The default setting of “48kHz” allows the DP-1 to work safely with all digital processors and receivers. When this DVD player is connected to the Polk Audio Digital Solution 7200 system (but NOT the RMDS-1 system), we recommend that you use the “96kHz” setting for the best possible audio performance. If you are using some other surround receiver or preamp/processor, see that unit’s manual to determine the best settings.
DP-1 SET UP MENUS Parental Block/Password Menus (optional) Video (Screen Saver) The Rating and Password menus are useful if you have children at home and want to prevent them from viewing inappropriate DVDs. Most DVD movies are age rated just like theatrical releases.
DVD OPERATION Playing a DVD 1. Turning On the System. Press SYSTEM POWER on the bottom of the DR-3 remote to turn on the Digital Solution system. Press the DVD Source/Device button at the top of the remote and then press the SOURCE POWER button back at the bottom. The CD/DVD player will turn on and the power indicator light on the front will turn green. After a few seconds delay, a cheery “HELLO” appears in the display of the DVD player.
ADVANCED DVD OPERATION 1. Changing the Surround Audio Mode. If the DVD has a 5.1 surround track but the DS preamp/processor does not indicate “3/2.1” in the display, use the AUDIO button to toggle through the available audio tracks on the DVD. Soundtracks on menus and extras are usually not 5.1, so wait until the movie is playing before changing audio tracks. The AUDIO button may not change the audio track on some DVDs.
ADVANCED DVD OPERATION The following seldom-used advanced features can only be accessed with the DR-4 remote control included with the DP-1. ▲ ▲ 1. Using Markers and Search. Markers allow you to go quickly back to a specific scene. Press the MARKER key at the beginning of a scene you want to return to. The on-screen display (figure 8) indicates which of the 9 available markers you have just used. At any time while watching that DVD, press the SEARCH button to bring up the Marker display (figure 9).
CD OPERATION Playing a CD 1. Turning On the System. Press SYSTEM POWER on the DR-3 remote to turn on the Digital Solution system. Press the DVD Source/Device button and then press the SOURCE POWER button (bottom, top, bottom). The CD/DVD player will turn on and the power indicator light will turn green. After a few seconds delay, a cheery “HELLO” appears in the display of the DVD player. You can make the turn-on procedure a lot simpler by setting up a “Macro.
CD OPERATION 2. A-B Repeat. Use this function to repeat a specific segment of an audio track over and over and over again (a great feature for the obsessed). Press the A-B button once at the start of the segment you want to repeat. Press the button a second time to mark the end of the segment. The segment will play over and over and over again. Redrum. Redrum. To return to sanity and normal play press the A-B button again and (picture OFF) will appear on the screen. 5. Graphic User Interface (GUI) Menus.
MP-3 OPERATION Playing an MP3 CD 1. Turning On the System. Press SYSTEM POWER on the DR-3 remote to turn on the Digital Solution system. Press the DVD Source/Device button and then press the SOURCE POWER button. The CD/DVD player will turn on and the power indicator light will turn green. After a few seconds delay “HELLO” appears in the display of the DVD player. Turn on your TV and select the video input that the Digital Solution system is plugged into.
MP-3 OPERATION Advanced MP3 Operation The following seldom-used advanced features can only be accessed with the DR-4 CD/DVD player-specific remote control. Turn on your TV so you can see the indicators and menus for these functions. 13. Markers and Search. Markers allow you to go quickly back to a specific part of the song. Press the MARKER key at the beginning of a music passage you want 14. Selecting Tracks.
Troubleshooting Guide If This Happens: It’s Probable Cause… Cures: The DVD player dosen’t turn on. The unit is not getting AC power. Make sure the power cord is securely plugged into a live AC outlet. Press the Power button on the DP-1’s faceplate. If it turns on, the problem lies with the remote control or operator error. DVD or CD disc is not inserted or is inserted improperly. Open the disc tray and make sure a DVD or CD is inserted correctly in the tray and that the label side is facing up.
Troubleshooting Guide If This Happens: It’s Probable Cause… Cures: The power is on but the machine will not play a MP3 disc. The disc is not inserted properly Open the disc tray and make sure the CD is inserted correctly in the tray and that the label side is facing up. The disc is not an ISO9660 disc The disc was probably made using a noncompatible software program, such as Direct-CD. You’ll have to re-burn the disc using a software program that will make ISO9660 formatted discs.
DP-1 SPECIFICATIONS DVD Player Power Supply AC 120V, 60 Hz Power Consumption 16 W Weight 7.1 lbs. (3.2 kg) External Dimensions (W x H x D) 17.3” x 3.5” x 10” (440 x 88 x 254 mm) Signal System NTSC Laser Semiconductor laser, wavelength 650 m (DVD), 780 mm (CD) Frequency Range (audio) DVD:fs = 96 kHz 4 Hz - 44 kHz fs = 48 kHz 4 Hz - 22kHz CD: 4 Hz - 20 kHz Signal-to-Noise Ratio More than 105 dB (EIAJ) Dynamic Range (audio) More than 100 dB (EIAJ) Harmonic Distortion (audio) 0.
Polk Customer Service (800) 377-7655 23
RM2069-1 5601 METRO DRIVE, BALTIMORE, MARYLAND 21215, USA, 410-764-5275, FAX: 410-764-5266 www.polkaudio.
DR-3 UNIFIED LEARNING REMOTE CONTROL INSTRUCTION MANUAL
INTRODUCTION Table of Contents DR-3 Remote Guided Tour ..................................................3 - 5 Button Function Chart ..............................................................6 Programming the Remote Manual Three-Digit Code Method............................................7 Auto Search Method................................................................8 Finding the Three-Digit Code Number for a Device..................8 Teaching Method ..............................................
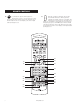
DR-3 REMOTE GUIDED TOUR See the chart on page 6 for the functions of each button with various device types. 1. Source/Device Area – These buttons serve two functions: to select the device that the remote will control and to change inputs on the Digital Solution preamp/processor. For example if you want to play the DVD player, push the “DVD” button on the top row.
8. MENU – This button acts as a chapter skip button to skip forward through DVD chapters or CD tracks. With TVs and other video devices it calls up the device menu. ^ PAUSE – This button acts as the pause/step frame button for the DP-1 CD/DVD player, VCRs, CD players and TIVO-type video storage devices. To return to normal play, press the PLAY button.
20.TUNE-/SUB TTL – Use to manually tune the radio on the Digital Solution system. Acts as the Subtitle toggle switch on DVD players. For the function on other devices see the chart on page 6. 21.SELECT – This button selects a choice on a menu such as the set up menu of a DVD player or the title menu of a DVD disc. With DSS and cable boxes it acts to call up “Favorites.” It has no function with the Digital Solution preamp/processor. 22.AUDIO – This button toggles through the available audio tracks on a DVD.
DR-3 FUNCTION LIST Button Name FM/AM DVD/6CH Polk DVD Others DSS CBL/CBL DIG CBL TV AUX/TAPE CD MULTI VCR TAPE/AUX (Toggle) DVD/6CH (Toggle) DSS/DSS DIG (Toggle) CBL/CBL DIG (Toggle) FM/AM (Toggle) CD MULTI VCR LIGHT LIGHT LIGHT LIGHT LIGHT LIGHT LIGHT LIGHT LIGHT LIGHT LIGHT MUTE MUTE MUTE MUTE MUTE MUTE MUTE MUTE MUTE MUTE MUTE SURROUND MODE MODE MODE MODE MODE MODE MODE MODE MODE MODE MODE VOL UP VOL UP VOL UP VOL UP VOL UP VOL UP VOL UP VOL UP VOL UP V
PROGRAMMING THE REMOTE Manual Three-Digit Code Method The DR-3 remote control can duplicate the remote functions of most brands of audio/video equipment by simply entering in a three-digit code number. When you enter in the code the DR-3 “learns” most or all of the remote functions of that equipment so you don’t need to program the DR-3 button by button. There are tables on pages 14 - 15 that list the major audio/video brands and their three-digit remote codes. Quick Instructions 1. Look up code number 2.
PROGRAMMING THE REMOTE Auto Search Method If none of the three-digit code numbers assigned to your brand shut off your equipment or if your brand of equipment is not listed in the code tables, you can use the Auto Search Method to find the correct threedigit number for your equipment. 1. Turn on the equipment you wish to program. NOTE: From here on in you have 20 seconds to perform each step. If the Source/Device button light goes off, you need to back up a step and do it again.
PROGRAMMING THE REMOTE Teaching Method From time to time the three-digit programming method doesn’t automatically program in all of the commands of the original remote. In such cases you can “teach” the DR-3 individual commands from your original equipment remote control. New commands can be taught to any button except the eight Source/Device buttons at the top of the remote and the LIGHT, MACRO, LEARN, CODE, SAVE, CNCL, MUTE, SURROUND MODE, VOL UP, VOL DOWN, SUB+, SUB– and SYSTEM POWER buttons.
PROGRAMMING THE REMOTE Erasing a Learned Command From a Button NOTE: You have 20 seconds to perform each step. If the source button light goes off, you need to back up a step and do it again. You can exit by pressing the CNCL (cancel) button at any time in the process. 1. Press and hold the LEARN button for two seconds. The status light at the top left of the remote will glow orange. 2. Press the Source/Device associated with the button you wish to erase. The Source/Device button light will turn on. 3.
PROGRAMMING THE REMOTE Erasing All the Learned Commands in All Device Modes This procedure will erase all the learned commands on all the buttons in all eight Source/Device modes. Be really, really sure you want to do this before following the steps below. 1. Press and hold the LEARN button for two seconds. The Status light at the top left of the remote will glow orange. 2. Press and hold the LEARN button again for 10 seconds. The Status light will flash red continuously.
MACRO OPERATION Programming the Macro Button The MACRO button can send out a sequence of up to 20 commands with one button press. It can be programmed for up to eight Source button macros and perform multi-step operations with just one button push. For example, you can program the MACRO button to turn on the TV, turn on the DS system, turn on the DVD player, select the correct Video input, and open DVD drawer with the push of one just button.
MACRO OPERATION Macro Sequence Programming Example: Confused? Don’t worry, it isn’t as bad as it looks. Let’s walk you through a hypothetical Macro sequence to show you how it works. In this example, we are programming the DVD source Macro button to turn on the TV, the Digital Solution system and the DVD player as well as select the DVD player as the source to view. In this case, we are assuming that you have programmed the TV codes into the CBL Source/Device. 2,7 4 1.
SETUP CODES Manufacturer/Brand Set-Up Code Number Manufacturer/Brand Tape/Aux PHILIPS TIVO SONY TIVO 001 002 DVD Player GOLDSTAR HARMAN KARDON HITACHI JVC LG MAGNAVOX MARANTZ MITSUBISHI MYRYAD NAD NAKAMICHI ONKYO PANASONIC PHILIPS PIONEER POLKAUDIO PROCEED PROSCAN RCA SAMSUNG SHARP SONY TATUNG THOMPSON TOSHIBA YAMAHA ZENITH Cable (TV) SPECTRICON SSS SYLVANIA 057 084 101 012 057 066 083 017 102 088 103 035 021 066 023 001 086 026 026 056 094 033 102 026 034 042 057 DSS Player ECHOSTAR HITACHI HUGHES
SETUP CODES Manufacturer/Brand VCR AIWA AKAI AMPRO ANAM AUDIO DYNAMICS BROKSONIC CANON CAPEHART CRAIG CUIRTIS MATHES DAEWOO DAYTRON DBX DYNATECH ELECTROHOME EMERSON FISHER FUNAI GE GO VIDEO GOLDSTAR HARMAN KARDON HITACHI INSTANTREPLAY JCL JCPENNY JENSEN JVC KENWOOD LLOYD LXI MAGIN MAGNAVOX MARANTZ MARTA MATSUI MEI MEMOREX MGA MINOLTA MITSUBISHI MTC MULTITECH NEC NORDMENDE Set-Up Code Number 034 043 072 031 012 035 028 108 001 031 117 108 012 034 059 006 116 101 001 034 031 132 004 012 026 031 031 004 043 0
The Setup Code list in the DR-3 owner's manual is incomplete. Use this remote code list for programming your Polk Audio DR-3 unified learning remote.
SETUP CODES Manufacturer/Brand Set-Up Code Manufacturer/Brand Cable (TV) TMK TOSHIBA TOTEVISION UNIVERSAL VIDEO CONCEPTS VIDIKRON VIDTECH VORK WARDS TERA 004 015 030 143 008 146 174 004 004 004 008 060 061 074 164 076 001 004 043 072 073 112 VCR AIWA AKAI AMPRO ANAM AUDIO DYNAMICS BROKSONIC CANON CAPEHART CRAIG CUIRTIS MATHES DAEWOO WESTING HOUSE YAMAHA YUPITERU ZENITH ZONDA CD ADCOM AIWA AKAI AUDIO TECHNICA CARVER DENON FISHER H/K JVC KENWOOD MARANTZ MONDIAL NAD NAKAMICHI NIKKO ONKYO PANASONIC PHILIP
RM2070-1 5601 METRO DRIVE, BALTIMORE, MARYLAND 21215, USA, 410-764-5275, FAX: 410-764-5266 www.polkaudio.