MC SERIES MC85 MC80 MC65 MC60 OWNER’S MANUAL MANUEL D’UTILISATION MANUAL DEL PROPIETARIO
ENGLISH SAFE LIMITS OF OPERATION PRODUCT DISPOSAL Polk Audio specifies the recommended amplification range for each of its passive (non-amplified) loudspeakers. Typically that specification will be expressed as a range of power such as 20-200 Watts (per channel). It is important to understand what those numbers mean when choosing a receiver or amplifier for your Polk loudspeakers.
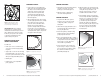
Figure 5—MC60, MC80 Models: While supporting the tweeter bridge, carefully use your index finger to aim the tweeter. Important Note: MC Series In-Wall Loudspeakers are not magnetically shielded and should not be placed closer than 1' (30cm) from a television or video monitor. If you experience discoloration or distortion, immediately move the speakers away from your TV. PREPARING TO PAINT: PAINTING THE FRAME: 1.
INSTALLATION Follow These Easy Steps: If you intend to do the installation yourself, we recommend that you possess some skill in the proper use of hand and power tools. You should have a thorough understanding of local building and fire codes and a familiarity with the area behind the wall or ceiling into which you plan to install your speakers. Install speaker wires before installing speakers. Wire meeting appropriate building and fire codes must be used.
FRANÇAIS 7. If you have a level, use it to help you correctly align the speaker. Tighten the wall clamp screws with a screwdriver. This will rotate the wall clamps and secure the speaker to the wall. Hint— on the MC65 and MC85 models, tighten the center screws before tightening the corners for the most flush fit to your wall. Do not over tighten the wall clamp screws (figure 14). 8. Carefully reinstall the grille by fitting it into its recess so that it is just resting on the frame.
OPTIONS D’INSTALLATION ORIENTATION DES TWEETERS PRÉPARATION: Les haut-parleurs encastrables Polk Audio MC Series vous permettent des options d’installation presqu’illimitées. Mais considérez judicieusement leur lieu d’installation car vous devrez faire des trous dans votre mur ou plafond. Pour maximiser l’imagerie et le détail, orientez les tweeters vers votre place d’écoute préférée.
PEINTURE DU CADRE: INSTALLATION Suivez Ces Simples Étapes: 1. Peignez les zones non-masquées. Appliquez au moins deux minces couches. La peinture en aérosol est recommandée (figure 7). Si vous comptez faire l’installation vousmême, vous devez posséder une certaine compétence dans l’utilisation d’outils manuels et électriques. Vous devez bien connaître les codes du bâtiment et des incendies.
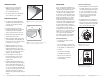
3. Découpez soigneusement le trou à l’aide d’un outil approprié au découpage du matériau de votre mur ou plafond. Commencez en faisant un trou à l’intérieur du traçage (le foret de la perceuse doit toucher le traçage). Utilisez ce trou pour insérer la scie ou le couteau puis commencez le découpage (figure 11). 4. Une fois le trou découpé, tirez le fil précédemment installé hors du trou et connectez-le au haut-parleur. Suivez les instructions de raccordement fournies avec votre récepteur.
ESPAÑOL LÍES SEGUROS DE OPERACIÓN ELIMINACIÓN DEL PRODUCTO Polk Audio especifica el intervalo de amplificación recomendado para sus altavoces pasivos (no amplificados). Por lo general, la especificación se expresa como un cierto intervalo de potencia, tal como 20 a 200 W (por canal). Es importante entender lo que estos números significan cuando se escoge un receptor o un amplificador para los altavoces Polk Audio.
Figura 5—Modelos MC60 y MC80: Mientras sostiene el puente del tweeter, oriéntelo cuidadosamente con los dedos índice. Nota importante: Los altavoces empotrados en la pared de la serie MC no tienen blindaje magnético y no deben colocarse a menos de 1 pie (30 cm) de monitores o televisores. Si nota distorsión o decoloración del video, aleje inmediatamente el altavoz del televisor. PREPARACÓN: PINTURA DEL ARMAZÓN: PINTURA DE LA REJILLA: 1.
6. Cuando la rejilla esté seca, presione cuidadosamente la tela tosca en su posición dentro de la rejilla. La tela tosca especial oculta los excitadores de los altavoces y no interfiere con el sonido. 7. Primero instale el altavoz (vea la página siguiente).
6. Afloje las abrazaderas rotatorias de pared desatornillándolas. Gírelas hacia adentro para que el altavoz quepa por la abertura sin dañar la pared. Luego coloque el altavoz cuidadosamente en la abertura (figura 13). Figura 13—Coloque el altavoz cuidadosamente en la abertura. Figura 14—Tighten retaining wall clamps to engage wall. Use a #2 Phillips head screwdriver or a powered screwdriver. 22 7. Si tiene un nivel, utilícelo para alinear el altavoz.
LIMITED FIVE YEAR WARRANTY GARANTIE LIMITÉE DE 5 ANS Polk Audio, Inc., warrants to the original retail purchaser only. This warranty will terminate automatically prior to its stated expiration if the original retail purchaser sells or transfers the product to any other party. Polk Audio, Inc.