RMDS-1 RMDS-1 INSTRUCTION MANUAL
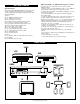
A word from Matthew Polk Table of contents Dear Home Entertainment Buff, Safety Warnings ..........................................................................4 RMDS-1 Features........................................................................5 Carton Contents ..........................................................................6 Quick Start Guide ........................................................................6 Rear Panels Guide ........................................................
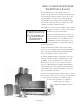
SIMPLY COMPLETE HOME THEATER: THE RM DIGITAL SOLUTION Even if you don’t have the room for full-size home theater speakers, you still deserve great sound. This is the theory behind the development of “subwoofer/satellite” systems, whose coffeecup-sized satellites can be placed conveniently and invisibly almost anywhere. These systems produce remarkable sound for their size, but even the best “sub/sat” systems have never quite equaled the performance of full-size speakers.
NOTE TO CATV SYSTEM INSTALLER: This reminder is provided to call the CATV (Cable-TV) system installer's attention to Article 820-40 of the NEC, that provides guidelines for proper grounding and, in particular, specified that the cable ground shall be connected to the grounding system of the building, as close to the point of cable entry as practical. NOTE: This equipment has been tested and found to comply with the limits for a Class B digital device, pursuant to Part 15 of the FCC Rules.
RMDS-1 FEATURES • You want to enjoy a home theater system, not have it take over your home. The RMDS-1 features 5 compact satellite speakers that easily integrate into any room. They’re easy to hide but look great when visible. You can even hang them on the wall with the supplied wall mount brackets. (Center brackets not supplied.) • The RMDS-1 is a fully integrated and performance optimized system.
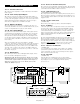
Quick Start Guide (see illustrations on pages 8 and 9) GETTING STARTED 1. Remove all of the components and accessories from the shipping cartons. 2. Connect sources such as DVD player, VCR, etc. to the RMDS-1 audio and video inputs using coaxial (RCA-type) cables. 3. Connect the video output of the RMDS-1 preamp/processor to a video input on your TV. 4. Connect the RMDS-1 to the subwoofer with the supplied 4 meter DB-25 cable. 5.
Area F - Remote Control Extension jacks REAR PANEL GUIDED TOUR These jacks are for potential future Polk Audio products. When we bring out other electronic products, these jacks will help you unify the remote control functions of the RMDS-1 and the new device. Area A - Antenna Connections This is where you hook up indoor or outdoor antennas for AM and FM radio reception.
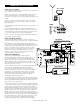
BASIC SYSTEM HOOK UP TV DVD PLAYER VIDEO IN AM LOOP ANTENNA DIGITAL OUT AUDIO FM ANTENNA RMDS VIDEO INPUTS ANTENNA DSS LD DVD VCR Input VCR Rec. Out AUDIO OUT (connect to subwoofer) Video TV out AC OUTLET SWITCHED REMOTE CONTROL EXTENSION 120V,60HZ 100W,0.8A S-VHS FM(75Ω) GROUND AM AC OUTLET UNSWITCHED (in) OR 120V,60HZ 100W,0.8A Standard ANALOG AUDIO INPUTS (out) LD Left RF Right DVD DSS D I G I TA L A U D I O I N P U T S CD TAPE In TAPE Rec.
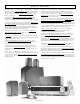
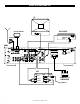
SPEAKER HOOK UP RIGHT SURROUND CONNECTS TO PROCESSOR LEFT SURROUND SUBWOOFER AUDIO INPUT FRONT SPEAKER OUTPUT L CENTER SPEAKER OUTPUT R L R SURROUND SPEAKER OUTPUT CENTER RIGHT FRONT LEFT FRONT www.polkaudio.
HOOKING UP THE SYSTEM AM LOOP ANTENNA Connection Precautions • Do not plug the preamp/processor or subwoofer into AC outlets until all the connections have been made. • When connecting sources, use either standard composite (good) or S Video (better) throughout. Do not use both composite and S Video connections. Use the same type of connection between the RMDS-1 and your TV. FM ANTENNA • Connect one cable at a time observing the “input” and “output.
Connecting a Stereo DSS (satellite TV) Receiver (see diagram on previous page) VCR The first generation of DSS receivers (pre 1999) only have stereo analog audio outputs and are not capable of delivering 5.1 channel digital surround sound. If your DSS receiver box only has Left and Right audio jacks and no jack marked “Digital Out” or “PCM Out,” use this hook up method.
Connecting a Laserdisc Player TV Connect the AC-3 RF output of the LD player LD RF input of the RMDS-1. IMPORTANT NOTE: Do not connect a normal analog audio output or digital coaxial output of a DVD player or any other source to the LD RF jack. You will damage the RMDS-1 if you do. Also connect the left and right analog audio outputs of the LD player to the Left and Right LD analog inputs on the connect to any RMDS-1 preamp/processor.
Connecting the Speakers We have supplied you with 5 sets of audiophilegrade speaker wire to connect your speakers. Each wire is color coded just to make it easy for you to see which wire is which at the subwoofer (amplifier) side. You can use any wire on any channel. Use whatever length makes sense for your set up and speaker placement. You can temporarily (and safely) rest the subwoofer on the grille-end to make it easy to see the terminals and connect the wires.
SPEAKER PLACEMENT IMPORTANT NOTE: When this manual refers to “Front Left.” we mean the speaker on your left side as you face the front (TV) side of the room. When we refer to “Surround Left” we mean the speaker that is behind you and to your left as you face the front (TV) side of the room. Center Channel Speaker Place the center speaker as close to the TV as possible. The most popular placement is right on top of your TV set.
Wall Mounting The Satellites The satellite speakers are supplied with wall mounting brackets. Follow the steps below to safely secure the brackets and speakers. On-wall installation of RM satellites requires basic skills in using tools such as a drill and screwdriver. If you are in doubt that you possess the necessary skills or tools, consult your Polk dealer or a professional installer. • Make sure the locations you select do not conceal electrical wiring or plumbing.
Power switch R M Standby D I G I T A L Main display Volume INTELLIGENT A/V PREAMP/PROCESSOR/LOUDSPEAKER SYSTEM S O L U T I O N power ———— standby TEST MEMO AUTO TUNED STEREO db kHz MHz PCM DIGITAL DOLBY OPT PROLOGIC COAX1 COAX2 MULTI STEREO D I G I T A L NIGHT P-SCAN volume on/off surround source multi-room save preset tune presets clear aux. inputs S-video video L..audio..
On/Off Surround Button This button switches between surround sound and 2 channel stereo. IMPORTANT NOTE: The Dolby Digital (AC-3) mode can be selected only when either LD, DSS Digital, or DVD inputs are selected. If you have selected a digital source with a Dolby Digital soundtrack and you cannot get the “3/2.1” indicator on the display (see page 24), the most likely causes are: 1. The DVD player is not set to send out a 5.1 channel Dolby Digital signal. In this case check the DVD player’s operation manual.
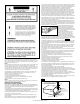
Remote Control Range REMOTE CONTROL OPERATION The distance between the remote control transmitter and the RMDS-1 preamp/processor should be 15 feet (5 meters) or less. If the transmitter is pointed to a direction other than the IR SENSOR or if there is an obstacle between them, the remote control may not work correctly. Loading Remote Control Batteries 1. Remove the back cover. R M D I G I T A L S O L U T I O N STANDBY POWER 2. Insert two AA type batteries with correct (+) and (–) polarity.
I - FM and AM Buttons REMOTE CONTROL GUIDED TOUR Push the AM button to listen to AM band radio stations or push the FM button to listen to FM radio band radio stations. The remote control is divided into three major sections. The top section contains the controls used most often, such as ON/OFF, MUTE, SUBWOOFER volume and system VOLUME controls. The middle section has the source buttons, where you select the source component you want to hear and see.
SET-UP AND CALIBRATION After you have connected all speakers and source components you may start using the RMDS-1 without any further set-up procedures and get excellent performance in most homes. One of the many benefits of the Polk RM Digital Solution system is that the electronics and speakers have been perfectly optimized for the highest Dolby Digital performance without the need for complicated set-up and calibration procedures.
Setting Dolby Pro Logic Delay 1. Play a Dolby Digital source and push the DELAY button on the remote control. This menu will appear on your TV screen: The channel delay function for Dolby Pro Logic exists for a somewhat different reason than for Dolby Digital. There is a different default surround delay value than that for Dolby Digital. Dolby Pro Logic does not require a center channel delay. The factory preset delay default values are Center = None and Surround = 30mS. (Fig. 1) 2.
R M D I G I T A L INTELLIGENT A/V PREAMP/PROCESSOR/LOUDSPEAKER SYSTEM S O L U T I O N power ———— standby TEST MEMO AUTO TUNED COAX1 COAX2 MULTI NIGHT STEREO db kHz MHz PCM DIGITAL DOLBY PROLOGIC OPT STEREO D I G I T A L P-SCAN volume source on/off surround multi-room tune save preset presets clear aux. inputs S-video video L..audio..
Presetting Radio Station Playing a DVD (or other audio/video source) You can preset up to 30 FM/AM stations in any order. Stations can be preset either manually (by you) or automatically (by the tuner). 1. Turn unit on by pressing POWER button (A). Auto Presetting This function scans the frequencies in the selected band and automatically presets all stations that can be received. 2.
ABOUT SURROUND SOUND The RMDS-1 system offers four modes of operation: Stereo, Dolby Pro Logic, 2 channel Dolby Digital and Dolby Digital 5.1 surround. You might wonder, “what is 2 channel Dolby Digital? Isn’t Dolby Digital always 5.1 surround?” The answer is no. Dolby Digital is a digital audio compression system that provides very high fidelity sound quality in either 2 or 6 channels. (The six channels are Left and Right front, Center, Left and Right rear and a Low Frequency Effects channel, or 5.1).
Operating from the front panel USING MULTI ROOM FEATURE 1. Push the MULTI ROOM button on the front panel of the preamp/processor. 2. The red MULTI indicator will blink and the words “SEL SOURCE” will appear on the display. The Multi Room feature allows you to listen to an audio source connected to the RMDS-1 system in another room of the house. For example, you can watch a movie in the living room while your children listen to the CD player in the family room.
TROUBLESHOOTING If something doesn’t seem to work right, please use the chart below before calling your dealer or Polk Audio. You will actually save time in the long run if you have already eliminated some of the possible reasons for the problem. If this happens: Try this: Well then: No sound from any speaker with any source. Make sure the subwoofer is plugged in to a live AC outlet, and that the power switch on the back of the sub is set to “Standby.” Still doesn’t work? Try...
Interference If this unit is placed very near a television, picture disturbance or noise may occur on the TV. In such a case, move the RMDS-1 preamp/processor as far as possible from the television. If the problem persists, re-route the TV antenna cable so that it is as far as possible from the power cable and audio and video connection cables of the RMDS-1 system.
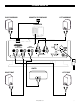
Standard OR S-VHS DVD VCR In VCR Input VCR Rec. Out VCR Rec. Multi-Room Output Out DVD Video TV out CD TAPE In TAPE Rec. Out DSS LD IN R AUDIO L AUDIO VIDEO VCR DSS (out) (in) REMOTE CONTROL EXTENSION L AUDIO VIDEO R AUDIO OUT D I G I TA L A U D I O I N P U T S DVD AM LD Right GROUND DSS LD RF FM(75Ω) VIDEO INPUTS VIDEO IN Left ANTENNA ANALOG AUDIO INPUTS RMDS FM ANTENNA AM LOOP ANTENNA TV OVERALL HOOK UP AUDIO OUT (connect to subwoofer) 120V,60HZ 100W,0.
RIGHT FRONT RIGHT SURROUND L FRONT SPEAKER OUTPUT AUDIOINPUT INPUT AUDIO R CENTER R R SURROUND SPEAKER OUTPUT L L Polk customer service (800) 377-7655 • www.polkaudio.
RMDS-1 Specifications System Overall Frequency Response 30Hz—24kHz -3dB Frequency Response Limits 38Hz—20kHz Subwoofer to Satellite/Center Crossover Design Active 4th order (24dB/octave) low-pass and high-pass, 150Hz acoustic crossover. Maximum Sound Pressure Level 105 dB in an IEC Standard 80 cubic meter (2825 cubic foot, e.g.
www.polkaudio.
RM6608-1 5601 METRO DRIVE, BALTIMORE, MARYLAND 21215, USA, 410-764-5275, FAX: 410-764-5266 www.polkaudio.