Sample Project: Simple Hexapod Walker © 2001–2012 Pololu Corporation Sample Project: Simple Hexapod Walker 1. Introduction . . . . . . . . . . . . . . . . . 2. Materials and Tools . . . . . . . . . . . . . 3. Construction . . . . . . . . . . . . . . . . 4. Sequencing the Hexapod Gait . . . . . . . 5. Using a Script for Obstacle Avoidance . . . 6. Suggested Modifications and Improvements 7. Conclusion and Community . . . . . . . . http://www.pololu.com/docs/0J42 . . . . . . . . . . . . . . . . . . . .
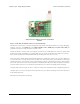
Sample Project: Simple Hexapod Walker © 2001–2012 Pololu Corporation 1. Introduction Six-legged locomotion is a simple, robust system of walking that is very popular both in the animal kingdom and among robotics hobbyists. Robot hexapods range from simple one-motor toys to advanced platforms with 18 or more servos. This tutorial shows you how to build a very simple autonomous hexapod robot using just three servos. The 2"-high hexapod is capable of walking forward and backward, and can turn left and right.
Sample Project: Simple Hexapod Walker © 2001–2012 Pololu Corporation 2. Materials and Tools Parts list: Parts you will need to build the hexapod. NOTE: the new version of the battery works with headers included with the Maestro instead of the special connector shown. Quantity Part # Part Notes 1351 Pololu Micro Maestro Get the kit version so that you can solder in your own wires Partial Kit for the most compact possible robot.
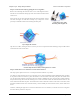
Sample Project: Simple Hexapod Walker © 2001–2012 Pololu Corporation Most of these parts are available in the Tools [http://www.pololu.com/catalog/category/5] section of the Pololu web site. A hot glue gun is available at most craft stores for a few dollars. 2.
Sample Project: Simple Hexapod Walker © 2001–2012 Pololu Corporation 3. Construction Step 1: Attach male header as a battery connector. Find the 1×10 piece of 0.1" male header included with your Maestro. Break off a 1×2 piece and solder it to the BAT and GND pins as shown. Note that the connector is not polarized, so you must be careful to always plug in the battery with the black wire connected to ground and the red wire connected to BAT.
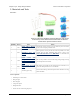
Sample Project: Simple Hexapod Walker © 2001–2012 Pololu Corporation Self power and a battery connector on the Micro Maestro. Step 3: Verify that the Maestro and servos are functioning. The Maestro Control Center is used for configuration and control of the Micro Maestro, for testing, debugging, scripting, and more. See Section 4 of the Micro Maestro User’s Guide [http://www.pololu.com/docs/0J40] for complete instructions on using the Maestro Control Center.
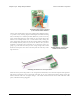
Sample Project: Simple Hexapod Walker © 2001–2012 Pololu Corporation Step 4: Construct the body by gluing the servos together. Remove the mounting tabs from all three servos with diagonal cutters. The tabs are not needed for this project and can interfere with the motion of the servos. Next, join the servos with a few dabs of hot glue as shown below. You do not need much glue to hold them securely! Try to align the corners precisely to make flat surfaces for mounting the other parts.
Sample Project: Simple Hexapod Walker © 2001–2012 Pololu Corporation Connecting the servos to ports 0, 1, and 2 on the Micro Maestro. Cut the sensor boards with a rotary tool, grinding wheel, diagonal cutters, or a jeweler’s saw, removing the part containing the unneeded mounting hole, so that they are as small as possible. (Make sure you do not cut any traces.) Then solder them to a cable so that you can connect them to the Maestro.
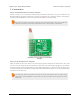
Sample Project: Simple Hexapod Walker © 2001–2012 Pololu Corporation Soldering the sensor cable on to the Maestro. You now have a complete electrical assembly. Plug in the batteries, and the sensors should become active, turning on their red LEDs whenever they detect an object within 10 cm. With the Maestro control center, you should be able to see the input value change from 255, when no object is present, to a low value of 40 or so, when an object is detected.
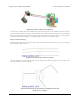
Sample Project: Simple Hexapod Walker © 2001–2012 Pololu Corporation Fold the third piece into an M shape, with sections of length 1.25", 1.75", 1.75", and 1.25", like this: The middle legs of the hexapod. The segments at the end should be 1.25" in length. Hot-glue the legs onto servo horns. Use a straight horn for the middle legs and cross-shaped or round horns for the front and back legs. Gluing the hexapod legs to servo horns.
Sample Project: Simple Hexapod Walker © 2001–2012 Pololu Corporation Attaching the legs and Maestro to the servos. Important: Never apply torque to the legs with your hands, attempt to prevent them from moving, or backdrive them. Servo gears can be easily broken, so they should only ever move under their own power. Use the Maestro Control Center to experiment with different positions, instead of forcing the servos. Step 7: Attaching the battery and sensors.
Sample Project: Simple Hexapod Walker © 2001–2012 Pololu Corporation The assembled hexapod, front view. Take care that the wiring does interfere with the motion of the middle legs. You might want to route yours differently. Use small drops of hot glue as necessary to hold the wires in place. 3.
Sample Project: Simple Hexapod Walker © 2001–2012 Pololu Corporation The assembled hexapod, top view. Step 8: Final touches. Use the Maestro Control Center to find the neutral positions (where the legs are as symmetrically arranged as possible) as well as their safe minimums and maximums. Set the neutral positions as the “Go to” values for each servo, and set Min and Max values so that your hexapod will never destroy itself.
Sample Project: Simple Hexapod Walker © 2001–2012 Pololu Corporation The assembled hexapod, side view. One final, optional thing that you might want to do is to add a dab of hot glue to each foot, so that the metal is less likely to scratch up your work surface. Your hexapod is now ready to be programmed! 3.
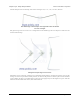
Sample Project: Simple Hexapod Walker © 2001–2012 Pololu Corporation 4. Sequencing the Hexapod Gait Gaits Now that you have constructed your hexapod, it is time to make it walk. A method of walking forward with legs is called a gait, and animals or robots with many degrees of freedom have a variety of gaits available – humans can walk, run, hop, or skip; horses can walk, trot, canter, or gallop, and so on.
Sample Project: Simple Hexapod Walker © 2001–2012 Pololu Corporation Frame 0 right front & back, left middle legs touching the ground Frame 1 down legs move back, front legs move forward Frame 2 weight shifted to the other tripod 4.
Sample Project: Simple Hexapod Walker © 2001–2012 Pololu Corporation Frame 3 down legs move back, front legs move forward In the screenshots of the Maestro Control Center, you can see that the servos are always either at their minimum or maximum values, which you should have configured to be safe values that do not cause the servo to strain. Your numbers might be slightly different from the ones shown here.
Sample Project: Simple Hexapod Walker © 2001–2012 Pololu Corporation 5. Using a Script for Obstacle Avoidance The Micro Maestro has an internal scripting language that can store sequences, read sensors, and link everything together to form intelligent behaviors, making your hexapod truly autonomous. For complete documentation on the scripting language, see Section 6 of the Micro Maestro User’s Guide [http://www.pololu.com/docs/0J40].
Sample Project: Simple Hexapod Walker 150 7168 return # right sub right 100 4992 120 7168 100 6528 120 4992 return © 2001–2012 Pololu Corporation 5056 frame_0_2 # Frame 3 5312 6976 frame_0_1_2 # Frame 1 5056 frame_0_2 # Frame 2 frame_1 # Frame 3 6976 frame_0_2 # Frame 0 sub frame_0_1_2 2 servo 1 servo 0 servo delay return sub frame_0_2 2 servo 0 servo delay return sub frame_1 1 servo delay return 5.
Sample Project: Simple Hexapod Walker © 2001–2012 Pololu Corporation 6. Suggested Modifications and Improvements Here are some ideas for improvements or modifications that could be made to the hexapod design: • More complicated scripted behaviors – help your hexapod get out of stuck situations more reliably. • More robust sensor readings.
Sample Project: Simple Hexapod Walker © 2001–2012 Pololu Corporation 7. Conclusion and Community The Micro Maestro can act as the brain for a simple hexapod robot. Three of the Maestro’s six channels are used for the servos, so there are three channels available for sensors such as distance sensors, which the hexapod can use to react to its environment. The Maestro’s scripting functionality allows simple behaviors and motion sequences to be programmed onto the device, making the hexapod autonomous.