
Data Sheet


7. Programming using the PICkit 3
Warning: Using a PICkit to program the P-Star will permanently erase its USB bootloader, so you
will not be able to program it over USB using the Pololu USB Bootloader Utility. It will also erase
the serial number of the device.
The PICkit 3 [http://www.microchip.com/pickit3] from Microchip is a hardware debugger and programmer for PIC
microcontrollers that can be used to program the P-Star.
The PICkit 3 has a female header with six pins. Five of these pins need to be connected to the P-Star in order to
program it:
• Pin 1 of the PICkit 3, which is indicated with a triangle on the PICkit’s case, connects to the P-Star’s
MCLR pin.
• Pin 2 connects to VDD.
• Pin 3 connects to GND.
• Pin 4 connects to RB7 (also known as PGD).
• Pin 5 connects to RB6 (also known as PGC).
• Pin 6 should be left unconnected.
In addition to making these connections, the P-Star must also be powered (the PICkit 3 does not supply power).
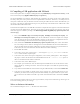
The picture below shows one way to connect a P-Star 25K50 Micro to a PICkit 3. An upwards-pointing 1×4
male header is soldered to VDD, GND, RB7, and RB6. These pins are connected to the PICkit 3 with male-
female premium jumper wires [https://www.pololu.com/category/67/male-female-premium-jumper-wires]. The MCLR
pin is connected to the PICkit 3 through the breadboard and a male-male premium jumper wire
[https://www.pololu.com/category/68/male-male-premium-jumper-wires]. The PICkit 3 must be connected via USB to a
computer, and the P-Star needs to be powered either from its USB port or from the VIN pin.
Pololu P-Star 25K50 Micro User’s Guide © 2001–2017 Pololu Corporation
7. Programming using the PICkit 3 Page 26 of 38