Pololu AVR C/C++ Library User’s Guide © 2001–2015 Pololu Corporation Pololu AVR C/C++ Library User’s Guide View document on multiple pages. [https://www.pololu.com/docs/0J20] View this document as a printable PDF: pololu_avr_library.pdf [https://www.pololu.com/docs/pdf/0J20/ pololu_avr_library.pdf] 1. Introduction . . . . . . . . . . . . . . . . . . . . . . . 2. Getting Started . . . . . . . . . . . . . . . . . . . . . . 2.a. Download Instructions . . . . . . . . . . . . . . 2.b. Manual Installation .
Pololu AVR C/C++ Library User’s Guide © 2001–2015 Pololu Corporation 1. Introduction This document is a guide to using the Pololu AVR C/C++ library, including installation instructions, tutorials, and example programs. The Pololu AVR Library makes it easy for you to get started with the following Pololu products: Pololu 3pi robot [https://www.pololu.com/product/975]: a mega168/328-based programmable robot.
Pololu AVR C/C++ Library User’s Guide © 2001–2015 Pololu Corporation Pololu Baby Orangutan B-328 [https://www.pololu.com/product/1220]: a mega328 version of the above. The mega328 offers more memory for your programs (32 KB flash, 2 KB RAM). This library also supports the Baby Orangutan B-168 [https://www.pololu.com/product/1216], which was replaced by the Baby B-328. Pololu QTR-1A [https://www.pololu.com/product/958] and QTR-8A [https://www.pololu.
Pololu AVR C/C++ Library User’s Guide © 2001–2015 Pololu Corporation 2. Getting Started Please see the Pololu AVR Programming Quick Start Guide [https://www.pololu.com/docs/0J51] for detailed instructions on how to get started using the library in Linux, Windows, and Mac OS X. That guide also explains how to get started with Pololu USB AVR Programmer [https://www.pololu.com/product/1300]. 2.a.
Pololu AVR C/C++ Library User’s Guide © 2001–2015 Pololu Corporation • libpololu-avr-101104.zip zip) [https://www.pololu.com/file/download/libpololu-avr-101104.zip?file_id=0J413] (2MB • libpololu-avr-100607.zip zip) [https://www.pololu.com/file/download/libpololu-avr-100607.zip?file_id=0J381] (2MB • libpololu-avr-100326.zip zip) [https://www.pololu.com/file/download/libpololu-avr-100326.zip?file_id=0J334] (2MB • libpololu-avr-100129.zip zip) [https://www.pololu.
Pololu AVR C/C++ Library User’s Guide • C:\Program Files (x86)\Atmel\AVR Studio 5.0\AVR Toolchain\avr • C:\WinAVR-20100110\avr • /usr/lib/avr • /usr/avr • /usr/local/CrossPack-AVR/avr/ © 2001–2015 Pololu Corporation If you currently have an older version of the Pololu AVR Library, your first step should be to delete all of the old include files and libpololu_*.a files that you installed previously. Next, copy the libpololu_*.a files into the lib subdirectory of your avr directory (e.g.
Pololu AVR C/C++ Library User’s Guide © 2001–2015 Pololu Corporation 3. Functional Overview and Example programs 3.a. Orangutan Analog Input Functions Overview This section of the library provides a set of methods that can be used to read analog voltage inputs, as well as functions specifically designed to read the value of the trimmer potentiometer (on the 3pi Robot [https://www.pololu.com/product/975], Orangutan SV [https://www.pololu.com/product/1227], Orangutan LV-168 [https://www.pololu.
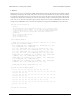
Pololu AVR C/C++ Library User’s Guide © 2001–2015 Pololu Corporation unsigned int avg; unsigned char samples; int main() { set_analog_mode(MODE_8_BIT); // 8-bit analog-to-digital conversions sum = 0; samples = 0; avg = 0; start_analog_conversion(TRIMPOT); // start initial conversion while(1) { if (!analog_is_converting()) // if conversion is done...
Pololu AVR C/C++ Library User’s Guide © 2001–2015 Pololu Corporation while(1) // run over and over again { lcd_goto_xy(0,0); // LCD cursor to home position (upper-left) print_long(to_millivolts(read_trimpot())); // trimpot output in mV print(" mV "); // added spaces are to overwrite left over chars lcd_goto_xy(0, 1); // LCD cursor to start of the second line unsigned int temp = read_temperature_f(); // get temp in tenths of a degree F print_long(temp/10); // get the whole number of degrees print_charact
Pololu AVR C/C++ Library User’s Guide © 2001–2015 Pololu Corporation 1. buzzer1 Demonstrates one way to use this library’s play_note() method to play a simple melody stored in RAM. It should immediately start playing the melody, and you can use the top user pushbutton to stop and replay the melody.
Pololu AVR C/C++ Library User’s Guide int main() { currentIdx = 0; print("Music!"); © 2001–2015 Pololu Corporation // run once, when the sketch starts while(1) // run over and over again { // if we haven't finished playing the song and // the buzzer is ready for the next note, play the next note if (currentIdx < MELODY_LENGTH && !is_playing()) { // play note at max volume play_note(note[currentIdx], duration[currentIdx], 15); } // // // // } } // optional LCD feedback (for fun) lcd_goto_xy(0, 1); //
Pololu AVR C/C++ Library User’s Guide © 2001–2015 Pololu Corporation #include // this lets us refer to data in program space (i.e. flash) // store this fugue in program space using the PROGMEM macro. // Later we will play it directly from program space, bypassing the need to load it // all into RAM first.
Pololu AVR C/C++ Library User’s Guide © 2001–2015 Pololu Corporation /* * buzzer3: for the Orangutan LV, SV, SVP, X2, and 3pi robot. * * This example program is indended for use on the Orangutan LV, SV, * SVP, X2, and 3pi robot and will NOT work under the Arduino environment. * It uses the OrangutanBuzzer functions to play a series of notes on * the Orangutan's buzzer.
Pololu AVR C/C++ Library User’s Guide © 2001–2015 Pololu Corporation while(1) { // allow the sequence to keep playing automatically through the following delays #ifndef ALWAYS_CHECK play_mode(PLAY_AUTOMATIC); #else play_mode(PLAY_CHECK); #endif lcd_goto_xy(0, 0); print("blink!"); int i; for (i = 0; i < 8; i++) { #ifdef ALWAYS_CHECK play_check(); #endif red_led(1); delay_ms(500); red_led(0); delay_ms(500); } lcd_goto_xy(0, 0); print("timing"); lcd_goto_xy(0, 1); print(" "); // clear bottom LCD line // turn
Pololu AVR C/C++ Library User’s Guide © 2001–2015 Pololu Corporation Digital outputs When a pin is configured as a digital output, the AVR is either driving it low (0 V) or high (5 V). This means that the pin has a strong electrical connection to either 0 V (GND) or 5 V (VCC). An output pin can be used to send data to a peripheral device or supply a small amount of power (for example, to light an LED). Digital inputs When a pin is configured as a digital input, the AVR can read the voltage on the pin.
Pololu AVR C/C++ Library User’s Guide © 2001–2015 Pololu Corporation 1. digital1 This example program takes a digital reading on PC1, and uses that reading to decide whether to drive pin PD1 (the red LED pin) low or high. You can test that the example is working by connecting a wire from PC1 to ground. When the connection is made the red LED should change state. #include
Pololu AVR C/C++ Library User’s Guide © 2001–2015 Pololu Corporation Complete documentation of this library’s methods can be found in Section 5 of the Pololu AVR Library Command Reference [https://www.pololu.com/docs/0J18]. Usage Examples This library comes with two examples in libpololu-avr\examples. 1. lcd1 Demonstrates shifting the contents of the display by moving the word “Hello” around the two lines of the LCD. #include
Pololu AVR C/C++ Library User’s Guide © 2001–2015 Pololu Corporation #include // get random functions #include /* * lcd2: for the Orangutan controllers and 3pi robot * * This example uses the OrangutanLCD functions to display custom * characters on the LCD. Simply push a any user pushbutton to * display a new, randomly chosen, custom mood character. * * http://www.pololu.com/docs/0J20 * http://www.pololu.com * http://forum.pololu.
Pololu AVR C/C++ Library User’s Guide © 2001–2015 Pololu Corporation int main() { lcd_load_custom_character(happy, 0); lcd_load_custom_character(sad, 1); lcd_load_custom_character(indifferent, 2); lcd_load_custom_character(surprised, 3); lcd_load_custom_character(mocking, 4); clear(); // this must be called before we can use the custom characters print("mood: ?"); // initialize the random number generator based on how long // they hold the button the first time wait_for_button_press(ALL_BUTTONS); long see
Pololu AVR C/C++ Library User’s Guide © 2001–2015 Pololu Corporation Complete documentation of these functions can be found in Section 10 of the Pololu AVR Library Command Reference [https://www.pololu.com/docs/0J18]. This library comes with an example program in libpololu-avr\examples. 1. led1 A simple example that blinks LEDs. #include
Pololu AVR C/C++ Library User’s Guide © 2001–2015 Pololu Corporation Complete documentation of these functions can be found in Section 7 of the Pololu AVR Library Command Reference [https://www.pololu.com/docs/0J18]. Usage Examples This library comes with two examples in libpololu-avr\examples. 1. motors1 Demonstrates controlling the motors using the trimmer potentiometer and uses the red LED for feedback. #include
Pololu AVR C/C++ Library User’s Guide © 2001–2015 Pololu Corporation * motors in response to the position of user trimmer potentiometer * and to display the potentiometer position and desired motor speed * on the LCD. It uses the OrangutanAnalog library to measure the * trimpot position, and it uses the OrangutanLEDs library to provide * limited feedback with the red and green user LEDs. * * * http://www.pololu.com/docs/0J20 * http://www.pololu.com * http://forum.pololu.
Pololu AVR C/C++ Library User’s Guide © 2001–2015 Pololu Corporation 1. pushbuttons1 Demonstrates interfacing with the user pushbuttons. It will wait for you to push either the top button or the bottom button, at which point it will display on the LCD which button was pressed. It will also detect when that button is subsequently released and display that to the LCD. #include
Pololu AVR C/C++ Library User’s Guide © 2001–2015 Pololu Corporation transmitting bytes on TXD0, the red LED will be off. When the AVR is transmitting bytes on TXD0, the red LED will flicker. However, the AVR on the Orangutan SVP has two UARTs, so if you want to use the red LED and you only need one UART then you can use UART1 instead of UART0. Complete documentation of this library’s methods can be found in Section 10 of the Pololu AVR Library Command Reference [https://www.pololu.com/docs/0J18].
Pololu AVR C/C++ Library User’s Guide © 2001–2015 Pololu Corporation green_led(1); break; // If the character 'g' is received, turn off the green LED. case 'g': green_led(0); break; // If the character 'c' is received, play the note c. case 'c': play_from_program_space(PSTR("c16")); break; // If the character 'd' is received, play the note d. case 'd': play_from_program_space(PSTR("d16")); break; } } // If any other character is received, change its capitalization and // send it back.
Pololu AVR C/C++ Library User’s Guide } } } © 2001–2015 Pololu Corporation // have been received. wait_for_button_release(MIDDLE_BUTTON); 3.i. Orangutan Servo Control Functions Overview This section of the library provides commands for generating digital pulses to control servos. Complete documentation of these functions can be found in Section 11 of the Pololu AVR Library Command Reference [https://www.pololu.com/docs/0J18].
Pololu AVR C/C++ Library User’s Guide © 2001–2015 Pololu Corporation board 8-output demultiplexer. If you just need to control one servo, you can leave the demultiplexer input lines disconnected, and plug your servo in to servo port 0. If you want to control more than one servo, then you must choose which free I/O lines to connect to the demultiplexer’s three output-selection lines. If you use one I/O line, you can control two servos. If you use two I/O lines, you can control up to four servos.
Pololu AVR C/C++ Library User’s Guide © 2001–2015 Pololu Corporation wait_for_button_release(BOTTOM_BUTTON); } // // // // // // } } // When the user releases the bottom button, print its current // position (in microseconds) and then move it back quickly. clear(); print_long(get_servo_position(0)); print_from_program_space(PSTR(" \xE4s")); set_servo_speed(0, 0); set_servo_target(0, 1300); Local Variables: ** mode: C ** c-basic-offset: 4 ** tab-width: 4 ** indent-tabs-mode: t ** end: ** 2.
Pololu AVR C/C++ Library User’s Guide set_servo_target(4, set_servo_target(5, set_servo_target(6, set_servo_target(7, while(1) { } } © 2001–2015 Pololu Corporation 1300); 1300); 1300); 1300); // Loop forever. // When the user presses the top button, execute a pre-programmed // sequence of servo movements.
Pololu AVR C/C++ Library User’s Guide // take 1.
Pololu AVR C/C++ Library User’s Guide } // // // // // // } © 2001–2015 Pololu Corporation } Local Variables: ** mode: C ** c-basic-offset: 4 ** tab-width: 4 ** indent-tabs-mode: t ** end: ** 3.j. Orangutan SVP Functions Overview The Orangutan SVP [https://www.pololu.com/product/1325] is based on the AVR ATmega324 or ATmega1284 processor. It has an auxiliary processor that provides the USB connection, five configurable input lines, and battery voltage reading.
Pololu AVR C/C++ Library User’s Guide © 2001–2015 Pololu Corporation You can use the setMode() command at the beginning of your program to set the mode of the auxiliary processor. See the Pololu AVR Library Command Reference for details. Powered by SPI Whenever you call a function in the Pololu AVR Library that uses the auxiliary processor, the function might initiate SPI communication to the auxiliary processor.
Pololu AVR C/C++ Library User’s Guide © 2001–2015 Pololu Corporation if (usb_configured()) { // Connected to USB and the computer recognizes the device. print("USB"); } else if (usb_power_present()) { // Connected to USB. print("usb"); } if (usb_suspend()) { // Connected to USB, in the Suspend state. lcd_goto_xy(4,0); print("SUS"); } if (dtr_enabled()) { // The DTR virtual handshaking line is 1. // This often means that a terminal program is conencted to the // Pololu Orangutan SVP USB Communication Port.
Pololu AVR C/C++ Library User’s Guide © 2001–2015 Pololu Corporation Complete documentation of these functions can be found in Section 16 of the Pololu AVR Library Command Reference [https://www.pololu.com/docs/0J18]. Usage Notes Calibration This library allows you to use the calibrate() method to easily calibrate your sensors for the particular conditions it will encounter. Calibrating your sensors can lead to substantially more reliable sensor readings, which in turn can help simplify your code.
Pololu AVR C/C++ Library User’s Guide © 2001–2015 Pololu Corporation 3. For line-detection applications, you can request the line location using the qtr_read_line() functions, which takes as optional parameters a boolean that indicates whether the line is white on a black background or black on a white background, and a boolean that indicates whether the IR emitters should be on or off during the measurement.
Pololu AVR C/C++ Library User’s Guide © 2001–2015 Pololu Corporation proportional constant Kp. This is because the derivative of the error is a much smaller quantity than the error itself, so in order to produce a meaningful correction it needs to be multiplied by a much larger constant. int lastError = 0; void loop() // call this routine repeatedly from your main program { unsigned int sensors[3]; // get calibrated sensor values returned in the sensors array, // along with the line position.
Pololu AVR C/C++ Library User’s Guide © 2001–2015 Pololu Corporation Usage Notes The two sensors A and B on the encoder board go through a four-step cycle as each tooth of the wheel passes by, for a total of 48 counts per revolution. This corresponds to about 3 mm for each count, though you will have to calibrate values for your own robot to get a precise measure of distance.
Pololu AVR C/C++ Library User’s Guide © 2001–2015 Pololu Corporation 4. Using the Pololu AVR Library for your own projects After getting one of the example projects to work with an Orangutan controller or 3pi robot, you can start working on more complicated programs of your own. The library provides easy access to all of the features of the Orangutans and 3pi, including the LCD screen, buttons, LEDs, motors, and buzzer.
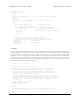
Pololu AVR C/C++ Library User’s Guide © 2001–2015 Pololu Corporation AVR Studio 4 library settings for using the Pololu AVR library (libpololu). Finally, we also strongly recommend the linker option -Wl,-gc-sections. This causes unused library functions to not be included, resulting in a much smaller code size. To include this in AVR Studio 4, select Project > Configuration Options > Custom Options. Click on [Linker options] and add -Wl,-gc-sections to the list.
Pololu AVR C/C++ Library User’s Guide © 2001–2015 Pololu Corporation Recommended AVR Studio 4 linker options for projects using the Pololu AVR Library. Special option necessary for Orangutan X2 If you are using one of the newer Orangutan X2s that comes with a ATmega1284p processor, you must define the _X2_1284 preprocessor macro so that the Pololu AVR Library Header files know that you are programming an X2 rather than an Orangutan SVP-1284.
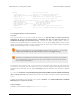
Pololu AVR C/C++ Library User’s Guide © 2001–2015 Pololu Corporation This picture shows how to configure AVR Studio 4 to use the -D_X2_1284 option, which is required when compiling a program a newer Orangutan X2 that has a ATmega1284p. 4.
Pololu AVR C/C++ Library User’s Guide © 2001–2015 Pololu Corporation 5. Compiling the Pololu AVR Library (Optional) This section is optional, for people who want to modify the library or get a better understanding of how it works. If you just want to install the library, proceed to Section 3.b for Windows, Section 4.b for Linux, or Section 5.b for Mac OS X.
Pololu AVR C/C++ Library User’s Guide © 2001–2015 Pololu Corporation 6. Additional resources To learn more about programming AVRs and using the Pololu AVR Library, see the following list of resources: • Pololu AVR Library Command Reference [https://www.pololu.com/docs/0J18]: detailed information about every function in the library.