Programming Orangutans and the 3pi Robot from the Arduino Environment © 2001–2019 Pololu Corporation Programming Orangutans and the 3pi Robot from the Arduino Environment 1. Introduction . . . . . . . . . . . . . . . . . . . . . . . . . . 2. ATmega168/328-Arduino Pin Mapping . . . . . . . . . . . . 2.a. Orangutan SV-xx8 and LV-168 Pin Mappings . . . . . 2.b. Baby Orangutan B Pin Mappings . . . . . . . . . . . 2.c. 3pi Robot Pin Mappings . . . . . . . . . . . . . . . . 3.
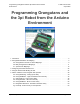
Programming Orangutans and the 3pi Robot from the Arduino Environment © 2001–2019 Pololu Corporation 1. Introduction Baby Orangutan B with included header pins soldered in for breadboard installation. The Orangutan LV-168 attached to a 3-AA battery holder. Arduino [http://www.arduino.cc/] is a popular, open-source prototyping platform that makes it easy for people with little electronics experience to get into the world of microcontrollers and embedded programming.
Programming Orangutans and the 3pi Robot from the Arduino Environment © 2001–2019 Pololu Corporation The Orangutans and 3pi robot offer integrated hardware that Arduinos do not, such as on-board dual motor drivers. This makes them well suited for applications involving control of small- to medium-sized robots. The Orangutan SV-xx8, Orangutan LV-168, and 3pi robot also have integrated pushbuttons, a piezo buzzer, and a removable LCD, all of which are additional features not found on official Arduinos.
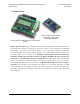
Programming Orangutans and the 3pi Robot from the Arduino Environment © 2001–2019 Pololu Corporation Pololu USB AVR programmer with included sixpin ISP cable. Note: This document applies only to the 3pi robot and Orangutan SV-xx8 [https://www.pololu.com/product/1227], [https://www.pololu.com/product/775], 1220] [https://www.pololu.com/product/975] Orangutan LV-168 and Baby Orangutan B [https://www.pololu.com/product/ robot controllers.
Programming Orangutans and the 3pi Robot from the Arduino Environment © 2001–2019 Pololu Corporation 2. ATmega168/328-Arduino Pin Mapping In our standard Orangutan and 3pi documentation, we use the same convention that Atmel uses in its ATmega168/328 datasheet, referring to pins by their associated ports. For example, pin PD7 is pin 7 of port D. This convention is used because each port is controlled by its own AVR registers, and the bits of these registers correspond to individual pins.
Programming Orangutans and the 3pi Robot from the Arduino Environment © 2001–2019 Pololu Corporation 2.a. Orangutan SV-xx8 and LV-168 Pin Mappings 2.
Programming Orangutans and the 3pi Robot from the Arduino Environment © 2001–2019 Pololu Corporation Orangutan SV-168 bottom view with dimensions Orangutan LV-168 bottom view with dimensions (Arduino pin mapping). (Arduino pin mapping). 2.
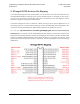
Programming Orangutans and the 3pi Robot from the Arduino Environment © 2001–2019 Pololu Corporation Pin Assignment Table Sorted by Function Function Arduino Pin mega168 Pin digital pins 0 and 1 PD0, PD1, analog inputs 0 – 5 PC0 – PC5 analog inputs (x8) analog inputs 0 – 7 PC0 – PC5, ADC6, ADC7 motor 1 control (A and B) digital pins 5 and 6 PD5 and PD6 motor 2 control (A and B) digital pins 3 and 11 PD3 and PB3 red user LED digital pin 1 PD1 green user LED digital pin 7 PD7 user push
Programming Orangutans and the 3pi Robot from the Arduino Environment © 2001–2019 Pololu Corporation Pin Assignment Table Sorted by Pin 2.
Programming Orangutans and the 3pi Robot from the Arduino Environment Arduino Pin Orangutan Function © 2001–2019 Pololu Corporation Notes/Alternate Functions digital pin 0 digital I/O USART input pin (RXD) digital pin 1 digital I/O digital pin 2 LCD control line RS external interrupt 0 (INT0) digital pin 3 M2 control line Timer2 PWM output B (OC2B) digital pin 4 LCD control line E digital pin 5 M1 control line Timer0 PWM output B (OC0B) digital pin 6 M1 control line Timer0 PWM output
Programming Orangutans and the 3pi Robot from the Arduino Environment analog input 7 dedicated analog input reset reset pushbutton © 2001–2019 Pololu Corporation jumpered to user trimmer potentiometer ADC input channel 7 (ADC7) internally pulled high; active low digital I/O disabled by default 2.b. Baby Orangutan B Pin Mappings 2.
Programming Orangutans and the 3pi Robot from the Arduino Environment © 2001–2019 Pololu Corporation Pin Assignment Table Sorted by Function Function digital I/Os (x16) Arduino Pin digital pins 0 – 2, 4, 7 – 10, 12, 13 analog inputs 0 – 5 mega168 Pin PD0 – PD2, PD4, PD7, PB0 – PB2, PB4, PB5, PC0 – PC5 analog inputs (x8) analog inputs 0 – 7 PC0 – PC5, ADC6, ADC7 motor 1 control (A and B) digital pins 5 and 6 PD5 and PD6 motor 2 control (A and B) digital pins 3 and 11 PD3 and PB3 red user LED
Programming Orangutans and the 3pi Robot from the Arduino Environment © 2001–2019 Pololu Corporation Pin Assignment Table Sorted by Pin 2.
Programming Orangutans and the 3pi Robot from the Arduino Environment Arduino Pin Orangutan Function © 2001–2019 Pololu Corporation Notes/Alternate Functions digital pin 0 digital I/O USART input pin (RXD) digital pin 1 digital I/O digital pin 2 digital I/O external interrupt 0 (INT0) digital pin 3 M2 control line Timer2 PWM output B (OC2B) digital pin 4 digital I/O digital pin 5 M1 control line Timer0 PWM output B (OC0B) digital pin 6 M1 control line Timer0 PWM output A (OC0A) digit
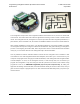
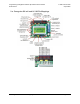
Programming Orangutans and the 3pi Robot from the Arduino Environment © 2001–2019 Pololu Corporation 2.c. 3pi Robot Pin Mappings General features of the Pololu 3pi robot, top view. 2.
Programming Orangutans and the 3pi Robot from the Arduino Environment © 2001–2019 Pololu Corporation Labeled bottom view of the Pololu 3pi robot. 2.
Programming Orangutans and the 3pi Robot from the Arduino Environment © 2001–2019 Pololu Corporation Specific features of the Pololu 3pi robot, top view. 2.
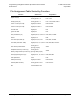
Programming Orangutans and the 3pi Robot from the Arduino Environment © 2001–2019 Pololu Corporation Pin Assignment Table Sorted by Function Function free digital I/Os (x3) (remove PC5 jumper to free digital pin 19) Arduino Pin digital pins 0, 1, 19 mega168 Pin PD0, PD1, PC5 free analog inputs (if you remove jumpers, x3) analog inputs 5 – 7 PC5, ADC6, ADC7 motor 1 (left motor) control (A and B) digital pins 5 and 6 PD5 and PD6 motor 2 (right motor) control (A and B) digital pins 3 and 11 PD3 and
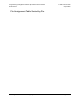
Programming Orangutans and the 3pi Robot from the Arduino Environment © 2001–2019 Pololu Corporation Pin Assignment Table Sorted by Pin 2.
Programming Orangutans and the 3pi Robot from the Arduino Environment Arduino Pin Orangutan Function © 2001–2019 Pololu Corporation Notes/Alternate Functions digital pin 0 free digital I/O digital pin 1 free digital I/O digital pin 2 LCD control line RS external interrupt 0 (INT0) digital pin 3 M2 control line Timer2 PWM output B (OC2B) digital pin 4 LCD control line E digital pin 5 M1 control line Timer0 PWM output B (OC0B) digital pin 6 M1 control line Timer0 PWM output A (OC0A) dig
Programming Orangutans and the 3pi Robot from the Arduino Environment © 2001–2019 Pololu Corporation ADC input channel 5 (ADC5) analog input 6 dedicated analog input analog input 7 dedicated analog input reset reset pushbutton 2.
Programming Orangutans and the 3pi Robot from the Arduino Environment © 2001–2019 Pololu Corporation 3. Configuring the Arduino Environment The configuration instructions in this section explain how to alter the Arduino IDE so that it programs your Orangutan or 3pi robot using the correct settings via our USB AVR Programmer [https://www.pololu.com/product/1300], and provides a series of libraries that can help you interface with onboard hardware on your device. 1. Go to http://www.arduino.
Programming Orangutans and the 3pi Robot from the Arduino Environment © 2001–2019 Pololu Corporation • libpololu-arduino-150218.zip [https://www.pololu.com/file/0J859/libpololu-arduino-150218.zip] (111k zip), tested with Arduino 1.6.0 • PololuArduinoLibraries-120914 PololuArduinoLibraries-120914.zip] (107k zip), tested with Arduino 1.0.1 • PololuArduinoLibraries-111221 PololuArduinoLibraries-111221.zip] 3. Configuring the Arduino Environment [https://www.pololu.
Programming Orangutans and the 3pi Robot from the Arduino Environment © 2001–2019 Pololu Corporation 4. Using the Arduino IDE: Blinking an LED Now it’s time to take the Arduino IDE for a spin. Our first goal will be to load a simple LED-blinking sketch (Arduino program) onto our Orangutan or 3pi. Open the Arduino IDE and create the following sketch: 1 2 3 4 5 6 7 8 9 10 11 12 13 14 15 16 17 18 19 20 21 22 23 24 25 ? /* * Blink * * The basic Arduino example, modified to work for Orangutans.
Programming Orangutans and the 3pi Robot from the Arduino Environment © 2001–2019 Pololu Corporation Select the programmer: If you are using a Pololu USB AVR Programmer, select “Pololu USB AVR Programmer” in the Programmer menu. Otherwise, consult the documentation of your programmer to find out which option to select. Select the programmer’s serial port: 4.
Programming Orangutans and the 3pi Robot from the Arduino Environment © 2001–2019 Pololu Corporation If you are using a Pololu USB AVR Programmer, make sure you have installed the proper drivers (see the programmer’s user’s guide [https://www.pololu.com/docs/0J36]) and have connected it to your computer. Once this is done, you should be able to see its COM port listed under the Tools > Serial Port menu.
Programming Orangutans and the 3pi Robot from the Arduino Environment © 2001–2019 Pololu Corporation Program your Orangutan or 3pi with the sketch: Make sure your Orangutan or 3pi is connected to power and turned on. The power LED on the board should be on. Connect your programmer to the Orangutan or 3pi via its six-pin ISP header, making sure that pin 1 of the programmer lines up with pin 1 of the target’s programming header.
Programming Orangutans and the 3pi Robot from the Arduino Environment © 2001–2019 Pololu Corporation 5. Arduino Libraries for the Orangutan and 3pi Robot Note: Because the Orangutans were not designed as official Arduino boards, and run at 20 MHz instead of 16 Mhz, not all existing Arduino library code will be directly compatible with them. Also, Orangutan-specific libraries might conflict with existing Arduino libraries if the two are competing for the same hardware peripherals (e.g.
Programming Orangutans and the 3pi Robot from the Arduino Environment © 2001–2019 Pololu Corporation Overview This section provides a series of Orangutan-specific libraries that will allow you to easily interface with the Orangutan/3pi hardware from the Arduino environment. It is important to note that the Baby Orangutan B is a hardware subset of the larger Orangutan SV-xx8 and LV-168, and these Orangutans are (almost) a hardware subset of the 3pi robot.
Programming Orangutans and the 3pi Robot from the Arduino Environment © 2001–2019 Pololu Corporation Usage examples Most libraries come with at least one example sketch that demonstrates how the library can be used. To load an example sketch, open the Arduino IDE and go to File > Examples > Orangutan____. The Pololu3pi library comes with several detailed line-following and maze-solving example sketches that can be loaded using File > Examples > Pololu3pi.
Programming Orangutans and the 3pi Robot from the Arduino Environment © 2001–2019 Pololu Corporation Overview This library provides a set of methods that can be used to read analog voltage inputs, as well as functions specifically designed to read the value of the trimmer potentiometer (on the 3pi robot [https://www.pololu.com/product/975], Orangutan SV-xx8 [https://www.pololu.com/product/1227], Orangutan LV-168 [https://www.pololu.com/product/775], and Baby Orangutan B [https://www.pololu.
Programming Orangutans and the 3pi Robot from the Arduino Environment © 2001–2019 Pololu Corporation OrangutanAnalog Methods Complete documentation of this library’s methods can be found in Section 2 of the Pololu AVR Library Command Reference [https://www.pololu.com/docs/0J18]. 5.
Programming Orangutans and the 3pi Robot from the Arduino Environment © 2001–2019 Pololu Corporation Usage Examples This library comes with two example sketches that you can load by going to File > Examples > OrangutanAnalog. The example sketches that come with the OrangutanMotors library also make limited use of this library. 1.
Programming Orangutans and the 3pi Robot from the Arduino Environment 1 2 3 4 5 6 7 8 9 10 11 12 13 14 15 16 17 18 19 20 21 22 23 24 25 26 27 28 29 30 31 32 33 34 35 36 37 38 39 40 41 42 43 44 45 46 47 48 49 50 51 52 53 54 55 © 2001–2019 Pololu Corporation #include #include
Programming Orangutans and the 3pi Robot from the Arduino Environment © 2001–2019 Pololu Corporation sensor on the Orangutan LV-168 is connected to 2/3rds of the battery voltage on the 3pi and to 1/ 3rd of the battery voltage on the Orangutan SV-xx8. It displays on the LCD the trimmer potentiometer output in millivolts and the temperature sensor output in degrees Fahrenheit.
Programming Orangutans and the 3pi Robot from the Arduino Environment © 2001–2019 Pololu Corporation Overview This library allows you to easily control the piezo buzzer on the 3pi robot [https://www.pololu.com/ product/975], Orangutan Orangutan SV-xx8 [https://www.pololu.com/product/775]. [https://www.pololu.
Programming Orangutans and the 3pi Robot from the Arduino Environment © 2001–2019 Pololu Corporation OrangutanBuzzer Methods Complete documentation of this library’s methods can be found in Section 3 of the Pololu AVR Library Command Reference [https://www.pololu.com/docs/0J18]. 5.
Programming Orangutans and the 3pi Robot from the Arduino Environment © 2001–2019 Pololu Corporation Usage Examples This library comes with three example sketches that you can load by going to File > Examples > OrangutanBuzzer. 1. OrangutanBuzzerExample Demonstrates one way to use this library’s playNote() method to play a simple melody stored in RAM. It should immediately start playing the melody, and you can use the top user pushbutton to stop and replay the melody.
Programming Orangutans and the 3pi Robot from the Arduino Environment 1 2 3 4 5 6 7 8 9 10 11 12 13 14 15 16 17 18 19 20 21 22 23 24 25 26 27 28 29 30 31 32 33 34 35 36 37 38 39 40 41 42 43 44 45 46 47 48 49 50 51 52 53 54 55 56 57 58 59 60 61 62 © 2001–2019 Pololu Corporation #include #include #include
Programming Orangutans and the 3pi Robot from the Arduino Environment 63 64 65 66 67 68 69 70 71 72 73 74 75 76 77 78 79 80 81 82 83 84 85 86 87 88 89 90 91 92 93 94 95 96 97 98 99 100 101 102 103 104 105 106 107 108 109 110 111 112 113 114 115 © 2001–2019 Pololu Corporation 250, 125, 125, 125, 250, 125, 125, 125, 125, 125, 125, 125, 125, 125, 250, 125, 125, 125, 250, 125, 125, 200, 50, 100, 25, 500, 250, 125, 125, 125, 250, 125, 125, 125, 125, 125, 125, 125, 125, 125, 250, 250, 125, 375, 500 }; Oranguta
Programming Orangutans and the 3pi Robot from the Arduino Environment © 2001–2019 Pololu Corporation is driven entirely by the Timer1 overflow interrupt. The top user pushbutton will play a fugue by Bach from program memory, the middle user pushbutton will quietly play the C major scale up and back down from RAM, and the bottom user pushbutton will stop any melody that is currently playing or play a single note if the buzzer is currently inactive. 5.
Programming Orangutans and the 3pi Robot from the Arduino Environment 1 2 3 4 5 6 7 8 9 10 11 12 13 14 15 16 17 18 19 20 21 22 23 24 25 26 27 28 29 30 31 32 33 34 35 36 37 38 39 40 41 42 43 44 45 46 47 48 49 50 51 52 53 54 55 56 57 58 59 60 61 62 © 2001–2019 Pololu Corporation ? #include #include #include
Programming Orangutans and the 3pi Robot from the Arduino Environment 63 64 65 66 67 68 69 70 71 72 73 74 75 76 77 78 79 80 81 82 83 84 © 2001–2019 Pololu Corporation } if (button == MIDDLE_BUTTON) { buzzer.play("! V8 cdefgab>cbagfedc"); lcd.print("C Major"); lcd.gotoXY(0, 1); lcd.print("RAM ->"); } if (button == BOTTOM_BUTTON) { if (buzzer.isPlaying()) { buzzer.stopPlaying(); lcd.print("stopped"); } else { buzzer.playNote(NOTE_A(5), 200, 15); lcd.print("note A5"); } } } 3.
Programming Orangutans and the 3pi Robot from the Arduino Environment 1 2 3 4 5 6 7 8 9 10 11 12 13 14 15 16 17 18 19 20 21 22 23 24 25 26 27 28 29 30 31 32 33 34 35 36 37 38 39 40 41 42 43 44 45 46 47 48 49 50 51 52 53 54 55 56 57 58 59 60 61 62 © 2001–2019 Pololu Corporation #include #include #include
Programming Orangutans and the 3pi Robot from the Arduino Environment 63 64 65 66 67 68 69 70 71 72 73 74 75 76 77 78 79 80 81 82 83 84 85 86 87 88 89 90 91 92 93 94 95 96 97 98 99 100 101 102 103 104 105 106 107 108 109 110 111 112 113 114 115 116 117 118 119 120 121 122 123 124 © 2001–2019 Pololu Corporation #include
Programming Orangutans and the 3pi Robot from the Arduino Environment 125 126 127 128 © 2001–2019 Pololu Corporation lcd.print("max="); lcd.print((unsigned int)maxTime); lcd.print(' '); // overwrite any left over characters } 5.c. OrangutanLCD - LCD Control Library 5.
Programming Orangutans and the 3pi Robot from the Arduino Environment © 2001–2019 Pololu Corporation Overview This library gives you the ability to control the 8×2 character LCD on the 3pi robot [https://www.pololu.com/product/975], Orangutan SV-xx8 [https://www.pololu.com/product/1227], and Orangutan LV-168 [https://www.pololu.com/product/775].
Programming Orangutans and the 3pi Robot from the Arduino Environment © 2001–2019 Pololu Corporation OrangutanLCD Methods Complete documentation of this library’s methods can be found in Section 5 of the Pololu AVR Library Command Reference [https://www.pololu.com/docs/0J18]. 5.
Programming Orangutans and the 3pi Robot from the Arduino Environment © 2001–2019 Pololu Corporation Usage Examples This library comes with two example sketches that you can load by going to File > Examples > OrangutanLCD. Note that most of the other libraries have example sketches that use the LCD, so please see these for more OrangutanLCD usage examples. 1. OrangutanLCDExample Demonstrates shifting the contents of the display by moving the word “Hello” around the two lines of the LCD.
Programming Orangutans and the 3pi Robot from the Arduino Environment 5.
Programming Orangutans and the 3pi Robot from the Arduino Environment 1 2 3 4 5 6 7 8 9 10 11 12 13 14 15 16 17 18 19 20 21 22 23 24 25 26 27 28 29 30 31 32 33 34 35 36 37 38 39 40 41 42 43 44 45 46 47 48 49 50 51 52 53 54 55 56 57 58 59 60 61 62 © 2001–2019 Pololu Corporation ? #include #include #include
Programming Orangutans and the 3pi Robot from the Arduino Environment 63 64 65 66 67 68 69 70 71 72 73 74 75 76 77 78 79 80 81 82 83 84 85 86 87 88 89 90 91 92 93 94 95 96 97 98 99 100 101 102 103 104 105 106 107 108 © 2001–2019 Pololu Corporation 0b01010, 0b01010, 0b01010, 0b00000, 0b11111, 0b00101, 0b00010 }; char prevMood = 5; void setup() // run once, when the sketch starts { lcd.loadCustomCharacter(happy, 0); lcd.loadCustomCharacter(sad, 1); lcd.loadCustomCharacter(indifferent, 2); lcd.
Programming Orangutans and the 3pi Robot from the Arduino Environment © 2001–2019 Pololu Corporation Overview This library allows you to easily control the LED(s) on the 3pi robot 975], [https://www.pololu.com/product/ Orangutan SV-xx8 [https://www.pololu.com/product/1227], Orangutan LV-168 [https://www.pololu.com/ product/775], and Baby Orangutan B [https://www.pololu.com/product/1220].
Programming Orangutans and the 3pi Robot from the Arduino Environment © 2001–2019 Pololu Corporation OrangutanLEDs Methods Complete documentation of this library’s methods can be found in Section 6 of the Pololu AVR Library Command Reference [https://www.pololu.com/docs/0J18]. 5.
Programming Orangutans and the 3pi Robot from the Arduino Environment © 2001–2019 Pololu Corporation Usage Examples This library comes with an example sketch that you can load by going to File > Examples > OrangutanLEDs. 1. OrangutanLEDExample Alternately blinks the red and green LEDs on the Orangutan SV-xx8, Orangutan LV-168, or 3pi robot.
Programming Orangutans and the 3pi Robot from the Arduino Environment © 2001–2019 Pololu Corporation Overview This library gives you the ability to control the motor drivers on the 3pi robot product/975], Orangutan SV-xx8 [https://www.pololu.com/product/775], [https://www.pololu.com/product/1227], and Baby Orangutan B [https://www.pololu.com/ Orangutan LV-168 [https://www.pololu.com/product/1220].
Programming Orangutans and the 3pi Robot from the Arduino Environment © 2001–2019 Pololu Corporation OrangutanMotors Methods Complete documentation of this library’s methods can be found in Section 7 of the Pololu AVR Library Command Reference [https://www.pololu.com/docs/0J18]. 5.
Programming Orangutans and the 3pi Robot from the Arduino Environment © 2001–2019 Pololu Corporation Usage Examples This library comes with two example sketches that you can load by going to File > Examples > OrangutanMotors. 1. OrangutanMotorExample Demonstrates controlling the motors using the trimmer potentiometer and uses the red LED for feedback. 5.
Programming Orangutans and the 3pi Robot from the Arduino Environment 1 2 3 4 5 6 7 8 9 10 11 12 13 14 15 16 17 18 19 20 21 22 23 24 25 26 27 28 29 30 31 32 33 34 35 36 37 38 39 40 41 42 43 44 45 46 47 48 49 50 51 © 2001–2019 Pololu Corporation ? #include #include #include
Programming Orangutans and the 3pi Robot from the Arduino Environment 1 2 3 4 5 6 7 8 9 10 11 12 13 14 15 16 17 18 19 20 21 22 23 24 25 26 27 28 29 30 31 32 33 34 35 36 37 38 39 40 41 42 43 44 45 46 47 48 49 50 51 52 53 54 55 56 57 58 #include #include #include #include © 2001–2019 Pololu Corporation ? /* * OrangutanMotorExample2 for the 3pi robot, Orangutan LV-168, * and Orangutan SV-xx8.
Programming Orangutans and the 3pi Robot from the Arduino Environment © 2001–2019 Pololu Corporation Overview This library allows you to easily interface with the three user pushbuttons on the 3pi robot [https://www.pololu.com/product/975], Orangutan SV-xx8 [https://www.pololu.com/product/1227], and Orangutan LV-168 [https://www.pololu.com/product/775] by either polling for the state of specific buttons or by waiting for press/release events on specifiable buttons.
Programming Orangutans and the 3pi Robot from the Arduino Environment © 2001–2019 Pololu Corporation OrangutanPushbuttons Methods Complete documentation of this library’s methods can be found in Section 9 of the Pololu AVR Library Command Reference [https://www.pololu.com/docs/0J18]. 5.
Programming Orangutans and the 3pi Robot from the Arduino Environment © 2001–2019 Pololu Corporation Usage Examples This library comes with an example sketch that you can load by going to File > Examples > OrangutanPushbuttons. 1. OrangutanPushbuttonExample Demonstrates interfacing with the user pushbuttons. It will wait for you to push either the top button or the bottom button, at which point it will display on the LCD which button was pressed.
Programming Orangutans and the 3pi Robot from the Arduino Environment © 2001–2019 Pololu Corporation Overview This library allows you to easily interface with the five infrared reflectance sensors on the 3pi robot [https://www.pololu.com/product/975]. Note that in order to use this library, you must also include PololuQTRSensors.h in your sketch. You should have something like the following at the top of your sketch: 1 2 3 4 #include #include #include #include
Programming Orangutans and the 3pi Robot from the Arduino Environment © 2001–2019 Pololu Corporation Pololu3pi Methods Complete documentation of this library’s methods can be found in Section 19 of the Pololu AVR Library Command Reference [https://www.pololu.com/docs/0J18]. 5.
Programming Orangutans and the 3pi Robot from the Arduino Environment © 2001–2019 Pololu Corporation Usage Examples This library comes with three example sketches that you can load by going to File > Examples > Pololu3pi. There is a simple line-following example, a more advanced PID-based line-following example, and a basic maze-solving example.