Building Line Following and Line Maze Courses © 2001–2009 Pololu Corporation Building Line Following and Line Maze Courses 1. About Line Following and Maze Solving 2. What You Will Need . . . . . . . . . . . 3. Building the Line-Following Course . . . 4. Building the Line Maze Course . . . . . . . . . . . . . . . . . . . . . . . . . . . . . . . . . . . . . . . . . . . . . . . . . . . . . . . . . . . . . . . . . . . . . . . . . . . . . . . . . . . . . . . . . . . . . . . . . . . .
Building Line Following and Line Maze Courses © 2001–2009 Pololu Corporation 1. About Line Following and Maze Solving Line following is a great introduction to robot programming, and it makes a great contest: it’s easy to build a linefollowing course, the rules are simple to understand, and it’s not hard to program a robot to follow a line.
Building Line Following and Line Maze Courses © 2001–2009 Pololu Corporation 2. What You Will Need The following materials will allow you to construct a beautiful looking line or maze for your robot to explore: • Several large sheets of white posterboard (available at crafts or office supply stores) or dry-erase whiteboard stock (commonly available at home/construction supply stores). • Light-colored masking tape or some sorts of clips for joining multiple sheets together.
Building Line Following and Line Maze Courses © 2001–2009 Pololu Corporation 3. Building the Line-Following Course Step 1: Plan your course. Sketch out your course on a piece of paper. We recommend including precise dimensions so that you can make multiple copies of the course, publish the plan on your website, etc. You should take into account the dimensions of the posterboard sheets that you will use to build the course and the circular object that you will use to trace arcs.
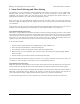
Building Line Following and Line Maze Courses © 2001–2009 Pololu Corporation Stretch out the tape to make a straight line. Press the tape down to the posterboard. When going around the curves, it is particularly important to stretch the tape tightly. To make sure you are stretching it in the right direction, visualize a line drawn from the point where the tape separates from the posterboard to the center of the circle that you are following.
Building Line Following and Line Maze Courses © 2001–2009 Pololu Corporation Finish the rest of the line on this sheet in the same way. Step 4: Finish the ends. Cut off the end of the tape. To make the line go cleanly to the end of the sheet, tuck the last inch or so under the posterboard: Tuck the tape under to make a smooth end. Step 5: Apply tape to the other sheet. You should be able to create the line on the second sheet of posterboard in the same way as the first.
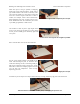
Building Line Following and Line Maze Courses © 2001–2009 Pololu Corporation Put the pieces together to make a finished course. 3pi on the line course, ready to race. Your course is now complete! It’s perfect for racing the 3pi robot [http://www.pololu.com/catalog/product/975] or your own custom robot based on a QTR sensor array [http://www.pololu.com/catalog/product/961]. Example line-following code for the 3pi is included with the Pololu AVR C/C++ Library [http://www.pololu.
Building Line Following and Line Maze Courses © 2001–2009 Pololu Corporation 4. Building the Line Maze Course Step 1: Plan your maze. The maze we will be building in this section is aligned on a 3" grid, so that parallel segments are never closer than 3". This grid is quite small, but it fits the 3pi robot well, and it allows an interesting maze to fit on a single sheet of posterboard. If you want to use a larger grid, you can combine multiple sheets together, just like we did with the line course.
Building Line Following and Line Maze Courses Make each piece as long as possible, overlapping them at the corners and intersections. You’ll need to pay careful attention to the corners so that they come out as clean as possible. Any extra pieces of tape that stick out at incorrect angles could cause a robot to confuse, for example, corners with T-intersections.
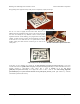
Building Line Following and Line Maze Courses © 2001–2009 Pololu Corporation Keep putting down segments of tape until you have completely copied your design. Putting down the last line segment of the course. We use a 3" circle to signify the end of the maze. Since it is so different from the straight lines and corners in the rest of the course, the circle can actually be very difficult to detect.