
User Manual
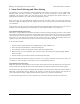


The dot at the finish requires extra care.
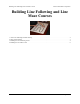
Keep putting down segments of tape until you have completely copied your design.
Putting down the last line segment of the course.
We use a 3" circle to signify the end of the maze. Since it is so
different from the straight lines and corners in the rest of the course,
the circle can actually be very difficult to detect. You’ll spend a
significant amount of time making your program detect the ending
reliably, so make sure that you also spend enough time to make the
circle look nice. You could also use a 3" square block to make a
simpler ending, but make sure that it doesn’t get too close to the
nearby lines.
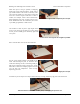
A 3pi ready to run on the finished course.
Your maze is now complete! It’s perfect for the 3pi robot [http://www.pololu.com/catalog/product/975] or your own
custom robot based on a QTR sensor array [http://www.pololu.com/catalog/product/961]. For more information on how to
actually program a maze-solving robot, please take a look at Section 8 of the 3pi user’s
guide [http://www.pololu.com/docs/0J21]. You might also want to take a look at this maze-solving algorithm
presentation [http://www.pololu.com/file/download/line-maze-algorithm.pdf?file_id=0J195] (505k pdf) written by customer
(and robotics professor) R. Vannoy.
Building Line Following and Line Maze Courses © 2001–2009 Pololu Corporation
4. Building the Line Maze Course Page 10 of 10