
User Manual
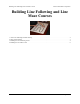


A sketch of the maze course.
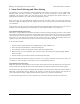
Draw the grid lightly in pencil.
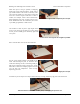
Start with a cleanly-cut piece of tape for the first segment.
4. Building the Line Maze Course
Step 1: Plan your maze.
The maze we will be building in this section is aligned on a 3" grid, so that
parallel segments are never closer than 3". This grid is quite small, but it fits the
3pi robot well, and it allows an interesting maze to fit on a single sheet of
posterboard. If you want to use a larger grid, you can combine multiple sheets
together, just like we did with the line course. You can also use multiple sheets to
make more complicated courses, and the sheets can even be rearranged to make a
variety of different mazes. At Pololu, our favorite maze is an 8’×8’ course, using
a 6" grid, made out of four 4’-square pieces of whiteboard material that can be
rearranged to form many different combinations.
The course drawn at right has an important feature: it has no loops. This means that your robot can navigate through
the entire course, starting from any point, by following a very simple “left hand on the wall” strategy, where it turns
left, if possible, at every intersection. Looped mazes are more complicated, because this simple strategy will often
cause the robot to get stuck in an infinite loop or to bypass an important section of the maze. For a robot to navigate
a looped maze, it needs to be able to measure its current position accurately enough to determine when it has
encountered a loop. This requires precision timing or some kind of wheel encoding, and it adds another level of
complexity to the program. We recommend using no loops for your first maze.
For our course, we’ve also been careful to make the total length of the side-paths equal on the right and left sides of
the shortest path through the maze. This means that a “left hand” and a “right hand” robot should take about the
same amount of time to solve the maze.
Step 2: Pencil the course onto the posterboard sheet.
Start by marking the edges of the posterboard with 3" tick marks, then using a
long straightedge (such as another piece of posterboard) to lightly pencil in the
grid. Then, with darker lines, highlight the segments that will become part of
the maze.
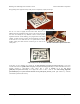
Step 3: Place electrical tape along each segment of the maze.
Each line segment of the maze should be made
with a cleanly-cut piece of electrical tape that
stretches 3/8" past the grid point on either side,
so that it will be aligned with the segments at
right angles to it.
Building Line Following and Line Maze Courses © 2001–2009 Pololu Corporation
4. Building the Line Maze Course Page 8 of 10