
User Manual


3. Construction
Connecting the Receiver to the 3pi
Begin by soldering the 2×7 female header where it fits between the 3pi’s gearmotors, as shown in the picture below.
If you do not have the header, you can still build an RC 3pi; you will need to solder the wires directly to the 3pi’s
circuit board in the places where they would have been inserted into the female header.
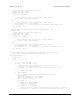
A 2×7 female header soldered into the 3pi expansion pin holes.
Attach one end of each servo cable to a channel on the RC receiver. Then, with the 3pi turned off, connect the wires
as shown in the picture below:
1. Connect the signal pin (usually the wire with white or yellow insulation) of one servo cable to PC5 and the
signal pin of the other servo cable to PD0. These connections are made with blue wires in the picture below.
2. Connect the power pin (usually the wire with red or orange insulation) of one servo cable to VBAT on the
3pi. This will power the receiver directly off of the 3pi’s batteries.
3. Connect the ground pin (usually the wire with black or brown insulation) of one servo cable to GND on the
3pi.
The wiring of a radio-controlled 3pi.
Remove the PC5 jumper and use double-sided tape to secure the RC receiver and its antenna to the 3pi as shown in
the picture below. Note that the receiver might fit better if you first remove the LCD.
Sample Project: RC 3pi © 2001–2009 Pololu Corporation
3. Construction Page 4 of 11