Pololu Orangutan SV-xx8 and LV-xx8 User's Guide © 2001–2014 Pololu Corporation Pololu Orangutan SV-xx8 and LVxx8 User's Guide 1. Overview . . . . . . . . . . . . . . . . . . . . . . . . . . . 2. Contacting Pololu . . . . . . . . . . . . . . . . . . . . . . . 3. Schematic Diagrams . . . . . . . . . . . . . . . . . . . . . 4. Module Pinouts, Component Identification, and Usage Notes 5. Getting Started . . . . . . . . . . . . . . . . . . . . . . . . 5.a. Using the Demo Program . . . . . . . . . . . . . . .
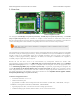
Pololu Orangutan SV-xx8 and LV-xx8 User's Guide © 2001–2014 Pololu Corporation 1. Overview A top view of the Orangutan SV-328. The Orangutan SV-168 Pololu Orangutan LV-168. [http://www.pololu.com/product/1225], SV-328 [http://www.pololu.com/product/1227], and LV-168 robot controllers are complete control solutions for small robots. These units all have the same form-factor and nearly identical peripheral hardware with matching pin assignments.
Pololu Orangutan SV-xx8 and LV-xx8 User's Guide © 2001–2014 Pololu Corporation • removable 8-character x 2-line LCD • buzzer tied to one of the mega168’s hardware PWMs • 3 user pushbutton switches • 2 user LEDs • user potentiometer optionally jumpered to ADC7 Features Specific to the Orangutan LV-168 • An integrated step-up regulator allows for 2 – 5 V input voltage, making the LV-168 ideal for powering lowvoltage, high-current motors and 5V peripheral electronics from 2 – 4 NiMH cells.
Pololu Orangutan SV-xx8 and LV-xx8 User's Guide © 2001–2014 Pololu Corporation 2. Contacting Pololu You can check the Orangutan SV-328 robot controller page [http://www.pololu.com/product/1227] and Orangutan LV-168 robot controller page [http://www.pololu.com/product/775] for additional information, including pictures, example code, and application notes. You can also find a libraries for interacting with the on-board hardware and an assortment of sample code in the Pololu AVR Library [http://www.pololu.
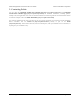
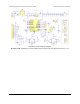
Pololu Orangutan SV-xx8 and LV-xx8 User's Guide © 2001–2014 Pololu Corporation 3. Schematic Diagrams Orangutan SV-328 Robot Controller schematic diagram. Download a PDF version (413k pdf) [http://www.pololu.com/file/download/orangutan-sv-328-robot-controller-schematic- diagram.pdf?file_id=0J639] 3.
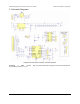
Pololu Orangutan SV-xx8 and LV-xx8 User's Guide © 2001–2014 Pololu Corporation Orangutan LV-168 schematic diagram. Download a PDF version [http://www.pololu.com/file/download/OrangutanLV168_schematic.pdf?file_id=0J164] (39k pdf) 3.
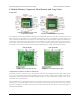
Pololu Orangutan SV-xx8 and LV-xx8 User's Guide © 2001–2014 Pololu Corporation 4. Module Pinouts, Component Identification, and Usage Notes Components Orangutan SV-328 top view with components labeled. Orangutan LV-168 features (top view). The Orangutan contains a programmable ATmega168 or ATmega328P AVR microcontroller, a dual motor driver for direct control of two DC motors, an 8×2 character LCD, a buzzer, three user pushbuttons, two user LEDs, and a 10k user trimmer potentiometer.
Pololu Orangutan SV-xx8 and LV-xx8 User's Guide © 2001–2014 Pololu Corporation Orangutan LV-168 Power & Motor Connections Just like the Orangutan SV-xx8, the power and motor connections are on the right side of the unit. The Orangutan LV-168 is designed to operate off of three NiMH cells, which corresponds to a voltage range of about 2.5 – 4.5 V. However, the unit can operate from two or four NiMH cells with some limitations.
Pololu Orangutan SV-xx8 and LV-xx8 User's Guide © 2001–2014 Pololu Corporation Motors The motor drivers are controlled by the AVRs hardware PWM outputs on eight-bit timers 0 and 2, which lets you achieve variable motor speeds using hardware rather than processor-intensive software PWMs on the motor control lines. The two Timer0 PWM outputs connect to both of motor 1’s direction inputs and the two Timer2 PWM outputs connect to both of motor 2’s direction inputs.
Pololu Orangutan SV-xx8 and LV-xx8 User's Guide © 2001–2014 Pololu Corporation Programming Connector The Orangutan has a 6-pin programming connector on the upper right side; the robot controller is designed for an AVR ISP in-system programmer from Atmel or a compatible programmer, such as the Pololu Orangutan USB programmer [http://www.pololu.com/product/740]. Pin 1 is the pin most toward the inside of the board. 4.
Pololu Orangutan SV-xx8 and LV-xx8 User's Guide © 2001–2014 Pololu Corporation 5. Getting Started The Orangutan requires power be applied across the + and GND pins along the right edge of the board. The device is protected by a MOSFET against accidental reverse-battery connection. When the Orangutan is powered, you can press the power button, which is located on the right side of the bottom edge of the board, to turn the Orangutan on and off.
Pololu Orangutan SV-xx8 and LV-xx8 User's Guide © 2001–2014 Pololu Corporation 7. Timer: A simple stopwatch. Press C to start or stop the stopwatch and A to reset. The stopwatch continues to count while you are exploring the other demos. The source code for the demo program is included with the Pololu AVR C/C++ Library [http://www.pololu.com/docs/ 0J20]. After downloading and unpacking the library zip file, the demo program can be found in the appropriate examples\atmegaxx8\xV-xx8_demo_program.
Pololu Orangutan SV-xx8 and LV-xx8 User's Guide © 2001–2014 Pololu Corporation the melody directly from program memory (i.e. flash), thereby conserving RAM, and it uses timer interrupts to play the melody notes at the proper times, so program execution is not blocked as the melody plays. 5.b. Programming Your Orangutan To program the Orangutan, you will need a computer and an external AVR ISP programmer such as the Pololu USB AVR Programmer [http://www.pololu.com/product/1300].
Pololu Orangutan SV-xx8 and LV-xx8 User's Guide © 2001–2014 Pololu Corporation 6.
Pololu Orangutan SV-xx8 and LV-xx8 User's Guide © 2001–2014 Pololu Corporation 7.
Pololu Orangutan SV-xx8 and LV-xx8 User's Guide © 2001–2014 Pololu Corporation 8.
Pololu Orangutan SV-xx8 and LV-xx8 User's Guide © 2001–2014 Pololu Corporation brake). Similarly, OCR2B = 255 is equivalent to holding PD3 low while OCR2A = 0 is equivalent to holding PB3 high. In this state, M2B connects to your battery’s positive terminal and M2A connects to ground. 8.
Pololu Orangutan SV-xx8 and LV-xx8 User's Guide © 2001–2014 Pololu Corporation 9. Related Resources The following list of resources might come in handy: • ATmega168 documentation [http://www.atmel.com/dyn/products/product_card.asp?PN=ATmega168]: ATmega168 datasheet and additional documentation • ATmega328P documentation [http://www.atmel.com/dyn/products/product_card.asp?PN=ATmega328P]: ATmega328P datasheet and additional documentation • Pololu AVR Programming Quick Start Guide [http://www.pololu.