Qik 2s9v1 User's Guide © 2001–2012 Pololu Corporation Qik 2s9v1 User's Guide 1. Overview . . . . . . . . . . . . . . . . . . . . . . . . . 2. Contacting Pololu . . . . . . . . . . . . . . . . . . . . . 3. Connecting the Qik . . . . . . . . . . . . . . . . . . . . 3.a. Power and Motor Connections . . . . . . . . . . 3.b. Logic Connections . . . . . . . . . . . . . . . . 3.c. Included Hardware . . . . . . . . . . . . . . . . 3.d. Jumpers . . . . . . . . . . . . . . . . . . . . . . 3.e. Indicator LEDs . . .
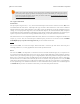
Qik 2s9v1 User's Guide © 2001–2012 Pololu Corporation 1. Overview The qik 2s9v1 is Pololu’s second-generation dual serial motor controller. The compact board allows any microcontroller or computer with a serial port (external RS-232 level converter required) or USB-to-serial adapter [http://www.pololu.com/catalog/product/391] to drive two small, brushed DC motors with full direction and speed control.
Qik 2s9v1 User's Guide © 2001–2012 Pololu Corporation the use or to the performance of this product. This product is not designed for, and should not be used in, applications where the malfunction of the product could cause injury or damage. Please take note of these additional precautions: • This product contains lead, so follow appropriate handling procedures, such as not licking the product and washing hands after handling.
Qik 2s9v1 User's Guide © 2001–2012 Pololu Corporation 2. Contacting Pololu You can check the qik 2s9v1 dual serial motor controller page [http://www.pololu.com/catalog/product/1110] for additional information. We would be delighted to hear from you about any of your projects and about your experience with the qik motor controller. You can contact us [http://www.pololu.com/contact] directly or post on our forum [http://forum.pololu.com/].
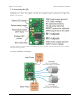
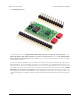
Qik 2s9v1 User's Guide © 2001–2012 Pololu Corporation 3. Connecting the Qik Connecting to the qik can be as simple as hooking up logic and motor power, your motors, and RX. Many applications can leave the jumpers off and the remaining logic connections—TX, ERR, and RESET—disconnected. The qik connections are shown above, and most of the pins are labeled on the back side of the motor controller. All square pads are ground. 3.a. Power and Motor Connections 3.
Qik 2s9v1 User's Guide © 2001–2012 Pololu Corporation The qik motor controller takes two power inputs: motor power supplied via the VMOT and GND pins at the bottom of the board and logic power supplied via the VCC and GND pins at the top of the board. Motors and Motor Power The qik can independently drive up to two bidirectional brushed DC motors, referred to as M0 and M1. The two terminals of each motor should be connected to the qik as shown above.
Qik 2s9v1 User's Guide © 2001–2012 Pololu Corporation Note: Even if your motor and logic power sources share a common ground, make sure you connect your motor power supply’s ground to the GND pin just above the VMOT pin. This ground pin is designed to handle the higher currents that your motors will draw; the ground pin above the VCC pin is not intended for high currents. 3.b.
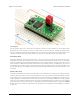
Qik 2s9v1 User's Guide © 2001–2012 Pololu Corporation 3.c. Included Hardware The qik ships with a 16×1 straight 0.100" male header strip [http://www.pololu.com/catalog/product/965], a 12×1 right angle 0.100" male header strip [http://www.pololu.com/catalog/product/967], and two red shorting blocks [http://www.pololu.com/catalog/product/971]. This hardware gives you several options when it comes to making connections to your qik.
Qik 2s9v1 User's Guide © 2001–2012 Pololu Corporation 3.d. Jumpers The qik jumpers allow you to easily alter the behavior of the device. These jumpers can be left off for most applications. If you use a jumper, it must be in place when the unit first starts up; changing the jumpers while the unit is running does not take effect until the qik is reset or power is cycled. The only exception to this is the removal of the demo mode jumper while the qik is in demo mode, which takes the qik out of demo mode.
Qik 2s9v1 User's Guide © 2001–2012 Pololu Corporation Demo Mode If you short pin A to pin B (the circular pads right next to the silkscreen labels) and reset the qik, it enters demo mode and remains in demo mode for as long as the short is maintained. Demo mode gives you an easy way to test your qik and troubleshoot your application for potential problems. In demo mode, the qik smoothly ramps motor M0 from stopped to full-speed forward to full-speed reverse to stopped again over a few seconds.
Qik 2s9v1 User's Guide © 2001–2012 Pololu Corporation 2. red ON and green OFF 3. red OFF and green ON 4. red and green OFF This cycle takes several seconds, and each of the four LED states corresponds to a different output state of the qik’s motor ports. When the red error LED is on, motor M0 is active, and when the red error LED is off, motor M1 is active. When the green status LED is on, the active motor is moving forward, and when the green status LED is off, the active motor is moving in reverse. 3.
Qik 2s9v1 User's Guide © 2001–2012 Pololu Corporation 4. Serial Interface You can use the serial interface for three general purposes: querying the qik for information, setting its configuration parameters, and sending it motor commands. Motor commands are strictly one-way; all other commands result in the qik’s responding with a single byte that either represents information that has been requested or feedback on the effect of the issued command. 4.a.
Qik 2s9v1 User's Guide © 2001–2012 Pololu Corporation Note: These lines are not compatible with RS-232 serial, which is inverted and uses voltages that would be out of spec (e.g. -12V to 12V). To connect the qik to an RS-232 device, you will need to use a converter such as our 23201a serial adapter [http://www.pololu.com/catalog/product/126], or a level shifter and inverter. 4.b. Baud Rates The qik can handle baud rates between 1200 and 38,400 bps.
Qik 2s9v1 User's Guide © 2001–2012 Pololu Corporation Pololu Protocol: This protocol is compatible with the serial protocol used by our other serial motor and servo controllers. As such, you can daisy-chain a qik on a single serial line along with our other serial controllers (including additional qiks) and, using this protocol, send commands specifically to the desired qik without confusing the other devices on the line.
Qik 2s9v1 User's Guide © 2001–2012 Pololu Corporation 5. Serial Commands 5.a. 0x81: Get Firmware Version Compact protocol: 0x81 Pololu protocol: 0xAA, device ID, 0x01 This command returns the a single ASCII byte that represents the version of the firmware running on the qik. All qiks produced so far have firmware version ‘1’ or ‘2’. Firmware version 2 makes a slight change to the LED feedback used during the automatic baud detection phase.
Qik 2s9v1 User's Guide © 2001–2012 Pololu Corporation pulled low through the LED). If shutdown-on-error configuration parameter is set to 1, motors M0 and M1 will be stopped as a safety precaution when any of these errors occurs (see Section 5.c). 5.c. 0x83 & 0x84: Get & Set Configuration Parameter The qik has four configuration parameters that are saved in non-volatile memory, and uses commands 0x83 and 0x84 to read and write these parameter values, respectively.
Qik 2s9v1 User's Guide © 2001–2012 Pololu Corporation bits (which are interpreted as a number from 0 – 7). If the lower four bits are called x and the upper three bits are called y, the equation for the length of the timeout duration would be: timeout = 0.262 seconds * x * 2y For example, if the timeout parameter is set as 0x5E (01011110 in binary), we have that x = 1110 (binary) = 14 (decimal) and y = 101 (binary) = 5 (decimal), which results in a timeout duration of 0.262s * 14 * 25 = 117 seconds.
Qik 2s9v1 User's Guide © 2001–2012 Pololu Corporation 5.d. 0x86 & 0x87: Motor M0 & M1 Coast Command 0x86: Motor M0 Coast Compact protocol: 0x86 Pololu protocol: 0xAA, device ID, 0x06 Command 0x87: Motor M1 Coast Compact protocol: 0x87 Pololu protocol: 0xAA, device ID, 0x07 These commands will set the specified motor to coast by setting the motor outputs to high impedance, which lets the motor turn freely.
Qik 2s9v1 User's Guide © 2001–2012 Pololu Corporation Command 0x8A: Motor M0 Reverse Compact protocol: 0x8A, motor speed Pololu protocol: 0xAA, device ID, 0x0A, motor speed Command 0x8B: Motor M0 Reverse (speed + 128; used in 8-bit mode) Compact protocol: 0x8B, motor speed Pololu protocol: 0xAA, device ID, 0x0B, motor speed Motor M1 Commands Commands 0x8C – 0x8F apply to motor M1.
Qik 2s9v1 User's Guide © 2001–2012 Pololu Corporation 6. Cyclic Redundancy Check (CRC) Error Detection For certain applications, verifying the integrity of the data you’re sending and receiving can be very important. Because of this, the qik has optional 7-bit cyclic redundancy checking, which is similar to a checksum but more robust as it can detect some possible errors, such as an extra zero byte, that would not affect a checksum. When jumper B is in place, cyclic redundancy checking is enabled.
Qik 2s9v1 User's Guide © 2001–2012 Pololu Corporation Steps 3, 4, & 5: _______________________________________________ 1 0 0 0 1 0 0 1 ) 1 1 0 0 0 0 0 1 1 0 0 0 0 0 0 0 0 0 0 0 0 0 0 XOR 1 0 0 0 1 0 0 1 | | | | | | | | | | | | | | | --------------- | | | | | | | | | | | | | | | 1 0 0 1 0 0 0 1 | | | | | | | | | | | | | | shift ----> 1 0 0 0 1 0 0 1 | | | | | | | | | | | | | | _______________ | | | | | | | | | | | | | | 1 1 0 0 0 0 0 0 | | | | | | | | | | | 1 0 0 0 1 0 0 1 | | | | | | | | | | | __________
Qik 2s9v1 User's Guide © 2001–2012 Pololu Corporation } unsigned char CRC(unsigned char message[], unsigned char length) { unsigned char i, crc = 0; } for (i = 0; i < length; i++) crc = CRCTable[crc ^ message[i]]; return crc; int main() { unsigned char message[3] = {0x83, 0x01, 0x00}; int i,j; GenerateCRCTable(); message[2] = CRC(message,2); } for(i=0;i>j)%2); printf(" "); } printf("\n"); return 0; 6.
Qik 2s9v1 User's Guide © 2001–2012 Pololu Corporation 7. Troubleshooting The following are some suggestions for ways you can troubleshoot your qik: • Test for life: With nothing more than logic voltage connected, look for a green LED heartbeat. If you do not see the green LED flashing, you either lack sufficient logic power (e.g. the voltage is out of range or the power supply is too noisy) or your qik is damaged. See Section 3.a for more information about logic power requirements.
Qik 2s9v1 User's Guide © 2001–2012 Pololu Corporation 8. Arduino Library We have written a basic Arduino library for the qik dual serial motor controllers that makes it simple to interface the qik 2s9v1 with an Arduino [http://www.pololu.com/catalog/product/2191]. The library handles the details of serial communication with the qik, and two example programs are included to help you configure the qik and get started controlling two brushed DC motors.