SoundStation 2W™ USER GUIDE / ADMINISTRATOR GUIDE User Guide and Administrator Guide
IMPORTANT SAFETY INSTRUCTIONS When using your telephone equipment, the following safety precautions should always be followed to reduce the risk of fire, electric shock, and injury to people. Read and understand all instructions. Follow all warnings and instructions marked on the equipment. Installation must be performed in accordance with all national wiring rules.
Table of Contents Thank You ...................................................................................5 Overview......................................................................................5 Parts List ......................................................................................6 Product Packages .........................................................................7 Setting up SoundStation2W™ .....................................................8 Features .....................
Table of Contents Paging the Console ................................................................................26 LCD Messages ....................................................................................... 26 Troubleshooting ...........................................................................27 No Signal.............................................................................................. 27 No Dial Tone .........................................................................
Thank You Thank you for choosing the Polycom SoundStation2W™. In this User Guide, you will find everything you need to quickly set up, use, and manage your new conference telephone. Be sure to verify with your System Administrator that your network is prepared for configuring your SoundStation2W™ telephone. Lastly, it is important that you read the Parts List, and the Safety Notices section in this guide before you begin using the SoundStation2W™.
Parts List The following items are included in your SoundStation2W™ package. Some packages do not include the SoundStation2W™ base, or Base power supply. For more details, see Product Packages on page 7. Check this list before installation to ensure that you have received each item. If you are missing any items, please contact your SoundStation2W™ reseller.
Product Packages Console and Base Station Set Battery pack SoundStation2W™ console SoundStation2W™ base -2 Cell Pack for SoundStation2W™ Basic -4 Cell Pack for SoundStation2W™ EX Console Charging module Base power supply Mobile telephone connector Telephone cord Quick Start Guide/CD Console-Only Set Battery pack SoundStation2W™ console -2 Cell Pack for SoundStation2W™ Basic Telephone -4 Cell Pack for SoundStation2W™ EX Quick Start Guide/CD Console Charging module Mobile telephone connector So
Setting up SoundStation2W™ 1 Analog telephone line Connect base station to power and analog phone line. BONG! Install battery. Wait for phone to register to base station. Ready State SoundStation2W™ will display a Ready message after successfully communicating with the base upon power up. The Ready message is also shown after a call is completed and the phone is available for the next call.
Mounting Options Both the base station and the console can be wall mounted if desired. The base station can also be mounted under a table. The appropriate mounting screw holes are provided on the back surfaces. The console can also be locked in place using a standard laptop security cable. This feature is designed for rooms where it is important to ensure that the phone does not get removed from its home location, and where it is desirable to eliminate the analog phone cable to the wall.
Features LED Indicators The LEDs located on the top of your SoundStation2W™ indicate the current status of your conference telephone: Green - your call is in progress. Blinking green - a call is incoming. Red - your call is muted. Blinking Red - your call is on hold. Buttons Scroll Menu Navigate up or down through displayed lists. Displays a menu of settings and options. Exit Select Exits from current screen to previous menu. Choose a menu item.
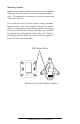
Wireless Technology SoundStation2W™ comes in two different formats. The product uses either 2.4 GHz WDCT (Worldwide Digital Cordless Telecommunications), 1,8 GHz DECT (Digital Enhanced Cordless Telecommunications) or 1,9 GHz DECT 6.0 standard technology. WDCT is widely used in North America, South America, and China, while DECT is used in Europe, parts of Asia, and Australia.
Mobile Phone Mode Mobile Phone Mode is an additional new mode of operation offered by the SoundStation 2W™. This feature enables you to combine the convenience of a mobile phone with the acoustics of a conference phone. For example, if you were in a call on your mobile telephone, you could connect your mobile telephone to the SoundStation2W™ and use its speaker and microphones to continue your conversation and include everyone in the room in the conversation.
Using SoundStation2W™ ► For best performance, charge the console for a full charging cycle (4 hours for BASIC, 8 hours for EX) prior to first use. Placing a Call SoundStation2W™ allows you to place a call over an analog line or through an analog terminal adapter (ATA). Several methods are available to initiate a call. Direct Dial Indirect Dial 1. To obtain dial tone, press the key. 2. Dial the desired number. ► To cancel the call, press the key. 1. From the Ready screen, dial the desired number. 2.
Ending a Call To end a call, press the key. Call Hold When a call is on hold, you cannot hear your remote party, and they cannot hear you. ► To place a call on hold, press the HOLDsoft key. The LEDs on the top of your SoundStation2W™ will blink red. ► To resume a call, press the RESUMEsoft key. Call Mute When a call is muted, you can hear the remote party, but they cannot hear you. ► To mute a call, press the mute button . The LEDs on the top of your SoundStation2W™ will glow red when your call is muted.
Redial SoundStation2W™ stores the number that was last dialed. This number can be recalled using the REDIALsoft key. ► Press the REDIALsoft key. The last number called will be displayed and dialed. OR ► Press the key and then the REDIALsoft key. The last number called will be displayed and dialed. Speed Dial a Number You can speed dial any entry in your Phone Book, in either of these ways: Speed Dial Number First 1. Enter the 1- or 2-digit Speed Dial number. 2. Press the Phone button or the SEND soft key.
Dialing using the Phone Book Connection Diagram Entries in the Phone Book can be automatically dialed. 1. Choose the entry you want to dial. (See “Quick selection in a list” on page 17.) 2. Press the DIALsoft key. You will see and hear the call being dialed. ► You can also access the DIAL soft key after selecting an entry with the Select button. Ringer Volume Adjustment When the SoundStation2W™ is in Ready state or on hook, press the Volume buttons to adjust the ringer volume.
Ringer Type Selection 1. Press the Menu button and choose Settings and press the Select button. 2. Cycle through the options using the Scrolling buttons and choose Ringer Type, and then press the Select button. 3. Sample the ring types by press ing the Scrolling buttons or the <— and —> soft keys. 4. Press the SAVEsoft key or Select button to apply the selected ringer setting. ► Press the Exit button to cancel this change.
Language SoundStation2W™ allows you to select your preferred language for the phone to use when displaying information. To change the language setting: 1. Press the Menu button and choose Settings. 2. Cycle through the options using the Scrolling buttons and choose Language, and then press the Select button. 3. Cycle through the available languag es by pressing the Scrolling buttons or the <— and —> soft keys. 4.
Bridge Soft Key You may program the telephone number of your preferred conferencing bridge vendor into the SoundStation2W™ so that it is immediately available. ►The SPEED DIAL soft key will not display when the bridge number is configured. Programming the Bridge number 1. Press the Menu button, choose Bridge Setup using the Scrolling buttons, and press the Select button. 2. Choose Enter Phone Number and press the Select button and then enter the bridge number using the dial pad.
Placing a call using the Bridge soft key 1. Press the BRIDGEsoft key. 2. The programmed number is auto matically dialed and a call is placed to your preferred bridge vendor. Phone Book You can use the Phone Book to store a local directory of 25 contacts. You can add, edit, delete, dial, or search any contact in this list through just a few key strokes. Selecting the PH BOOKsoft key displays the Phone Book list sorted by names. This list may be sorted by Name, Company, or Speed Dial.
Adding an entry 1. Press the PH BOOKsoft key and then the NEW soft key. 2. Enter information in the Name, Ph# (telephone number including any prefixes, such as 9 and/or 1), and Co (company) field using the alphanumeric keys on the dial pad. You can move between fields using the Scrolling buttons. 3. Press the SAVEsoft key. You can accept the next available speed dial number assigned to your new entry or you can choose your own speed dial number by using the Scrolling buttons or the dial pad. 4.
Deleting an entry 1. Choose the entry you wish to delete and press the Select button. 2. Press the REMOVEsoft key. Press the OKsoft key to remove or the CANCELsoft key to leave the menu without removing. View System Information This feature displays the following information about the SoundStation2W™: Location and Number, System Information, and Registration Information. With this feature you can easily identify the home room location for the phone. Location and Number System Information 1.
Standby Mode The phone has an automatic power save function to extend battery operated usage. The product will switch into Standby within one minute of being in an idle inactive state. The console will not go into Standby if there is an active call, even if there are pauses in the conversation. If the console is registered to the base station, and the phone goes into Standby mode, the LCD will display a “READY” message.
Charging SoundStation2W™ operates on a rechargeable lithium ion battery. The battery needs to be recharged periodically. Use the supplied charger to recharge the battery while it is installed in the console. In similar fashion to a laptop PC or a mobile phone, the SoundStation2W™ can be used or continue operation while being charged. The battery cannot be recharged outside the console.
Auxiliary Audio Output SoundStation2W™ allows the speaker output to be routed to an external recording device. The external recording device should be connected to the base station. 1. Connect an external recording device, such as a cassette tape recorder, via the auxiliary jack on the base station. 2. Press the Menu button on the phone console, choose Settings and press the Select buttons. 3. Choose Aux Audio Out and press the Select button.
LCD Message Summary The following messages are displayed on the console LCD to represent various usage conditions. LCD Message What it means: Ready No Signal Call Ended What you will see: Phone is in idle state and ready to make calls. Signal strength is too weak to carry a call. Idle screen. The call has been dropped. “Call Ended” with elapsed time indicated. Mobile Phone In A mobile phone is plugged in to the mobile phone jack OR a mobile phone call has been initiated.
Troubleshooting No Signal “No Signal” is displayed when the console loses contact with the base. Verify the following: ► If the console and base station ► Check that the base station is are separated by multiple brick powered up. walls, this will reduce the avail► Make sure that the console is able range between the base and not out of the allowed range console. (150 feet). ► Move the console to a location where there are fewer obstructions or walls between console and base station.
Short Silences, Echoes, or Clipped Speech ► Do not move the ► At the beginning of each call, let SoundStation2W™ console someone at each location speak in while it is in use. turn for a few moments to enable ► Keep your hands away from the SoundStation2W™ to adapt to its console during calls. environment. ► To avoid excessive noise around ► The other parties may be using SoundStation2W™, move comnon-Polycom equipment which puters, projectors, papers, cups, may cause strange audio.
Administrator Guide
Administrative Setup - Overview The Administrative Setup menu consists of the following options. If desired, you can set a passcode to access the administrative options on the SoundStation2W™. There will not be any passcode required when you first use the phone. Location: 1 Location Name Enter a name for the SoundStation2W™’s location, such as “Conference Room B”. 2 This Phone # Enter the SoundStation2W™’s telephone number. Phone System: 1 Caller ID Turn Caller ID on or off (if available).
For GAP registration, press GAP soft key in step 2. the Base for 10 seconds. 5. Press CHANGE soft key if 1234 is not the required GAP PIN, and enter the new PIN by deleting the old one first. 6. Press SAVE soft key. 7. Press REGISTER soft key. Passcode When you select Passcode from the Admin Setup menu, the screen will display whether or not a passcode is currently assigned. Assign a passcode: 1. Press the Menu button, choose Admin Setup using the Scrolling buttons, and press the Select button.
2. Press the REMOVEsoft key, enter the current passcode, and press the ENTERsoft key. If you decide not to remove the password, press the CANCELsoft key or the Exit button. ►If you enter an incorrect password, you will be notified to try again. ►If you make an error, press the
Assigning a location name: 1. Press the Menu button, choose Admin Setup and press the Select button, enter passcode (if required) and press the ENTERsoft key. Choose Location using the Scrolling buttons, and press the Select button. 2. Choose Location Name using the Scrolling buttons, and press the Select button. Enter a location name using the dial pad. This name will be displayed when “Location Name and Number” submenu of “This Phone” menu is selected from the main menu.
Phone System Caller ID You can turn Caller ID on or off. By default, Caller ID is on. 1. Press the Menu button, choose Admin Setup and press the Select button, enter passcode (if required) and press the ENTERsoft key. Choose Phone System using the Scrolling buttons, and press the Select button. 2. Choose Caller ID using the Scrolling buttons, and press the Select button. Press the ON or OFFsoft key or cycle through the options ∗Caller ID is a subscription using the Scrolling buttons. service.
Flash Timing You can adjust the timing of the Flash delay to 75, 100, 300, or 600 milliseconds. 1. Press the Menu button, choose Admin Setup and press the Select button, enter the passcode (if required) and press the ENTERsoft key. 2. Choose Phone System followed by Flash Timing from the available options and press the Select button. 3. Use the <- and -> soft keys to step through the available Flash Timing options. 4. Press the SAVEsoft key to save changes.
Diagnostics Mic (Microphone) Test You may test the SoundStation2W™’s microphones to ensure that they are working optimally. ►If testing microphone’s meter indicates that it is receiving an atypically low or high sample, despite appropriately controlled input, contact Polycom Technical Support. 1. Press the Menu button, choose 3. Choose any microphone using Admin Setup and press the the Scrolling buttons, and press Select button, enter passcode (if the Select button.
►White Noise is a signal whose energy is distributed uniformly among all frequencies within a band of interest, which for the SoundStation2W™ 3. Press the Select button to acti vate the signal. Restore Defaults Restoring the defaults will irretrievably remove all settings and data that have been entered since the SoundStation2W™ was first installed. 1. Press the Menu button, choose Admin Setup and press the Select button, enter passcode (if required) and press the ENTERsoft key.
Specifications and Warranty Information
Limited Warranty and Limitation of Liability Limited Warranty Polycom warrants to the end user (“Customer”) that this product will be free from defects in workmanship and materials, under normal use and service, for one year from the date of purchase from Polycom or its authorized reseller.
WARRANTY EXCLUSIVE. IF A POLYCOM PRODUCT DOES NOT OPERATE AS WARRANTED ABOVE, CUSTOMER’S SOLE REMEDY FOR BREACH OF THAT WARRANTY SHALL BE REPAIR, REPLACEMENT, OR REFUND OF THE PURCHASE PRICES PAID, AT POLYCOM’S OPTION.
Exhibit J - Customer Information IMPORTANT: The antenna used for this transmitter must be installed to provide a separation distance of at least 20 centimeters from all persons and must not be co-located or operating in conjunction with any other antenna or transmitter. CE Mark R and TTE Directive This SoundStation2W has been marked with the CE mark. This mark indicates compliance with EEC Directives 1999/5/EC.
Safety Notices Installation Instructions Installation must be performed in accordance with all relevant national wiring rules. Plug Acts as Disconnect De vice The socket outlet to which this apparatus is connected must be installed near the equipment and must always b readily accessible.xpq Compliance New Zealand Only: 1. This equipment shall not be set up to make automatic calls to the Telecom “111” Emergency Service. 2.
11 For information, contact your reseller or go to: www.polycom.com Polycom WW Headquarters: Polycom, Inc. Corporate Headquarters 6001 America Center Drive San Jose, CA 95164 USA © 2012, Polycom, Inc. All rights reserved. POLYCOM®, the Polycom logo and the names and marks associated with Polycom’s products are trademarks and/or service marks of Polycom, Inc. and are registered and/or common law marks in the United States and various other countries.