Polycom® RSS™ 4000 System User Guide 5.0.0 | Oct.
Trademark Information Polycom®, the Polycom “Triangles” logo, and the names and marks associated with Polycom’s products are trademarks and/or service marks of Polycom, Inc., and are registered and/or common-law marks in the United States and various other countries. All other trademarks are the property of their respective owners. Patent Information The accompanying product is protected by one or more U.S. and foreign patents and/or pending patent applications held by Polycom, Inc. © 2009 Polycom, Inc.
Table of Contents Preface····························································································· I Polycom® RSS™ 4000 Installation and Preliminary Configuration ·············································································· 1-1 General Safety Precautions ·················································· 1-1 Preparations····································································· 1-1 Unpacking and Installing the Polycom® RSS™ 4000················· 1-2 Initial P
Table of Contents Managing Recording Files··················································2-37 Viewing Archive Properties············································2-38 Looking Up Archives ····················································2-38 Sorting Archives ··························································2-39 Changing Archive Properties··········································2-39 Playing Back Archives via the Web ··································2-40 Downloading Archives···············
Polycom® RSS™ 4000 User Guide Accessing and Installing Polycom RSS Media Tools·················· 6-2 Uninstalling Polycom RSS Media Tools·································· 6-2 Operating Environment······················································ 6-2 Using Polycom RSS Multicast Player ····································· 6-2 Receiving Multicast Videos ············································· 6-3 Playing Multicast Videos ················································ 6-4 Adjusting Video Window
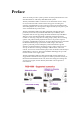
Preface This User Guide provides system operation and setup information for users and administrators of the Polycom® RSS™ 4000 system. The Polycom® RSS™ 4000 is a network server that enables users to easily record, stream and archive media content. It supports recording and archiving of high-definition video content, processing of streaming media, and H.323 playback. It is an important component of Polycom's peer-to-peer video communications product series.
1 Polycom® RSS™ 4000 Installation and Preliminary Configuration General Safety Precautions Follow these rules to ensure general safety: Keep the area around the Polycom® RSS™ 4000 unit clean, free of clutter and well ventilated. Decide on a suitable location for the Polycom® RSS™ 4000 rack that will hold the Polycom® RSS™ 4000 unit and is near a grounded power outlet.
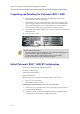
Chapter 1- Polycom® RSS™ 4000 Installation and Preliminary Configuration Unpacking and Installing the Polycom® RSS™ 4000 1 Place the Polycom® RSS™ 4000 unit on a stable flat surface in the selected location, not for rack mount. 2 Insert each power cord connector into the rear of the unit and connect each to an appropriately rated socket outlet. The Polycom® RSS™ 4000 unit is supplied with two power cords, BOTH power cords should be connected to the mains power supply during normal operation.
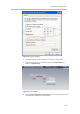
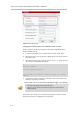
Polycom® RSS™ 4000 User Guide Figure 1-3 IP Address Settings 3 Open the internet explorer and browse to: http://192.168.1.254 4 Login to the system. Use the default User name (POLYCOM) and Password (POLYCOM). Figure 1-4 Login to Web UI 5 Go to system configuration->IP setting and set a static IP address. Click the save button and then reset the system.
Chapter 1- Polycom® RSS™ 4000 Installation and Preliminary Configuration Figure 1-5 IP Settings Page Changing the initial IP address via an RS232 Console or Telnet Another option to modify the IP address of the Polycom® RSS™ 4000 is using the RS232 console. 1 Connect to the RS232 port – and activate the console (9600, 8bits). 2 When login to the console, input the default password “POLYCOM” to enter the system.
2 Web User Interface (UI) The Polycom® RSS™ 4000 provides two types of user interface: Web UI - Web Interface to configure, control, monitor Polycom® RSS™ 4000 and view archives.
Chapter 2 - Web User Interface (UI) Logging into Polycom® RSS™ 4000 via the Web 1 Enter the Polycom® RSS™ 4000's IP address in the address field and press enter. The user will see the Polycom® RSS™ 4000's login page, as shown in Figure 2-1. 2 After correctly entering a user name and password in the login screen, press enter to log in. The default user name is "POLYCOM" and the default password is "POLYCOM". These defaults are pre-set for use in first-time log in.
Polycom® RSS™ 4000 User Guide Polycom® RSS™ 4000 Web UI Main screen Figure 2-2 Polycom® RSS™ 4000 Web UI Main screen The Polycom® RSS™ 4000 Main screen includes three major sections: 1 System Management – This section includes the following sections: System Information, System Configuration, Account Management, Recording Setting, Archives and Live Streaming.
Chapter 2 - Web User Interface (UI) Figure 2-3 Product Information Page Table 2-1 Product Information Details 2-4 Item Details System name Displays the current Polycom® RSS™ 4000 device name. Product type Displays the video server type. Version Displays the current version and distribution date. Maximum H.323 Connections Displays that the Polycom® RSS™ 4000 can support a maximum of 15 H.323 playback connections.
Polycom® RSS™ 4000 User Guide Item Details Configure multicast parameters in the "Recording parameters-> multicast settings" page. See multicast settings for details. When not activated, is displayed. To use the multicast function, acquire a multicast-activated product key code. Steps for activating the multicast function are the same as those for new device activation. Please refer to the Product activation section for further information.
Chapter 2 - Web User Interface (UI) Table 2-2 System Usage Details Item Details Hard drive usage Displays the Polycom® RSS™ 4000's current hard drive resource usage. CPU usage Displays the Polycom® RSS™ 4000's current CPU usage.
Polycom® RSS™ 4000 User Guide Figure 2-5 Product Activation 2 Click on “Polycom Resource Center” to enter the Polycom Resource login page. 3 Sign in with your registered email account and password. If you are a new user, register for an account first. 4 Go to Service & Support–> Product Activation -> Single Product Activation. 5 Input the License Number and the Serial Number and click Submit to generate the Key Code.
Chapter 2 - Web User Interface (UI) If you wish to activate the device's optional functions alone, you must first obtain a product license with these functions. Please contact a distributor if you wish to obtain such a license. Please do the activation in the following order: system license (5, 10, or 15); then HD Live Streaming; then multicast; then encryption. System Configuration Click on "System Configuration" in the navigation bar on the left side of the screen.
Polycom® RSS™ 4000 User Guide uses a NAT, you can enable NAT option to allow the Polycom® RSS™ 4000 to communicate with external networks. If “Enable NAT” is selected, the external address for NAT usage must be configured. The calling party outside the LAN will call the NAT address of your system, while local users on your LAN will continue to use the LAN address. When setting the IP address, only dots and numbers within the scope of 0-255 can be entered for the IP address, subnet mask and gateway address.
Chapter 2 - Web User Interface (UI) the next available Polycom® RSS™ 4000 device with the same prefix, and the user can play back or record a video on another Polycom® RSS™ 4000 without having to disconnect and reconnect. Table 2-3 Details of Gatekeeper Settings Item Details Gatekeeper IP Address Enters the IP address of the GK the user wishes to register to. System prefix/E.164 number Sets E.164 alias of the Polycom® RSS™ 4000. After registering, endpoints may use this E.
Polycom® RSS™ 4000 User Guide Figure 2-10 User customization screen Customizing the IVR Messages Figure 2-11 IVR Message setting section Users will hear different IVR messages when operating the Polycom® RSS™ 4000. The user can change the system's IVR messages in the "IVR message" area on this interface. When an IVR file is uploaded to the Polycom® RSS™ 4000, the file name must consist of only alphanumeric characters.
Chapter 2 - Web User Interface (UI) Click on the "Browse" button in this area, confirm the path of the file to be changed, and click on the "Download file" button to download the new file. After the file has been downloaded successfully, the system's logos will be replaced with the new logos. Customizing the login screen welcome message Figure 2-13 Welcome Message setting section The user can change the login interface welcome message in the "Login screen welcome message" area of the interface.
Polycom® RSS™ 4000 User Guide Setting the default endpoint menu language Figure 2-16 Default endpoint menu language setting section After the endpoint is used to call and establish a connection with the Polycom® RSS™ 4000, the menu screen sent from the Polycom® RSS™ 4000 will appear on the endpoint. The default endpoint menu language can be set using the "default endpoint menu language" area. Select on the languages and single-click the "Apply" button to change the endpoint menu language.
Chapter 2 - Web User Interface (UI) Backup Settings Policies There are three options with regard to automatic backup frequency: Never backup – Video files will not be backed up to the FTP server if this is selected. Backup after end of recording – Video files will be immediately backed up to the FTP server if this is selected. Backup after a specified number of days- Video files will be backed up to the FTP server at a configured frequency if this option is selected. The backup time must be set.
Polycom® RSS™ 4000 User Guide Figure 2-18 System Settings Page Table 2-4 System Settings Details Item Details Turn on Windows Firewall Turn on or turn off the Polycom® RSS™ 4000 system’s firewall. When it is enabled, Windows Firewall blocks all unsolicited incoming network traffic on all network connections. Blocking unsolicited incoming traffic makes the RSS less open to attack and increases its level of security.
Chapter 2 - Web User Interface (UI) Item Details Disable H.323 Playback This item is not checked by default. If selected, it will disable the H.323 connection’s playback function and "Play Video" will be disabled in the Onscreen UI main menu. This setting does not affect playback from Web site. Enable AES If this function is enabled, the system will automatically encrypt H.323 calls with other endpoints or MCUs with AES encryption, if the endpoint or MCU supports AES.
Polycom® RSS™ 4000 User Guide Figure 2-20 Logger Settings Page Managing Log Files For log files already created by the device, Polycom® RSS™ 4000 offers a function to manage these log files.
Chapter 2 - Web User Interface (UI) log file in his computer’s file destination path. Delete Log Files: First select the log file for deletion, the user can select a single file or multiple files to be deleted. The user can also delete all files. After selecting the files to be deleted, single click the "Delete" button. The check box on the left side of the first row in the log table is "Select All".
Polycom® RSS™ 4000 User Guide If the software version information did not change, it means the software upgrade was not successful. In that case, enter the Product Information page to check that the software currently running on the device meets the minimum version required by the upgrade package. In addition, the user can also check to see if the software upgrade activation code the user entered was correct.
Chapter 2 - Web User Interface (UI) the organization and location. Click on "Create" to complete the certificate request. Figure 2-24 Create New Certificate Request Step 2 – Get Certificate After creating a certificate request, it automatically enters the "Certificate Signing Request" page. This shows the recently created certificate request information, copy the information in the text box into the digital certificate request page the user already purchased in order to generate a certificate.
Polycom® RSS™ 4000 User Guide the user visits the device’s web page, the user must enter the format into the browser as "https://device IP address" in order to successfully connect. And it also requires installing the certificate according to the pop up message box on the local machine to be able to login to the web page. After this, the communication between the user end and the server will always encrypt data based on the SSL secured connection to ensure the security of transmitted data.
Chapter 2 - Web User Interface (UI) Figure 2-27 Add Endpoint Table 2-5 Details of Endpoint Configuration Items Item Details Name Enter the name to identify the endpoint. The user can enter any combination of letters or numbers, but the length cannot exceed 32 characters. IP Enter the endpoint’s IP address. E.164(optional) Enter the endpoint’s E.164 number registered to GK. H.323 ID (optional) Enter the endpoint’s H.323 ID registered to GK.
Polycom® RSS™ 4000 User Guide User Management Click on Account "Management -> Users" to add new users, edit user properties, and delete users in the Users page. Add User Click on the "New" button in the User Management page, and it will link to the Add User page as shown: Figure 2-28 Add User Table 2-6 Details of User Properties Configuration Items Item Details User Name Set user name for logging into Web UI. Enter any combination of letters or numbers, but the length cannot exceed 32 characters.
Chapter 2 - Web User Interface (UI) Item Details system, and the user has all privileges and cannot be deleted. However, the password can be changed. E-Mail Enter a valid e-mail address. The length cannot exceed 64 characters (For future use). User cannot change account information This option can only be changed for ordinary user level by Administrator. When enabled Ordinary users cannot change their own user password. User names must be unique; they cannot be duplicated.
Polycom® RSS™ 4000 User Guide Add Group Click the "New" button on the Groups Management page, and the page will jump to the Add User Group page. On the Add Group page, the user can set the added group name, group description, and the endpoints and users included in the group. Name: Group Name. The user can enter any combination of letters or numbers, but the length cannot exceed 32 characters.
Chapter 2 - Web User Interface (UI) Delete Group To delete a group on the Groups page, select the group and then click the "Delete" button. The user can select one group or multiple groups for deletion. The user can also select all groups for deletion by checking the check box in the header.
Polycom® RSS™ 4000 User Guide Item Details User Password: Sets the user password used by the Polycom® RSS™ 4000 when accessing the Active Directory server. When setting the domain name of the Active Directory server, make sure that the user has set a DNS server address that can resolve this domain name in “System Configuration -> IP Settings”.
Chapter 2 - Web User Interface (UI) The Polycom® RSS™ 4000 supports H.239 only. To record the proprietary People + Content standard, utilize a Polycom MGC to transcode the proprietary content to H.239. Click on “Recording Settings” in the navigation bar on the left side of the page, and make settings on these pages for the Polycom® RSS™ 4000’s single point recording properties, point-to-point recording properties, web dial-out recording, and multicast videos.
Polycom® RSS™ 4000 User Guide Setting a Request for Fast Forward / Backward Interval in the Recording Process In order to ensure quality during playback, the Polycom® RSS™ 4000 will request I-frames from the endpoint at the configured time interval. The default time interval is a request of one Fast Forward/Backward interval of one minute, and it can be set to anywhere between 1 and 10 minutes. During H.
Chapter 2 - Web User Interface (UI) recording resources available. Group List: When this is selected, only endpoints that are in selected groups can start to record. To set up groups with recording rights, the group must be selected from the list, and then the “Add” or “Add All” button must be clicked to add these to the rights list on the right side. When selecting groups to join the list, the user can use the “Ctrl” and “Shift” keys on the keyboard to select multiple groups at the same time.
Polycom® RSS™ 4000 User Guide parameters. In the Point to Point Settings page, the administrator can set recording room name, recording room number, recording room protocol, and recording room rate, as well as whether nor not to record H.239 dual video, request I-frame intervals during the recording process, whether or not to stream the video, and recording rights and viewing rights.
Chapter 2 - Web User Interface (UI) On this page, the administrator can configure the settings for recording room name, recording room number, video protocol, and recording room rate. Recording Room Name: This is used to identify the recording room. Any combination of letters or numbers that does not exceed 32 characters can be entered. Recording Room Number: This is used to identify the recording room’s E.164 number. Only numbers can be entered, with a maximum of 16 characters.
Polycom® RSS™ 4000 User Guide Delete Recording Room To delete a recording room on the page, select the recording room and then click the “Delete” button. The user can select one recording room or multiple recording rooms for deletion. The user can also select all recording rooms for deletion. The first check box under the “New” button on the Point-to-point Recording Settings page is “Select All”. All of the recording rooms will be checked if this check box is selected.
Chapter 2 - Web User Interface (UI) Polycom® RSS™ 4000 will do a capability negotiation with the called endpoint and establish a connection according to the negotiated audio and video protocols. After dialing and establishing a connection through the web, if there are recording resources available, recording starts immediately; there is no need to change additional settings on the endpoint other than answering the call.
Polycom® RSS™ 4000 User Guide Item Details Address video sent by the Polycom® RSS™ 4000 device. Media Base Port Sets the port used by the video sent by the Polycom® RSS™ 4000 device, with a range between 4000 and 65000. Archives Multicast To multicast one archive existing: 1 Click Archives-> Archives in the navigation bar on the left of page, and then select an existing archive in the list in Archives page. 2 Right click the corresponding Play button Multicast of this Video”.
Chapter 2 - Web User Interface (UI) Figure 2-39 Number of Repeats Option Live Streaming Multicast The video being streamed is also being multicast automatically if the multicast function is enabled. In other words, when a video is being streamed, the user can launch the Polycom® RSS™ 4000 Multicast Player software to receive the video, as shown below. Figure 2-40 Live streaming multicast Two archives can be simultaneous multicast.
Polycom® RSS™ 4000 User Guide 1 Click on “Recording Setting” -> “Streaming Settings” in the navigation bar on the left side of the Web Page to enter the following page: Figure 2-41 File Settings 2 Select one of the following dual video conversion modes: Table 2-9 Dual video conversion mode Item Details Dual window (Have separate media player window for people and content) During the live streaming or playback of dual video, two windows will pop up displaying the content at frame rate of up to 10 fp
Chapter 2 - Web User Interface (UI) Figure 2-42 Archives Page Viewing Archive Properties As shown in Figure 2-42, the Archives page shows the videos that can currently be seen by users and their video properties, including: video name, server name, video start time, duration, video recording rate, video protocol used, whether or not H.239 was used, and the file size.
Polycom® RSS™ 4000 User Guide Figure 2-43 Enquiring Archives Enter the keyword for the archive’s name in the inquiry input box, and then click the apply button to inquire. After successfully looking it up, the video table shows all archives that contain the keyword entered. Sorting Archives Besides looking up archives by their archive names, the Polycom® RSS™ 4000 also provides the function of sorting by archive properties.
Chapter 2 - Web User Interface (UI) Item Details the length cannot exceed 128 characters. Viewing Rights This is used for setting the viewing rights for this video during playback. The specific operations are the same as the settings on the Single Point Recording page. For details, please refer to Viewing Rights Settings. PIN Code After setting a PIN for the archive, the endpoint must enter the code that is entered into this field to play the video. Enter no more than 8 numbers.
Polycom® RSS™ 4000 User Guide download the archive. The user can select “Download WMV format archive” or “Download Native format archive”. The archive is in WMV format and can be directly played by the Windows Media Player. The native archive format file can only be played after using Media Converter for Polycom RSS to convert the video format. For an introduction of the converter tool, please refer to Using Media Converter for Polycom RSS.
Chapter 2 - Web User Interface (UI) The first check box under the “New” button on the Archives page is Select All. All of the archives will be checked if this check box is selected. Go to Archive Pages The current page number and total number of pages are shown in the top right corner of the archives table. The buttons to the right of the page numbers are used for page turning.
Polycom® RSS™ 4000 User Guide will change to . Repeatedly clicking on the button on the left will pause/continue the recording operation, and the buttons will change to . will stop recording. Clicking again Clicking on the button on the right on this button will disconnect the H.323 connection. Each H.323 connection status display includes: the IP address of the H.323 endpoint that establishes a connection with Polycom® RSS™ 4000, the H.
3 Onscreen User Interface (UI) – Conference Recording In addition to using the Web UI to manage the Polycom® RSS™ 4000, users can also use the onscreen UI which allows the user to perform recording and playback tasks to interact with the device. This chapter will explain in detail how to use the onscreen UI to perform single point and point-to-point recording. For information about playback please see Chapter 4 Onscreen User Interface (UI) – Archive Playback.
Chapter 3 - Onscreen User Interface (UI) – Conference Recording Single Point Recording Using an Endpoint Menu (onscreen UI) Main Menu After using an endpoint to call the Polycom® RSS™ 4000 and establish an H.323 connection, the Polycom® RSS™ 4000 will present the main menu below. Figure 3-1 Main Menu On the interface shown above, use the remote control to highlight and select Record Video. The user will see the Record Video menu, as shown below. Figure 3-2 Start Recording H.
Polycom® RSS™ 4000 User Guide viewed at the same time. If PC Content recording is selected, but no PC content was sent during the recording, two windows or one two-image window will be displayed during playback on the Web but the primary window for content will remain black. Therefore, users should only check “Record my PC Content” when they are sharing H.239 content. Otherwise, the user should select “No” for this option.
Chapter 3 - Onscreen User Interface (UI) – Conference Recording Figure 3-4 Setting PIN code and returning to the Record Video menu Start Recording Once the decision has been made to include H.239 content and/or a PIN code, select Start Recording to begin the recording. Once selected, the recording begins immediately. The user will hear an IVR message "Conference recording has started", and see a volume indicator at the bottom of the screen.
Polycom® RSS™ 4000 User Guide Stop Recording Use the remote control to select Stop to stop the current recording and generation of a video file. The user will hear the IVR message "The conference recording has ended". The Polycom® RSS™ 4000's internal storage will reserve 500 MB of storage space. Recording will be stopped and a video file created if the free hard drive space falls to less than 500 MB during a recording.
Chapter 3 - Onscreen User Interface (UI) – Conference Recording Figure 3-7 Enable immediate recording This functionality is intended to be used in case of connection where the Far End Camera Control or the DTMF are being disabled, which will not allow the user to navigate via the Polycom® RSS™ 4000 onscreen menu. Archive Name Format Files produced from single point recordings are named using the following rule: Endpoint's H.323 alias + Recording time stamp (Date & Time). For instance, if an endpoint's H.
Polycom® RSS™ 4000 User Guide Using a Polycom MCU for Single Point Recording Polycom's MCU (Multipoint Control Unit) line, consisting of the MGC and RMX, can be easily integrated with the Polycom® RSS™ 4000. Use the MGC’s Recording Link function to initiate a recording connection with the Polycom® RSS™ 4000 and record MGC conferences, or add the RSS as a participant in an RMX conference.
Chapter 3 - Onscreen User Interface (UI) – Conference Recording recording rooms configured on the Polycom® RSS™ 4000. Figure 3-9 Configured Recording Rooms From the "Recording room" interface, the user can view the names of all the conferences that have been established, the number of endpoints currently connected to each conference, and each conference's configured bandwidth and video protocol. Select the conference to join.
Polycom® RSS™ 4000 User Guide Using an E.164 number to immediately enter a recording room If the RSS is registered to a Gatekeeper, users can quickly access a recording room without using onscreen navigation menus. The user can dial the [Polycom® RSS™ 4000 prefix][Recording room prefix] to immediately enter a recording room. For example, if the RSS is registered to the gatekeeper with an E.
4 Onscreen User Interface (UI) – Archive Playback After a video has been recorded, it is stored separately in two formats: as a raw H.323 bit stream (for H.323 playback), and in WMV format (for Web archive view). An H.323 endpoint can play back a video stored as a raw bit stream by calling the Polycom® RSS™ 4000. Polycom® RSS™ 4000 can support a maximum of 15 simultaneous H.323 playback connections. Use the endpoint remote control and Far End Camera Control to select "Play Video" on the main menu.
Chapter 4 - Onscreen User Interface (UI) – Archive Playback Video Viewing Rights Select "Archive List" from the "Play Video" menu. This opens the interface shown in Figure 4-2, which displays a list of the videos that the endpoint can view. When the "Viewing rights" option of archive is set to "Allow all," or if set to "Group list" and the connected endpoint is a member of that group, the video will be included in the available "Play Video" list.
Polycom® RSS™ 4000 User Guide After an endpoint calls a Polycom® RSS™ 4000 and makes a connection, videos will be listed for playback only when the endpoint has viewing rights and its video algorithm supports the video. If the endpoint does not support the video algorithm, a video will not be shown on the Archive List even if the endpoint has viewing rights. Quick Access Codes for Archive Playback The user can use the quick access code to retrieve a recording file stored on a device.
Chapter 4 - Onscreen User Interface (UI) – Archive Playback Figure 4-4 Enter the quick access code Use the remote control's number keypad to input a file's quick access code, and press "#" when finished. If a PIN code has been set for a recording file, the system will prompt the user to enter the PIN code after the quick access code has been input. If no PIN code has been set, the system will immediately begin to play back the file after the quick access code has been entered.
Polycom® RSS™ 4000 User Guide Figure 4-5 Archive sort options Sorting rules that can be set in this interface include: Sorting by video creation time, sorting by the video's duration, sorting by the video's name, sorting by the name of the RSS (server) on which the video file is stored, and sorting by the video format. The symbol "*" in the interface indicates the archive list's currently selected sorting rule.
Chapter 4 - Onscreen User Interface (UI) – Archive Playback Fast Forward/Reverse/Stop When playing back a video, viewers can use the remote control to operate the fast forward/reverse/stop functions. The Polycom® RSS™ 4000 utilizes the following DTMF tones as convenient video play functions. Table 4-2 Description of DTMF key functions DTMF Key Description *1 Pause the current video. *2 Resumes a paused video. *3 Stops playback of the current video and returns to the main menu.
5 Appendix A – Terminal Setting and User Commands The Polycom® RSS™ 4000 supports command settings for the configuration of equipment and troubleshooting. There are two ways of using commands to configure settings: one is to connect to the Polycom® RSS™ 4000's serial port and use an emulation program like Hyperterminal; the other is to use telnet. The format of commands is the same in both cases.
Chapter 5 - Appendix A – Terminal Setting and User Commands The preset default login password is “POLYCOM" After forgetting the login password, a user can use emulation software to connect to the serial port, and then reset the Polycom® RSS™ 4000. When “…” is displayed on the emulation software, press "CTRL+C," and the user will be able to login to the system without entering the password. The user can now use appropriate commands to change the user login password.
Polycom® RSS™ 4000 User Guide # reset password Password has been successfully reset. Show system information Enter “show" after the prompt "#" and press Enter to display system information including system performance, software version, PHP version, image version, Apache version and LAN address.
Chapter 5 - Appendix A – Terminal Setting and User Commands “cleankey” after the prompt "#" and press Enter to remove the existing activation key code. # cleankey Are you sure to clean activation key. WARNING: RSS will be inactivated after this operation. ..............................? [Y for yes / N for no] The system displays the prompt to confirm the operation, enter “Y” to continue, or enter “N” to cancel. ClearArchives This command is used to delete all video files on the Polycom® RSS™ 4000.
Polycom® RSS™ 4000 User Guide Please input administrator's password to continue: Enter the correct administrator password after the prompt ":" and press Enter. The Polycom® RSS™ 4000 will begin resetting. Prepare to reset configurations... Resetting configurations now... Reset configurations OK. The Polycom® RSS™ 4000 must be restarted in order for the new settings to take effect. The Polycom® RSS™ 4000 will now be restored to the default configuration. The IP address will be: 192.168.1.
6 Appendix B - Polycom RSS Media Tools This section introduces three software tools used exclusively on the Polycom® RSS™ 4000: Polycom RSS Multicast Player, Media Converter for Polycom RSS, and Polycom RSS Archive Transfer Manager; these tools have the following functions: Polycom RSS Multicast Player: Used exclusively to receive multimedia sent by the Polycom® RSS™ 4000. Media Converter for Polycom RSS: Used to convert the format of raw bit streams from Polycom® RSS™ 4000 video recordings.
Chapter 6 - 6BAppendix B - Polycom RSS Media Tools Accessing and Installing Polycom RSS Media Tools To install the Polycom RSS Multicast Player, Media Converter for Polycom RSS, and Polycom RSS Archive Transfer Manager, enter the System Configuration-> Upgrade/Reset System screen using the Web UI, click on the "Click here to download" link to download the media tool pack. Follow the on-screen instructions to complete software installation.
Polycom® RSS™ 4000 User Guide shown below. Figure 6-1 Multicast Player Receiving Multicast Videos Click on the "Settings" button in the multicast operating window to change the Polycom RSS Multicast Player 's settings, as shown below. Figure 6-2 Setting The user must set the following two options in this interface: Session Advertisement Address: Configure the IP address for receiving the multicast file list. This address must be the same as the Polycom® RSS™ 4000's session announcement address.
Chapter 6 - 6BAppendix B - Polycom RSS Media Tools Figure 6-3 List of received video files Playing Multicast Videos Use the mouse to select a video from the list shown in Figure 6-3, and single-click the "Play" button to play the selected video, as shown below. Figure 6-4 Playing a video file The user can also double-click on a video in the list to play that video. Click on the "Stop" button to stop playing a video, as shown below.
Polycom® RSS™ 4000 User Guide Because the software requires some time to acquire the I-frame of the video stream, there will be a slight delay between clicking on the "Play" button, or double-clicking on a video, to the time the video actually starts playing. Adjusting Video Window Size Press the right mouse button while viewing the media play window; the user will see the setting options. Figure 6-6 Adjusting window size Select "Size 1x" to revert to the window's original size.
Chapter 6 - 6BAppendix B - Polycom RSS Media Tools Figure 6-7 Statistical information Using Media Converter for Polycom RSS Format conversion The Media Converter for Polycom RSS can be used to convert the format of video bit streams in two ways: Conversion between source code types: This type of conversion is used only to convert the video format and bandwidth of a bit stream.
Polycom® RSS™ 4000 User Guide Figure 6-8 Open Archive 2 Click on the "Browse File" button and select the bit stream file the user wish to convert. If the user wishes to view information concerning the file, click on the "Detail" button to call up the interface shown below. Figure 6-9 Video file details 3 In the interface shown in Figure 6-8, click on the "Next" button to enter the conversion type interface.
Chapter 6 - 6BAppendix B - Polycom RSS Media Tools Figure 6-10 Conversion type 4 Select a file conversion type: Native Archive Format or MP4 Format. 5 After selecting, click on the "Next" button to enter the other conversion option interface. Figure 6-11 Conversion option The user can set the following options in this interface: ― Bandwidth: Sets conversion bandwidth ― Video Format: Sets the video algorithm. This option can be used only when converting between raw bit stream formats.
Polycom® RSS™ 4000 User Guide 6 7 conversion tool during the conversion process. A preview is shown when this box is checked, but not permitted when this box is unchecked. Click on the "Save File" button and set the save path and filename after conversion. Click on the "Save File" button and set the save path and filename after conversion Figure 6-12 will appear.
Chapter 6 - 6BAppendix B - Polycom RSS Media Tools will pause file conversion. Clicking on the "Resume" button will then resume video conversion. Clicking on the "Stop" button will cause a confirmation dialog box to pop up; clicking on "OK" will stop the current conversion, and clicking on "Cancel" will enable the conversion to continue. 9 After completing conversion, click on the "Close" button to close the Media Converter for Polycom RSS tool.
Polycom® RSS™ 4000 User Guide to the Polycom® RSS™ 4000. Information shown in this list includes: Status, File Name, %, and Direction. Status indicates the file's upload status, which may be "pending," "transferring," "pause," "stop," "canceled," or "done." File Name shows the file's full pathname on the current computer. % shows the percentage of the file uploaded; 100% will be shown after the file has been successfully uploaded.
Chapter 6 - 6BAppendix B - Polycom RSS Media Tools Figure 6-16 Login dialog box Enter the IP address, administrator name, and password of the Polycom® RSS™ 4000 the user wish to connect to, and click on "Login" button to login to the Polycom® RSS™ 4000. After successful login, the IP address of the Polycom® RSS™ 4000 will be shown after "Polycom® RSS™ 4000:" in Area 4, as shown in Figure 6-17. The files will now be uploaded to the Polycom® RSS™ 4000.
Polycom® RSS™ 4000 User Guide 1 Click on the "Select File" and select bit stream files that you wish to upload. You can select multiple files. The software will show an incorrect format message if the format is not suitable for uploading. 2 Click on the "Start" button to begin file upload. If you have not logged into a Polycom® RSS™ 4000 before uploading files, a Polycom® RSS™ 4000 login screen will now pop up. Correctly fill out login information—the uploads will begin after successfully logging in.
Chapter 6 - 6BAppendix B - Polycom RSS Media Tools 7 Appendix C – Regulatory Notices Important Safeguards Read and understand the following instructions before using the system: Close supervision is necessary when the system is used by or near children. Do not leave unattended while in use. Only use electrical extension cords with a current rating at least equal to that of the system. Always disconnect the system from power before cleaning and servicing and when not in use.
Polycom® RSS™ 4000 User Guide Regulatory Notices uses, and can radiate radio frequency energy and, if not installed and used in accordance with the instruction manual, may cause harmful interference to radio communications.
Chapter 6 - 6BAppendix B - Polycom RSS Media Tools Regulatory Notices Lithium coin cell warning This equipment contains a Lithium coin cell which is not user serviceable. Refer servicing to qualified service personnel only. Do not attempt to open the case of this product. Caution Danger of Explosion if Battery is incorrectly replaced. Replace only with the same or equivalent type Recommended by the manufacturer.