User’s Guide for Polycom® HDX® Desktop Systems Version 3.
Trademark Information Polycom®, the Polycom “Triangles” logo, and the names and marks associated with Polycom’s products are trademarks and/or service marks of Polycom, Inc., and are registered and/or common-law marks in the United States and various other countries. All other trademarks are the property of their respective owners. Patent Information The accompanying product is protected by one or more U.S. and foreign patents and/or pending patent applications held by Polycom, Inc.
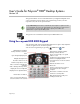
Contents Using the Polycom HDX 4000 Keypad . . . . . . . . . . . . . . . . . . . . . . . . . . . . . . . 1 Powering the System On and Off . . . . . . . . . . . . . . . . . . . . . . . . . . . . . . . . . . . 2 Calling and Answering . . . . . . . . . . . . . . . . . . . . . . . . . . . . . . . . . . . . . . . . . . . . 2 Answering a Call . . . . . . . . . . . . . . . . . . . . . . . . . . . . . . . . . . . . . . . . . . . . . 3 Placing a Call . . . . . . . . . . . . . . . . . . . . . . . . . . . . . . . . .
User’s Guide for Polycom HDX Desktop Systems Directory Groups . . . . . . . . . . . . . . . . . . . . . . . . . . . . . . . . . . . . . . . . . . . . 21 Refreshing Entries from the Polycom Global Directory Server . . . . . . 23 Contacts with Presence . . . . . . . . . . . . . . . . . . . . . . . . . . . . . . . . . . . . . . . 23 Including Multiple Sites in Calls . . . . . . . . . . . . . . . . . . . . . . . . . . . . . . . . . . . 24 Placing a Multipoint Call . . . . . . . . . . . . . . . . . . . . . . .
User’s Guide for Polycom® HDX® Desktop Systems Version 3.0 This guide includes overview information that you might find helpful when you’re just starting to learn about video conferencing or when you have experience, but you need a quick refresher. Polycom® HDX® systems can be customized to show only those options used in your organization. Therefore, this guide might cover options that you cannot access on your system.
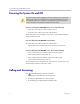
User’s Guide for Polycom HDX Desktop Systems Powering the System On and Off Caution. In order to avoid corrupting the file system, always power off a Polycom HDX system using the power button on the system. After turning the power off in this way, wait at least 15 seconds before you unplug the system from its power source. This helps ensure that the system powers off correctly. To power on the Polycom HDX 4000 series, do one of the following: • Press the power button on the front of the system.
User’s Guide for Polycom HDX Desktop Systems Answering a Call The way a Polycom HDX system handles incoming calls depends on how it is configured. It either answers the call automatically, rejects the call automatically, or prompts you to answer the call manually. To answer the call manually: >> Press Call or select Yes using the keypad. Placing a Call You can use your system to place a video call in any of these ways: • Entering a name or number on the Place a Call screen.
User’s Guide for Polycom HDX Desktop Systems 3 Enter any additional information needed for the call. The available settings depend on the type of call and your system’s configuration. Not all calls require these settings: — Call Quality – Specify the call rate or call type for this call. For most calls, choose Auto to let the system determine the best quality for the call. For audio-only calls, you might need to set this to Phone.
User’s Guide for Polycom HDX Desktop Systems Calling from the Favorites Screen You might be able to see a list of Contacts on the Favorites screen. To place a call from the Favorites screen: 1 Select Favorites from the Home screen. 2 Highlight the contact you want to call and press Call, or press the reference number that appears next to the contact to place the call. 3 For more information about the Favorites screen, refer to Working with Directory Entries and Favorites on page 18.
User’s Guide for Polycom HDX Desktop Systems Calling from the Calendar If your HDX system is configured to connect to the Microsoft Exchange Server, and the Polycom Conferencing Add-In for Microsoft Outlook is installed at your site, you can join a scheduled meeting from the Calendar screen. If the Calendar screen is blank, the system is not connected to the Microsoft Exchange Server or no meetings are scheduled. To join a scheduled meeting from the Calendar screen: 1 Go to the Calendar screen.
User’s Guide for Polycom HDX Desktop Systems Types of Video Calls You Can Make Depending on your system configuration, you might be able to make calls using ISDN, H.323, SIP, or V.35/RS-449/RS-530. You can place an audio-only call from Polycom HDX systems that have Analog Phone or Voice Over ISDN enabled. The following table lists some possible call combinations. From... You can call... By dialing... ISDN ISDN Phone number IP Phone number of the far-site gateway and the extension (E.
User’s Guide for Polycom HDX Desktop Systems Participating in an Encrypted Call If encryption is enabled on the system, a locked padlock icon appears on the monitor when a call is encrypted. If a call is unencrypted, an unlocked padlock appears on the monitor. • If you are in a point-to-point call or a multipoint call hosted by another system, the padlock icon displays the state of your individual connection.
User’s Guide for Polycom HDX Desktop Systems To use your Polycom HDX 4000 series system as a computer monitor: 1 Connect your computer to the Polycom HDX 4000 series system as shown on the setup sheet that came with the system. 2 Press View Computer on the keypad to toggle between displaying content from the computer and showing video from the video conferencing system.
User’s Guide for Polycom HDX Desktop Systems To adjust a camera using the keypad: 1 Select either a near-site or far-site video source to control. During a multipoint call being hosted by a system in the call, you can only adjust a camera at the far site that is currently speaking. 2 Press the arrow buttons on the keypad to move the camera up, down, left, or right. 3 Press Zoom on the keypad to zoom out or in.
User’s Guide for Polycom HDX Desktop Systems To store a preset: 1 If you are in a call, press Near or Far on the keypad. 2 With the camera in the desired position, press and hold a number to store the preset position. To store a double-digit preset, press the first digit quickly and hold the second number down. Any existing preset stored at the number you enter is replaced. The system uses preset 0 as the default camera position.
User’s Guide for Polycom HDX Desktop Systems To change layouts during a call, do one of the following: >> Press Layout on the keypad. During point-to-point calls without content, you can press the button to scroll through the following screen layouts: Layout 1 Near and far sites, same size, side by side 2 Far site big, near site small 3 Near site big, far site small 4 Near site, full screen 5 Far site, full screen 12 Polycom, Inc.
User’s Guide for Polycom HDX Desktop Systems During point-to-point calls with content, you can press the to scroll through the following screen layouts: Layout button 1 Content big, far and near sites small 2 Content big, far site small 3 Content and far site same size 4 Content, full screen Polycom HDX 4000 series systems with Hardware Version C show only two windows in Dual Monitor Emulation. Far sites cannot see what is on your computer screen until you press the Send Computer button.
User’s Guide for Polycom HDX Desktop Systems Adjusting the Monitor Brightness You can make the Polycom HDX 4000 series display brighter or dimmer using the + and - controls on the side of the monitor. Controlling What You Hear Adjusting Volume You can raise or lower the volume of the meeting. Changing the volume affects only the sound you hear at your site. To adjust the volume: • Press Volume Down or Volume Up on the keypad repeatedly.
User’s Guide for Polycom HDX Desktop Systems Points to note about muting the microphone: • Muting the microphone mutes audio coming from auxiliary audio inputs on Polycom HDX 7000 series, Polycom HDX 8000 series, and Polycom HDX 9000 series. • Muting the microphone does not mute audio coming from your computer. • The microphone might automatically mute when the system is asleep or is waiting for you to log in.
User’s Guide for Polycom HDX Desktop Systems Showing Content from a Computer Connected Directly to the Polycom HDX System If you have a computer connected to your Polycom HDX 4000 system, you can show your computer desktop (content) during a call. When you send content, the far site can see and hear you, and see and hear what is on your computer screen. To start sending content: >> Press the Send Computer button on the keypad. When you are sending content, the Send Computer button is lit.
User’s Guide for Polycom HDX Desktop Systems To start showing content: 1 On the computer, start the Polycom People+Content IP application. 2 Enter the IP address or host name of the Polycom HDX system and the meeting password, if one is set. 3 On the computer click Connect. 4 Open the content you want to show, and click in People+Content IP. To stop showing content: 1 If the People+Content IP toolbar is minimized, maximize it by clicking the icon in the task bar. 2 Click in People+Content IP.
User’s Guide for Polycom HDX Desktop Systems • Make sure that the room is well lit. • Stay about 3 feet in front of the background to avoid casting shadows on it. To show content with People on Content: 1 Make sure that the content you want to show is ready. 2 Press 3 Select People on Content. Option on the keypad. To stop showing content with People on Content: 1 Press Option on the keypad. 2 Select People on Content.
User’s Guide for Polycom HDX Desktop Systems Polycom HDX systems support up to 1,000 Favorites. They can also support one of the following: • Up to 200 additional Favorites with presence when registered with Microsoft Office Communications Server. • Up to 200 additional Favorites with presence when registered with a Polycom Converged Management Application™ (CMA®) system.
User’s Guide for Polycom HDX Desktop Systems 5 Specify the following information: Setting Description Name Name that appears in the directory list and on incoming call messages. Group The group where the new Contact appears. Call Type Call type to use for calls to the site. Depends on the capabilities of your system. For more information about call types, refer to Types of Video Calls You Can Make on page 7. Call Speed Call speed to use for video calls to this site.
User’s Guide for Polycom HDX Desktop Systems Press on the keypad or select Options > Delete Contact. If Delete Contact is not available, you highlighted a global directory entry, which cannot be deleted. 4 Points to note about deleting contacts: • If the contact is a member of more than one group, deleting it simply removes it from the group you are viewing. If the contact was created locally and is not a member of any other group, deleting it completely removes it from your system.
User’s Guide for Polycom HDX Desktop Systems You can put the same contact in more than one group, and you can delete it from one group at a time. To move a contact from one group to another, you must delete it from the first group and add it to the second group. Polycom HDX systems support up to 200 Favorites groups.
User’s Guide for Polycom HDX Desktop Systems You cannot call a group that contains another group, and you cannot call a group that exceeds your system’s multipoint calling capability. Refreshing Entries from the Polycom Global Directory Server The global directory entries are periodically refreshed on systems registered to the Polycom Global Directory Server. You can also manually refresh the global directory entries on your system.
User’s Guide for Polycom HDX Desktop Systems Icon Presence Description Unknown Presence The presence state is unknown. The Contact was created locally or is not registered with a presence service. Idle The system is a desktop client that is available but is currently idle. Offline The system is powered off or is offline. You can view Contact details in the system’s local interface. Highlight the Contact and press . A dialog appears with the display name, address, call speed, and group.
User’s Guide for Polycom HDX Desktop Systems To place a multipoint call by adding sites to a call: 1 Call the first site. 2 When the call connects, press 3 Place a call to the next site. For more information, refer to Placing a Call on page 3. 4 Repeat steps 2 and 3 until all sites are connected. Call on the keypad. To place a multipoint call using a directory group: 1 Press Directory on the keypad. 2 Highlight a group folder in the directory list. 3 Press Call to place the call.
User’s Guide for Polycom HDX Desktop Systems Passwords for Multipoint Calls You might be required to enter a meeting password to join a multipoint call. And you can require that far sites enter a meeting password, to prevent unauthorized participants from joining multipoint calls hosted by your HDX system. If you need to generate touch tones (DTMF tones), press press on the keypad, or and choose Touch Tones. Then use the keypad number buttons.
User’s Guide for Polycom HDX Desktop Systems Setting Description Video images from multiple sites can be automatically combined on one monitor in a display known as continuous presence. Auto The view switches between continuous presence and full screen, depending on the interaction between the sites. If multiple sites are talking at the same time, continuous presence is used. If one site speaks uninterrupted for at least 15 seconds, that site appears in full screen on the monitor.
User’s Guide for Polycom HDX Desktop Systems The type of host for the multipoint call and the systems in the call determine whether chair control is available. Hosted by... Allows chair control if... Video Conferencing System The call includes: Bridge • Polycom HDX systems, ViewStation® EX, ViewStation FX, VSX®, and VS4000™ systems connected by IP H.323, ISDN H.320, or both • Other systems connected by ISDN H.
User’s Guide for Polycom HDX Desktop Systems 5 Select a site from the list, and then use the controls in the web interface to perform one of these actions: If you are... You can do this... By selecting... Chair controller Pass chair control to the selected sites. Release Chair View the selected site’s video. This remains in effect until you choose Stop Viewing Site or you release chair control. View Site Return to viewing the video selected by the chair or by the host.
User’s Guide for Polycom HDX Desktop Systems Answering Video Calls Automatically If your system administrator has allowed access to user settings, you can specify whether to answer video calls automatically or to have the system announce incoming video calls and wait for you to answer manually. If you have a Polycom HDX 4000 system that you are using as your computer monitor, Polycom recommends that you set up the system so that you have to answer calls manually.
User’s Guide for Polycom HDX Desktop Systems Logging In and Out Depending on how your system is configured, you might have to log in when the system comes out of sleep mode. To log in: 1 When the Login screen appears, press Keyboard or use the number buttons on the keypad to enter the User ID. 2 Enter the account password. To enter numbers, use the number buttons on the keypad. To enter letters, press Keyboard on the keypad. 3 Select to log in.
User’s Guide for Polycom HDX Desktop Systems To place a point-to-point call using a connected SoundStation IP 7000 conference phone: 1 Press key. on the conference phone and press the Video or Phone soft 2 On the conference phone keypad, enter one of these: — The IP address (for example, 10*11*12*13) of the site you want to call — The phone number (for example, 19784444321) of the site you want to call To enter letters, press the ABC soft key.
User’s Guide for Polycom HDX Desktop Systems To end a call using a connected SoundStation IP 7000 conference phone: • Press on the conference phone to hang up the call. • Press the More softkey then the Manage softkey to hang up one connection in a multipoint call. To start or stop showing content using a connected SoundStation IP 7000 conference phone: >> Press the Content soft key on the conference phone.Content plays from Camera 2 if that input is configured for Content.
User’s Guide for Polycom HDX Desktop Systems Using Microsoft Office Communications Server Features with Video Calls Depending on how your system is configured, you might be able to search a Microsoft Office Communications Server directory, view a list of Microsoft Office Communications Server contacts, see if the contacts are online, and call them without knowing or remembering their addresses.
User’s Guide for Polycom HDX Desktop Systems Viewing Microsoft Office Communications Server Presence States Polycom HDX systems and Office Communicator users in an integrated environment use the following presence icons to indicate presence states: Icon Presence State Description Do Not Disturb Indicates that the HDX system or Office Communicator user is set to Do Not Disturb.
User’s Guide for Polycom HDX Desktop Systems Using Avaya Network Features with Video Calls Depending on how your system is configured, you might be able to use Avaya® telephony network features such as call forwarding, transferring calls, and adding additional sites in an audio-only conference. To activate call forwarding: 1 Make sure that the Polycom system is not in a call.
User’s Guide for Polycom HDX Desktop Systems 4 Press Select again. The call becomes an audio-only conference with all of the systems. If the system that dialed the flash hook hangs up, the other systems remain connected in a call with audio and video, if the capabilities are present. Customizing Your Workspace You can customize what you see on the screen, depending on how your system is configured.
User’s Guide for Polycom HDX Desktop Systems 4 Scroll to Far Site Name Display Time, press on the keypad, and select to display the far site’s name during the entire call, for a specified time, or not at all. 5 Press Home to save your change and return to the Home screen. Hearing Audio Confirmation When You Dial If your system administrator has allowed access to user settings, you can set up the system to speak each number as you enter it in the dialing entry field on the Place a Call screen.