Polycom® RSS™ 4000 System User Guide 6.0.0 | Apr.
Trademark Information Polycom®, the Polycom “Triangles” logo, and the names and marks associated with Polycom’s products are trademarks and/or service marks of Polycom, Inc., and are registered and/or common-law marks in the United States and various other countries. All other trademarks are the property of their respective owners. Patent Information The accompanying product is protected by one or more U.S. and foreign patents and/or pending patent applications held by Polycom, Inc. © 2010 Polycom, Inc.
Polycom® RSS™ 4000 User Guide Content Polycom® RSS™ 4000 Introduction············································ 1-1 Overview ······································································· 1-1 System Hardware Installation ············································· 1-2 General Safety Precautions ············································· 1-2 Unpack the Package ····················································· 1-2 Install the System ························································
Content Administrator Configuration··················································· 4-1 Recording Templates ························································ 4-1 Viewing Template Information········································ 4-1 Defining a Template ····················································· 4-1 Managing Templates ···················································· 4-2 Virtual Recording Room (VRR) ··········································· 4-3 Defining a VRR ····················
Polycom® RSS™ 4000 User Guide System Management······················································· 4-25 System Configuration Backup/Restore···························· 4-25 User Data Backup/Restore ··········································· 4-25 System Upgrade ························································ 4-27 Product Activation ····················································· 4-29 UI customization ······················································· 4-30 System time ···············
Polycom Solution Support Services Polycom Implementation and Maintenance services provide support for Polycom solution components only. Additional services for supported third-party Unified Communications (UC) environments integrated with Polycom solutions are available from Polycom Global Services and its certified Partners. These additional services will help customers successfully design, deploy, optimize and manage Polycom visual communications within their UC environments.
1 Polycom® RSS™ 4000 Introduction Overview Polycom® RSS™ 4000 Recording and Streaming Server is a web server that enables you to easily perform recording, live streaming, stream media processing and multimedia archiving, as needed. Polycom® RSS™ 4000 system supports the recording of both single-point and multipoint video conferences, including H.239 data contents. It can record and archive up to 1080P and live stream to the network audience at a quality of up to 720P.
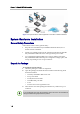
Chapter 1 – Polycom® RSS™ 4000 Introduction Figure 1-1 Polycom® RSS™ 4000's Application in the Video Conference Network System Hardware Installation General Safety Precautions Follow these rules to ensure general safety: • Keep the area around the Polycom® RSS™ 4000 unit clean, free of clutter and well ventilated. • Decide on a suitable location for the equipment rack that will hold the Polycom® RSS™ 4000 unit and is near a grounded power outlet.
Polycom® RSS™ 4000 User Guide Install the System 1 2 3 4 Place the Polycom® RSS™ 4000 unit on a stable flat surface in the selected location. Insert each power cord connector into the rear of the unit and connect each to an appropriately rated socket outlet. The Polycom® RSS™ 4000 unit is supplied with two power cords, BOTH power cords should be connected to the mains power supply during normal operation. Connect the LAN cable to LAN1 in the back of the system.
Chapter 1 – Polycom® RSS™ 4000 Introduction displays the product activation page, prompting you to enter a product activation key. 1 Enter the following website address in the address bar of the browser: http://portal.polycom.com, and go to Polycom Resource Center Login page. 2 Enter your Email address and password in the login box, and click Sign In. If you are a new user, click the Register for An Account link to be registered.
Polycom® RSS™ 4000 User Guide 4 5 6 (Optional) Select a language for the Web interface from the Select language list in the top right of the page. On the Login page, enter the administrator’s username and password, and then click the Log In button. The default username and password are both admin. The Product Activation page displays when you first-time log in. Enter the activation key obtained from the previous step Obtaining the Product Activation Key in the Activation Key box and click Update.
Chapter 1 – Polycom® RSS™ 4000 Introduction To change IP address via RS-232 Console or Telnet: 1 Connect your PC to the RS232 port of the Polycom® RSS™ 4000 with a serial port cable and activate the console port (115200,8bits). 2 After you logged in to the console port, input the default password POLYCOM to enter the system. 3 Enter "?" or "help" after the prompt "#" and the system displays available command information.
Polycom® RSS™ 4000 User Guide 3 Click Update and a dialog box will pop up, in which you should confirm to restart the system to apply the setting. User Interface The Polycom® RSS™ 4000 provides two types of user interfaces: Web configuration interface and an endpoint driven user interface. Web User Interface The system provides a user-friendly Web-based operations interface.
2 Basic Operations Introduction to the Web User Interface Run the Web browser on your computer. Enter https:// in the address bar and then press Enter to display Web login page of Polycom® RSS™ 4000 system. Enter your username and password to log in to the system. Default administrator username and password are both admin. The Web UI basically consists of the following four parts: • Menu bar: Provides all the function groups for system configuration.
Chapter 2 – Basic Operations 1B User Permissions You can log in to the Web UI as an administrator or a user.
Polycom® RSS™ 4000 User Guide Sizing the Pane Move the mouse pointer to the border of the pane; when the pointer turns into , drag the border to change the width of the pane while holding down the left mouse button. Windows Standard Multiple-Select Operations While adding or deleting list items, you can perform standard batch-processing operations by pressing Ctrl + targets or Shift + targets.
Chapter 2 – Basic Operations 1B Parameter Description VRR Name Click the Select button to select a virtual recording room (VRR) to be used for recording. You can use the built-in default VRR. VRR is the basis of recording, and determines the recording policies. For more information about VRR, see Virtual Recording Room (VRR). 5 Click the OK button to initiate a recording call.
Polycom® RSS™ 4000 User Guide 3 4 Choose Media>Archives at the upper part of the Web UI to access the archives page. Select the archive to be played back from the archives list, then click the Play button in the Archive Details pane on the right side to play back the files. To play back the files, you can also click the Play button in the Archive Files pane on the right side.
3 Ordinary User Configuration This chapter mainly describes Web configurations that ordinary users should set after logging into the Polycom® RSS™ 4000 system. For administrator users, see Chapter Administrator Configuration. When you log in to the system for the first time using the account and password assigned by the administrator, a password setting box appears, prompting you to change your password. You may enter the system after setting a password that meets the requirements.
Chapter 3 – Ordinary User Configuration To change password: 1 Click Change My Password in the ACTIONS area on the left side of the page. 2 In the popup password setting box, enter your old password, your new password, confirm password, and then click OK. If successful, you will be prompted that your password has been successfully changed. Otherwise, you will have to follow instructions to set an appropriate password. Only local users created in the Polycom® RSS™ 4000 system can change their passwords.
Polycom® RSS™ 4000 User Guide Modifying a VRR You can modify several parameters of your own VRR. To modify an existing VRR: 1 Click VRR>VRRs in the menu bar at the top of the page. 2 Double-click the VRR to be modified, or click that item and click Edit in the ACTIONS area on the left side of the page. 3 You can modify the following parameters: Table 3-2 VRR Parameters Description Parameter Description Name Specifies a unique name to identify the VRR.
Chapter 3 – Ordinary User Configuration The following list is the allowed list. All-user group (All_Users) and the VRR owner are included in the allowed list of VRR by default. Either double-click an item to be allowed in the selection list, or click that item and click the Add button to add it to the allowed list. The newly added item is shown in the allowed list, and the already added 5 items are identified by the icon in the user list.
Polycom® RSS™ 4000 User Guide In the list, you can search, sort and refresh archives. For specific instructions, see List Sorting, Searching, and Refreshing. Playing Back and Downloading Archives Polycom® RSS™ 4000 system can save recorded videos into three different formats, which apply to different kinds of playback: • Raw: Raw bit stream, which can be played back through the endpoint TV UI interface and downloaded for investigating.
Chapter 3 – Ordinary User Configuration To download an archive: 1 Click Media>Archives in the menu bar at the top of the page. 2 In the archives list, select the archive to be downloaded. 3 Click Archive Files at the right bottom of the page to expand its property pane. 4 5 Click the Download button corresponding to the target format. If the Download button appears as , it means you have to wait until transcoding is completed in case the archive status is Waiting or Transcoding.
Polycom® RSS™ 4000 User Guide ― To authorize a user to edit, check list. 6 for that user in the allowed Both add and delete operations support the Windows standard multiple-select operation. Click OK to complete the setup. Live Streaming Polycom® RSS™ 4000 system supports live streaming of video sources, such as live video conference or dual stream sent by endpoints or MCUs with a highest resolution of 720p and a maximum bandwidth of 4M.
Chapter 3 – Ordinary User Configuration Viewing Live Streaming Video When the system starts live streaming, you can view the video being live streamed in real time on the Live Streaming page. To view live streaming in progress: 1 Click Media>Live Streaming in the menu bar at the top of the page. 2 Select the live streaming content you want to view in the list, and then click the Play button in the Live Streaming Details area on the right side of the page. Windows Media Player opens to play the video.
4 Administrator Configuration With full Web configuration management permissions, administrators can view all recordings and live streaming videos, configure all functions, and monitor and maintain the system. This chapter mainly introduces Web configurations designed for administrators. For ordinary users, see the Chapter Ordinary User Configuration. By default, Polycom® RSS™ 4000 has one administrator, for which username and password are both admin.
Chapter 4 – Administrator Configuration 2 3 Click Add in the ACTIONS area on the left of the page. In the new template page that opens you can configure the following parameters: Table 4-1 Defining Template Parameters Parameter Description Name Specifies a unique name to identify this template. Primary Recording and Streaming Rate Specifies the maximum bandwidth to be used when recording and live streaming.
Polycom® RSS™ 4000 User Guide Virtual Recording Room (VRR) A Virtual Recording Room (VRR) is created based on recording templates. It defines various recording-related parameters, which are the basis of all kinds of recordings. A VRR is identified by digits, and you can directly start recording using specified VRR parameters by adding the VRR number to the dial-in number. A default VRR, named Default_VRR, is built in the system.
Chapter 4 – Administrator Configuration Parameter Description Recording Immediately If this option is selected, the system will immediately start recording once you connect to the VRR. If deselected, you may need to manually start recording through the Web UI or the endpoint interface. Email Notification If this option is selected, once the VRR recorded video has completed its format conversion and is ready for viewing, the system will send an Email message to the VRR owner.
Polycom® RSS™ 4000 User Guide To dial in VRR through an endpoint's remote control: • If the Polycom® RSS™ 4000 and the endpoint are both registered to a gatekeeper, the dial-in number is [RSS E.164 suffix][VRR number]. For example, if the Polycom® RSS™ 4000 E.164 is 1234 and your VRR number is 1000, you may dial "12341000". • If the network is not configured with a gatekeeper, the dial-in number is [RSS IP address]##[VRR number]. For example, if the Polycom® RSS™ 4000 IP address is 172.21.110.
Chapter 4 – Administrator Configuration To edit or delete a created channel: 1 Click VRR>Channels in the menu bar at the top of the page. 2 Click the channel entry to be edited in the channel list. 3 In the ACTIONS area on the left side of the page, click Edit or Delete to modify or delete the channel. Once a channel is deleted, VRRs belonging to that channel are automatically changed to belong to the default channel. Recording Setting Recording Setting page provides supplementary settings for recording.
Polycom® RSS™ 4000 User Guide Archives and Live Streaming While operations in this section are basically the same for administrators and ordinary users, the difference lies in their rights. The administrator can view and modify all recorded files currently archived by the system and live streamed video through the Web UI, and delete archives. Ordinary users can only view and modify recorded files and live streaming videos on which they are authorized to perform such operations.
Chapter 4 – Administrator Configuration Referring to the above table, you can easy calculate the number of live streams supported by the system in concrete scenarios. Take a Small model system that supports four resources. If there is an ongoing live streaming sending video at 720p 30 fps and recording video at 1080p 30 fps/720p 60 fps, using two rates and single window layout, it occupies three resources on the system.
Polycom® RSS™ 4000 User Guide Parameter Description Using the following IP Address Select this option to use the static IP address. You may need to manually enter the IP address, subnet mask, and gateway IP address. Obtain DNS Server Address Automatically Used in combination with the DHCP option. When the Obtain an IP Address Automatically (DHCP) option is selected, the system will automatically obtain DNS server address from a DHCP server in the network.
Chapter 4 – Administrator Configuration Parameter Description System Prefix/E164 Sets the E.164 number for the system. System H.323 Alias Sets the H.323 alias for the system. 3 Click Update and a dialog box will pop up, in which you should confirm to restart the system to apply the setting. QoS Quality of Service (QoS) is very important in transmission of high-bandwidth audio and video data.
Polycom® RSS™ 4000 User Guide Parameter Description Audio / Video Specify the priority for audio and video IP packets. The recommended priority is 4 for audio and video to ensure that the packet delay for both is the same, that audio and video packets are synchronized, and to ensure lip and audio synchronization (lip sync). ToS Select the Type of Service (ToS) that defines optimization tagging for routing the conference audio and video packets.
Chapter 4 – Administrator Configuration Table 4-10 Description for User List Information Parameter Description User ID User ID used for Web login. Full Name User full name. Domain User domain. LOCAL indicates that the user is a local user created in the system. Role User roles: Administrator or User. Different roles determine the user operation permissions after logging in to pages. Email User email address. Status A user can have four different statuses: Active: User status is active.
Polycom® RSS™ 4000 User Guide Table 4-11 Local User Parameters Description Parameter Description User ID Specifies the user ID used for Web login. User ID must be unique with a length of 1-128 characters, and consist of alphanumeric or "_" symbol characters. Once created, user ID cannot be modified. Full Name Specifies the user's full name. Password Specifies the login password. Confirm Password Specifies the confirm password which must be identical to the login password.
Chapter 4 – Administrator Configuration 3 4 Click Edit in the ACTIONS area on the left side of the page. On the Edit User page, set the user's full name, Email address, additional information and status, then click OK. If the user is an AD user, you can only modify its status. To modify user password (local user only): 1 Click User>Users in the menu bar at the top of the page. 2 Select the user entry to be modified in the user list. 3 Click Set Password in the ACTIONS area on the left side of the page.
Polycom® RSS™ 4000 User Guide 3 4 On the Add Local Group page that appears, specify a name for the group to be created. The group name must be unique. You can enter associated descriptions if necessary. Click the Group Members tab to add group members. The list at the top of the page displays all the users defined in the current system. Select users to add to the group, and then click the Add Button. Added users appear in the group member list, and are identified by the icon in the user list.
Chapter 4 – Administrator Configuration Parameter Description User Password Sets the user password that will be used by the Polycom® RSS™ 4000 to access resources on the Active Directory server. 3 Once set up is complete, click Update. After configuring the Active Directory server successfully, the configured Active Directory server domain name displays in the Domain drop-down list of the system's Web Login page.
Polycom® RSS™ 4000 User Guide Parameter Description Exchange server address Specifies the address or domain name of the Exchange server to be integrated. Note: If you set a domain name, make sure you have already set a DNS server address that can resolve this domain name in System Config>IP Setting. Calendar mailbox user ID Specifies the Email account ID allocated to the video conferencing system by the Exchange server. This ID should be the same as the ID used by the Polycom RMX or DMA.
Chapter 4 – Administrator Configuration Parameter Description Related Streams It is used for recurrent conferences, displaying the number of conference live streaming videos in progress under that conference series. Play URLs Lets you copy the URL of playing the archive to the clipboard. For archives recorded in two different bandwidths, clicking the Copy link will copy two URLs.
Polycom® RSS™ 4000 User Guide • : Starts recording/live streaming. Displays when the connection status is idle or paused recording. : Pauses recording. Displays when the connection status is recording. • • : Stops recording/live streaming. Displays when the connection status is recording. • : Disconnects H.323 connection. You can dial out to connect the endpoint to record via the Dial out to record button on the page. For details, see Start Recording from the Web UI in Starting a Recording.
Chapter 4 – Administrator Configuration • The maximum number of recording ports and live streaming ports supported by the system • The activation statuses of the charged options Hardware Status Displays the hardware status of the system, including status information about CPU, memory usage, fan, DSP and so on. If the hardware is in abnormal status, the font in the status bar appears in red. Gatekeeper Status Displays the status of the gatekeeper to which the system is currently registered.
Polycom® RSS™ 4000 User Guide Hard Disk Warning Administrators can set the system to display warning information once the free hard disk space reaches a certain threshold. To set a hard disk warning threshold: 1 Click Admin>Disk Warning in the menu bar at the top of the page. 2 On the Hard Disk Warning page, set a disk space threshold. You can set a value in the range of 1-50G. The system will send an Email message to the administrator once the free hard disk space equals this threshold.
Chapter 4 – Administrator Configuration Parameter Description Key Size Key size, defaulted to 512 digits. You can select 1024 digits or 2048 digits as needed. Challenge Password Certificate request challenge password, which can further strengthen security of the certificate request. 4 Click OK to complete certificate request creation. To apply for the certificate: 1 Click View Last Certificate Request in the certificate setting page to view the information about certificate request created.
Polycom® RSS™ 4000 User Guide Parameter Description TCP/UDP Ports Shows the default TCP/ UDP port range. The user can set the start port number here, and the end port number will be calculated automatically. 3 Click Update and a dialog box will pop up, in which you should confirm to restart the system to apply the setting. Security Policy Polycom® RSS™ 4000 system provides detailed security policy settings.
Chapter 4 – Administrator Configuration Parameter Password Management Password Complexity Description Session Maximum Duration Specifies the maximum time within which you can perform operations. When this time is reached, you are automatically disconnected and need to relog in. The maximum time can set to be 480 minutes. Session Maximum Number Per User Specifies the maximum number of logged-on users with the same account.
Polycom® RSS™ 4000 User Guide System Management System Configuration Backup/Restore You can backup and save the system configuration of Polycom® RSS™ 4000 to the local computer for restoring system configuration in case of future use.
Chapter 4 – Administrator Configuration FTP Server Configuration Before backing up archives, you need to configure FTP server on the Polycom® RSS™ 4000 for backup. To configure FTP server for backup: 1 Select Enable Data Backup/Restore in the Data Backup/Restore page. 2 Configure following parameters in the FTP Server Configuration area: Table 4-20 Description of FTP Server Parameters Parameter Description Server Address Enter the IP address and port of the FTP server.
Polycom® RSS™ 4000 User Guide Backup/Restore Status on the page shows the number of files being and have backed up. When a message pops up at the right bottom of the page prompting you for successful backup, the files backup has completed. Archives Restore The Polycom® RSS™ 4000 system will automatically generate a time point when successfully backing up recorded files. You can use the backup of recorded files to restore those recorded files on Polycom® RSS™ 4000 system.
Chapter 4 – Administrator Configuration 3 4 5 6 7 8 9 Click License Agreement on the Upgrade/Reboot System page and read the license agreement. You need to select Agree to continue the upgrade. Click the Browse button, select the first upgrade pack (Part1), and click Download File. A popup alert box will ask you whether to continue or not. Click Yes. Click Restart button on the page to restart the system. Re-log in to the Web interface after the system is restarted.
Polycom® RSS™ 4000 User Guide Import recorded files from v5.0: 1 Click Admin>Data Backup/Restore in the menu bar at the top of the page. 2 Click Import media from v5 in the ACTIONS area on the left of the page. The recorded files imported from version 5.0 can only be used for video-on-demand and downloaded through the Web interface of the system, but they cannot play back from the endpoint TV UI. Restore the system from v6.0 to v5.0: After restoring to v5.
Chapter 4 – Administrator Configuration Parameter Description Max Recording Ports The maximum number of recordings ports supported by the system. Max Live Steaming Ports The maximum number of live streaming ports supported by the system. Max RTSP Sessions The maximum number of Web video-on-demand supported by the system. Reach up to 200. Encryption Indicates whether the AES encryption function of the device is activated. This is a free option, but limited to only countries.
Polycom® RSS™ 4000 User Guide Customizing Web Interface Logo The Logo displayed at the top of the system Web interface can be replaced with the Logo of your organization as needed. To customize the Logo picture of the Web Management interface: 1 Click Admin>UI Customization in the menu bar at the top of the page. 2 Click Open in the Web User Interface Logo area to select the picture to be uploaded. The uploaded pictures must be in the *.png format, with 212 * 54 pixels.
Chapter 4 – Administrator Configuration Click Reboot Now in the popup message box to restart the system and apply settings. 3 System time Setting accurate system time ensures the correct display of time information such as recording and backup time. The built-in clock of the system can also be synchronized with a network time server. To set the system time: 1 Click System Config>System Time in the menu bar at the top of the page.
Polycom® RSS™ 4000 User Guide • • All current configuration and recorded archives will be cleared after the system is restored to the default configuration. Before the system restarts to complete restoring to the factory default configuration, please remove the USB device connected to the system. Otherwise, after the system restarts, you will receive a default configuration setting dialog box when you try to log in to the Web UI.
5 TV User Interface Operation In addition to Web interface, the Polycom® RSS™ 4000 also provides TV UI for end users to perform the most commonly used recording and playback operations through the remote control. The TV UI (User Interface) from Polycom® RSS™ 4000 system will displays on the screen after an endpoint dials the Polycom® RSS™ 4000 and sets up a connection successfully.
Chapter 5 – TV User Interface Operation Table 5-1 FECC and DTMF Control Keys Scenario FECC DTMF 描述 4 Return to the higher-level menu. 6 2 when in the menu display state 8 Select downward (cyclic). Turn to the next page if the menu items cannot be displayed on one page. - Turn to the previous page if the menu items cannot be displayed on one page. - *1 Pause the current video. - *2 Resumes a paused video. *3 Stops playback of the current video and returns to the main menu.
Polycom® RSS™ 4000 User Guide Start Recording You can use the up/down arrow keys of the remote control to select Start Recording on the main menu page, then press the right arrow key to enter the Recording menu page. You can choose to start recording directly or set a PIN code for recording. If you set a PIN code for the video to be recorded, you must input the correct PIN code to play back the video.
Chapter 5 – TV User Interface Operation To view the videos recorded by current VRR: 1 Select View VRR Archives on the main menu page and press the right arrow key to confirm. 2 Select a file to be viewed in the list and confirm the selection by pressing the right arrow key. You can use the up/down arrow keys to select the file, and press Zoom out/Zoom in to turn page. When you highlight a file, its related information, such as record time, duration and VRR used will display on screen.
6 Appendix A – Telnet/Terminal Commands Polycom® RSS™ 4000 supports device debugging from the command line. You can configure command settings in either of the following two methods: using the HyperTerminal after connecting it to the device through a serial port or configuring via telnet. Both methods use the same command format. Next, we will describe how to configure command setting using the HyperTerminal.
Chapter 6 – Appendix A – Telnet/Terminal Commands If you entered a wrong password, you may be required to re-login to the system. If you entered the right password, you will be brought directly to the command setting interface. Command Introduction Help After logging into the system, you may enter ? or help after the prompt "#" to show the command prompt information.
Polycom® RSS™ 4000 User Guide Reset Password Type "reset password" after the prompt "#" to restore the administrator user password for Web login to the default password (admin). The system will show the prompt message "Are you sure?". Type "Y" to proceed, or type "N" to cancel.
Chapter 6 – Appendix A – Telnet/Terminal Commands The default setting is telnet on. If "telnet off" is entered to disable the telnet function of the Polycom® RSS™ 4000, user can only use the serial port to perform above system setting tasks. The default telnet port is 23, which cannot be modified. The password and command operations for remote telnet login are identical to those for serial port login.
Polycom® RSS™ 4000 User Guide “set {lan1 | lan2} speed {auto | 1000 | 100 full | 100 half | 10 full | 10 half}” - set the connection features for the LAN 1 or LAN2 interface. Table 6-3 Network Setting Parameters – LAN Interface IP Address Parameter Description dhcp Automatically gets the address information through the DHCP server.
7 Appendix B – Regulatory Notices Important Safeguards Read and understand the following instructions before using the system: Close supervision is necessary when the system is used by or near children. Do not leave unattended while in use. Only use electrical extension cords with a current rating at least equal to that of the system. Always disconnect the system from power before cleaning and servicing and when not in use. Do not spray liquids directly onto the system when cleaning.
Chapter 7 – Appendix B – Regulatory Notices Regulatory Notices USA and Canadian Regulatory Notices This Class [A] digital apparatus complies with Canadian ICES-003. Cet appareil numérique de la classe [A] est conforme à la norme NMB-003 du Canada This device complies with part 15 of the FCC Rules.
Polycom® RSS™ 4000 User Guide Regulatory Notices 이 기기는 업무용으로 전자파적합등록을 한 기기이오니 판매자 또는 사용자는 이 점을 주의 하시기 바라며, 만약 잘못판매 또는 구입하였을 때에는 가정용으로 교환하시기 바랍니다. WARNING This is a Class A product. In a domestic environment this product may cause radio interference in which case the user may be required to take adequate measures. Electrical safety advisory We recommend that you install an AC surge arrestor in the AC outlet to which this device is connected.
Chapter 7 – Appendix B – Regulatory Notices Regulatory Notices Dispose of used batteries according to the manufacturer’s instructions ADVARSEL! Lithiumbatteri - Eksplosionsfare ved fejlagtig håndtering. Udskiftning må kun ske med batteri af samme fabrikat og type. Levér det brugte batteri tilbage tilleverandøren.