® SoundPoint IP 500/501 SIP User Guide SoundPoint® IP 500/501 SIP 1.5.
Contents Introduction ............................................... 1 Parts List ................................................... 1 Installing SoundPoint® IP 500/501 SIP .......... 2 Connecting Network and Power Source ................................2 Connecting the Handset and Optional Headset ....................3 Attaching the Base.................................................................3 Features .................................................... 4 Key Descriptions ......................
Shared Lines........................................................................14 Voicemail .............................................................................15 Distinctive Ringing / Call Treatment .....................................15 Multilingual Support (Localization) .......................................16 Phone Reboot ......................................................................16 Optional Features ..................................... 17 Text Messaging ....................
Introduction Thank you for choosing the SoundPoint® IP 500/501 SIP, a full-duplex, handsfree phone. This unit provides business telephony features and functions such as Multiple Call Appearances, Call Hold, Transfer, and Conference over an IP network. In this User Guide, you will find everything you need to quickly use your new phone.
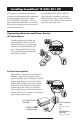
Installing SoundPoint® IP 500/501 SIP The SoundPoint® IP 500/501 SIP User Guide includes regulatory compliance information that your system administrator should review and can also be found at http://www.polycom.com. This section provides basic installation instructions and information for obtaining the best performance with the SoundPoint® IP 500/501 SIP phone. If you require additional information or assistance with your new phone, please contact your system administrator.
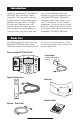
Connecting the Handset and Optional Headset 1. Connect the short straight end of the phone cord to the handset and the corresponding longer straight end of the cord to the handset jack on the back of the phone. 2. Connect the headset (optional accessory) to the headset jack on the back of the phone. (Optional) For information on headsets, please visit www.polycom.com and choose the Support link. LAN PC HEADSET HANDSET Attaching the Base 1.
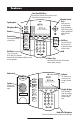
Features Line/Speed Dial Keys Use these keys to activate up to three lines or speed dials that can be assigned to your phone. Display Control Keys Speakerphone Microphone Mute Use the arrow keys to scroll through the displayed information. Use the Sel key to select a field of displayed data and the Del key to delete it. Sel Sel Headset Del Directories Feature Keys Services Access important features using these keys.
Key Descriptions Feature Key Description Allows for hands-free communication during calls. Sel Sel Sel Sel Sel Sel Mutes audio transmission locally during calls.
Using SoundPoint® IP 500/501 SIP Placing a Call Using the Handset: 1. To obtain dial tone, pick up the handset. 2. Dial the desired number, During a call, users can alternate between handset, headset, or handsfree modes by pressing the or Conference Directories keys, or picking up the handset. OR Dial by SIP URL or IP† address: • After obtaining dial tone press Name • Enter URL or IP (press * for “.” and # for “@”) • Press Send to complete the call.
1 4 HI Answering a Call Pick up the handset. Del Conference Directories Using Hands-Free Speakerphone Mode: Services Press or with the handset on hook press the line key ( ) opposite the incoming call, or the Answer soft key . 1 Buddy Status 2 ABC DEF 5 MNO PQRS TUV WXYZ GHI My Status DirectoriesSel Conference DEF 4 Using the Headset: Incoming calls may be ignored Messages Sel by pressing the Reject soft key or Do Not Disturb during ringing.
Menu Menu Directories Directories Messages Messages Services Services Conference Conference GeneralTransfer Key Use Transfer 11 22 33 ABCABC ABC ABC DEFDEF Disturb DoDo NotNot Disturb DEF DEF 44 55 66 JKL MNO GHIGHI JKL MNO Sel To navigate Redial through menus and to enter data, these are useful tips: Redial Hold Hold 7777 8888 9999 Sel and to scroll through 1. Use 5. To enter text using the dialpad, PQRS TUV WXYZ WXYZ PQRS TUV Hold Hold lists.
Call Timer Call progress on an active call is monitored through a local call timer. This is visible within the active call window on the display. Sel Sel Sel Del Directories Services Conference Directories Ending a Call Press the EndCall soft key.
Sel Menu Messages Do Not Disturb (Optional) If multiple lines are in use, Do Not Disturb can be set on a line-by-line basis. Contact your system administrator for futher details. When Do Not Disturb is enabled for a particular line, this is indicated by a flashing “ X ” beside the line Sel indicator on the display. Do Not Disturb to prevent the phone from Press Del ringing on incoming calls. A flashing icon and text on the display indicates that Do Not Disturb is on.
Ring Type Sel Sel Many ring types are available. Users can select different rings to distinguish between lines or to have a different ring from their neighbor’s phone. Del Conference Directories 3. Using the arrow keys, highlight the desired ring type. Press the Play soft key to hear the selected ring Del type. 4. Press Select to change to the selected ring type. 5. Press Menu or the Exit soft key to return to the idle display. To change the incoming ring to a desired Services sound: Menu .
7. Press Save to confirm or Cancel to abandon the changes then press Exit to return to the idle display. 4. Enter the Contact number. This is a required field and it must be unique (not already in the directory). 5. Speed Dial Index, Ring Type and Divert Contact may be left blank. Sel 6. Use and toSel switch between Enabled and Disabled settings for the last four fields. Contacts can be easily added from Call Lists. See Call Lists for more information.
Sel To remove a Speed Dial entry: Directories 1. Press Conference and select Contact Directory. Services 2. Scroll to the desired entry and press Sel Edit. 3. Delete Call theLists Speed Dial Index number Sel using the then Del keys.
Multiple Call Appearances Each line on the phone can be configured to have one or more call appearances. This is useful if there is an active call and an incoming call arrives on the same line. In the example shown, extension 9301 is in an outbound call with 9304. The second diagram shows an incoming call from extension 9305. To answer this incoming call, Sel put the original call on Hold or press the key. Soft key labels are updated on the display to enable the user to: Del 1. Answer the incoming call. 2.
Voice Mail Received messages Sel will be indicated by a flashing Message Waiting Indicator LED on the front of the phone and a visual notification on the display. A stutter dial tone in place of normal dial tone is used to indicate that one or more voice messages are waiting at the message center. Del Individual line indicators reflect voice or text messages left on that line (useful if multiple lines are in use).
Sel Sel MultilingualDelSupport (Localization) Many languages are supported by the phone. To change language: tories erence DEF ces 3 DEF ists 6 MNO y Status MNO 99 tatus WXYZ WXYZ # l Del 3. The display will change to the language of your choice. 4. Exit to the idle display by pressing . Menu 1. Press Menu and select Settings, Basic, Preferences, Language. Messages the list of available 2.
Optional Features Sel Text Messaging Users can send and receive Text messages on the phone. SIP Instant (Text) MesDel in real-time. Users saging is supported can send and receive text messages using their phones. Received messages will be indicated by a flashing Message Waiting Indicator LED on the front of the phone and optionally a visual notification on the display. Menu To read text messages: 3 DEF DEF 6 MNO MNO 99 WXYZ WXYZ # 3 DEF DEF 6 MNO MNO 99 WXYZ WXYZ # 3.
Sel 5. Press the Save soft key or Cancel to abandon the change then press to return to the idle display. Directories Conference Del Services show a typical Buddy Status screen The diagrams display of monitored phones and a My Status display.
Troubleshooting No Dial-Tone Verify power is correctly applied to the SoundPoint® IP 500/501 SIP phone: Verify if dial tone is present on any other audio paths: • Check that the display is illuminated. • Make sure the LAN cable is inserted properly at the rear of the phone (try unplugging and re-inserting the cable). • If using inline powering, check that the switch is supplying power to the phone (contact your System Administrator).
Sel No Response from Feature Key Presses Conference Directories Verify phoneServices is in active state: • Make a call to the phone to check Call Lists for inbound call display and ring1 try2 to 3 ing asBuddynormal. If successful, Status ABC DEF press feature keys within the call to 4 5 6 My Status access Directory or Buddy Status GHI JKL MNO for example.
Modifications approved by Polycom, Inc. could void the user’s authority to operate the equipment. In accordance with Part 15 of the FCC Rules, the user is cautioned that any changes or modifications not expressly Installation Instructions Installation must be performed in accordance with all relevant national wiring rules. L’Installation doit être exécutée conformément à tous les règlements nationaux applicable au filage électrique.
that provides for tracking of the package. Responsibility for loss or damage does not transfer to Polycom until the returned item is received by Polycom. The repaired or replaced item will be shipped to Customer, at Polycom’s expense, not later than thirty (30) days after Polycom receives the defective product, and Polycom will retain risk of loss or damage until the item is delivered to Customer. may be new or reconditioned.
Limitations of Liability LIMITATION OF LIABILITY.
IS”, WITHOUT WARRANTY OF ANY KIND, EXPRESS OR IMPLIED, INCLUDING BUT NOT LIMITED TO THE WARRANTIES OF MERCHANTABILITY, FITNESS FOR A PARTICULAR PURPOSE AND NONINFRINGEMENT. IN NO EVENT SHALL THE AUTHORS OR COPYRIGHT HOLDERS BE LIABLE FOR ANY CLAIM, DAMAGES OR OTHER LIABILITY, WHETHER IN AN ACTION OF CONTRACT, TORT OR OTHERWISE, ARISING FROM, OUT OF OR IN CONNECTION WITH THE SOFTWARE OR THE USE OR OTHER DEALINGS IN THE SOFTWARE.
Polycom, Inc. 1565 Barber Lane Milpitas, CA 95035 ©2005 Polycom, Inc. All Rights Reserved. Polycom®, SoundPoint®, and the Polycom logo design are registered trademarks of Polycom, Inc. in the U.S. and various countries. All other trademarks are the property of their respective compainies. 1725-11519-001 Rev.