Register your product and get support at EN User Manual FR Manuel de l’utilisateur ES Guía del usuario 52PFL7403D 47PFL7403D 42PFL7403D 52PFL5603D 47PFL5603D 42PFL5603D 42PFL5403D 32PFL5413D 32PFL5403D 52PFL3603D 47PFL3603D 42PFL3603D 42PFL3403D 32PFL3403D /85 EN: For further assistance, call the customer support service in your country. • U.S.A., PUERTO RICO, OR U.S.
*Proof of Purchase *Product Safety Notification *Additional Benefits Returning the enclosed card guarantees that your date of purchase will be on file, so no additional paperwork will be required from you to obtain warranty service. By registering your product, you'll receive notification - directly from the manufacturer - in the rare case of a product recall or safety defect.
ENGLISH FRANÇAISE ESPAÑOL )-0/24!.4 3!&%49 ).3425#4)/.
The material in this manual is believed adequate for the intended use of the system. If the product, or its individual modules or procedures, are used for purposes other than those specified herein, confirmation of their validity and suitability must be obtained. Philips warrants that the material itself does not infringe any United States patents. No further warranty is expressed or implied.
ENGLISH Contents 1.
Congratulations on your purchase and welcome to Philips! To fully benefit from the support that Philips offers, register your product at www.philips.com/welcome. 1.2 Screen care • Turn off and unplug the power cord before cleaning the screen. • Clean the screen with a soft, dry cloth. Do not use substances such as household cleaning agents as these may damage the screen. • To avoid deformations or color fading, wipe off water droplets as soon as possible.
ENGLISH 2. Your TV For more information about TV connections, see Connect your devices on page 32. This section describes the controls and functions of your TV. 2.1 2.2 Remote control Television overview Front and side controls 1 FRANÇAISE 2 VOLUME 4 3 3 MENU CHANNEL 2 ESPAÑOL 4 1 POWER 5 5 1. Power switch 2. Channel up/down 6 3. Menu The MENU key can be used as an OK key in some submenus. 7 4. Volume up/down 5.
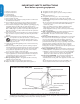
3.1 32 Position the TV VESAcompatible wall bracket (millimeters) Bolt and spacer type Adjustable 300 x 300 4 of M6x10mm steel bolt • Do not insert the power plug into the wall socket before all the connections are made. • Large screen TVs are heavy. Two people are required to carry and handle the TV. 4 of M6x50mm steel bolt with 40mm spacer 42 or larger Fixed 400 x 400 If the TV is mounted on a swivel base or swivel arm, ensure no strain is placed on the power cord when the TV is swivelled.
3.4 Connect the antenna or cable ENGLISH This section describes how to connect your TV to an antenna, cable, Direct Broadcast Satellite, and to a set-top box. ESPAÑOL FRANÇAISE Cable TV ANTENNA R L Step 3 Connect cables R R L L Pr Pr Pb Pb SERV.
If the TV is connected to a cable box or satellite set-top box via a coaxial connection, set the TV to channel 3 and 4, or the channel specified by the service provider. 3.5 Connect the power cord BBWARNING: Verify that your voltage corresponds with the voltage printed at the back of the TV. Do not insert the power cord if the voltage is different. To connect the power cord ENGLISH Connect a set-top box through RF IN/OUT 1. Locate the power connector at the back of the TV.
Switch on and setup the TV The TV switches on automatically after connecting the power cord. FRANÇAISE ENGLISH 3.7 Thank you for your purchase of this PHILIPS TV. Please proceed with the following steps to set-up your TV. For the BESTpossible picture performance, contact your local Cable / Satellite signal provider for High Definition signal options available in your area. ESPAÑOL Next Press the GREEN Next button located on your remote control to proceed.
4.2 Switch channels This section helps you perform basic TV operations. 4.1 Switch your TV on/off or to standby To switch the TV on • Watch TV Press . POWER at the right side of the TV. 1. Press a number (1 to 999) or press CH+ or CH- on your remote control. For digital channels, press a number (1 to 999) followed by a dot "." and then the corresponding sub channel number (1 to 999). Ex. 108.30. 2. Press PREV CH to return to the previously viewed TV channel. ENGLISH Use your TV FRANÇAISE 4.
ENGLISH 4.3 Watch channels from a set-top box 1. Switch on the set-top box. The picture from your set-top box might appear automatically on your screen. 2. Use the remote control of your set-top box to select channels. ESPAÑOL FRANÇAISE If the picture does not appear 1. Press SOURCE repeatedly to select the connected set-top box and wait a few seconds for the picture to appear. 2. Use the remote control of your set-top box to select channels. 4.4 Watch connected devices 1.
Use more of your TV This section describes the advanced features of your TV. 5. Color keys Selects tasks. 5.1 6. OPTION Activates the quick access menu. For information, see Use the quick access menu on the next page. Understand the remote control 7. OK To display the channel list or to activate a setting. 21 20 19 18 2 3 4 5 6 7 17 16 15 8 9 10 8. Cursor buttons Í Æ Î ï To navigate through the menus. 9.
ENGLISH 5.2 Use the quick access menu The quick access menu gives direct access to some often needed menu items. DDNote When digital channels are installed and broadcast, the relevant digital options are displayed in the quick access menu. 3. Press ï and Æ to select the Picture menu. TV menu TV Settings Picture Settings assistant Contrast Picture Brightness Sound Color Tint 1. Press OPTION on the remote control.
The following picture settings can be configured. Depending on the format of the picture source, some picture settings might not be available. The following picture formats can be selected. Depending on the format of the picture source, some picture formats might not be available. Contrast - Sets the level of white in the picture. • Brightness - Sets the brightness of the picture. • Color - Sets the level of saturation. • Tint - Adjusts the color balance between red and green.
This section describes how to adjust your sound settings. 1. Press MENU on the remote control and select TV settings > Sound. TV menu FRANÇAISE ENGLISH Change sound settings TV Settings Sound Settings assistant Equalizer Picture Balance Sound Digital audio language Alternate audio Mono/Stereo Incredible surround AVL BBE ESPAÑOL 2. Press Î or ï to highlight a sound setting and press Æ to select the setting. 3. Press Î or ï to adjust the setting, and press OK to confirm the change. 4.
1. Press Auto Mode to set your TV to a predefined picture and sound setting. 5.5 Create and use lists of favorite channels This section describes how to create and use lists of your favorite channels. Select a list of favorite channels FRANÇAISE 1. Press the FAV key on the remote control. ENGLISH Use Auto Mode 2. Press Î or ï to select one of the following settings: • Personal The customized settings you defined by using the Picture menu.
Set the clock Set the time manually This section describes how set the time, date, time zone, and daylight saving. Set the time automatically 1. Press MENU on the remote control and select Installation > Clock > Auto clock mode. 2. Press Î or ï to select Manual, and press Í to confirm your choice. Some digital channels transmit the time. For these channels, you can set the time automatically. Follow these steps to set the time automatically and to choose which channel to read the time from.
This section describes how to lock or unlock the TV. You can set a personal identification number (PIN) and prevent your children from watching certain programs or certain channels. Set or change your PIN Lock a channel This section describes how to lock specified channels. The channels can be selected but the screen is blanked out and the audio is muted. 1. Press MENU on the remote control and select Features > Child lock > Channel lock. 2. Enter your PIN. 2.
ESPAÑOL FRANÇAISE ENGLISH Use the TV ratings lock Summary of TV ratings Your TV is equipped with a V-chip that allows you to control access to individual programs based on their age rating and content rating. The program content advisory data are sent by the broadcaster or by the program provider. Age rating Content rating All None None None If you are receiving channels through a set-top box or cable box connected by HDMI, you cannot use the TV ratings lock.
Use the movie ratings lock Description All All items in the ratings list are locked. 1. Press MENU on the remote control and select Features > Child lock. NR Not rated. G Movies with a mild content, suitable for all ages. 2. Select one of the menus for movie ratings lock. PG Movies for which parental guidance is recommended. They may contain a few racy or violent scenes or maybe some bad language. PG -13 Movies for which parental guidance may be recommended if under age 13. R Restricted.
ENGLISH Use the region ratings lock 5.9 This section describes how to control access to digital programs based on downloaded region ratings. The caption service displays transmitted CC-, T-, and CS- text. The caption text can be displayed permanently or only when the TV is muted. This section describes how to use the caption service. Before you download a ratings table, ensure that regional ratings are broadcast. 1.
• T-1, T-2, T-3 and T-4 Often used for channel guide, schedules, bulletin board information for Closed Captions programs, news, weather information, or stock market reports. • CS-1, CS-2, CS-3, CS-4, CS-5 and CS-6 Service 1 is designated as the Primary Caption Service. This service contains verbatim, or near-verbatim captions for the primary language being spoken in the accompanying program audio. Service 2 is designated as the Secondary Language Service.
ENGLISH View your pictures on a USB device You can configure the following features of the slideshow: 1. After connecting your USB device to the TV, press Æ to enter the Multimedia menu. Picture is highlighted. • Details / More details Displays the picture name, date, size, and next picture in the slideshow. • Transitions Displays the list of available transition styles of the pictures. • Slide time Sets the time lag for picture transitions. • Rotate Rotates a picture.
5.12 Use your TV as a PC monitor Not all models can be configured in HDTV mode. For information about your set, see the specification. For information how to connect a PC to your TV see Connect a PC on page 34. Use an HDMI-DVI cable or an HDMI-DVI adaptor. For sound, add an audio cable with a stereo mini jack.
ESPAÑOL FRANÇAISE ENGLISH 5.13 Use Philips EasyLink Your TV supports Philips EasyLink, which enables one-touch play and one-touch standby between EasyLink-compliant devices. Compliant devices must be connected to your TV via an HDMI connector. One-touch play When you connect your TV to devices that support one-touch play, you can control your TV and the devices with one remote control.
The first time you switch on your TV you select the language for the TV menus and make basic choices for picture and sound settings. Use this chapter to reinstall the TV, to set preferences in the TV menus, or to tune new TV channels. 6.1 If you have forgotten your PIN, reset it as described in Set or change your PIN on page 19. 3. Select Cable or Antenna and press OK. • When Antenna is selected, the TV detects antenna signals. It searches for NTSC and ATSC channels available in your area.
ENGLISH 6.5 Uninstall and reinstall channels This section describes how to uninstall and reinstall a stored channel. When a channel is uninstalled it is removed from the list of channels. Uninstalled channels are not reinstalled during an installation update. 1. Press MENU on the remote control and select Installation > Channels > Uninstall channels. FRANÇAISE Show emergency alerts (EAS) The SCTE18 standard defines an emergency alert signalling method for use by cable TV systems.
Philips continuously tries to improve its products and we strongly recommend that you update the TV software when updates are available. Download the software 1. On your PC, open a web browser and go to www.philips.com/ welcome. 2. Find information and software related to your TV and download the latest software upgrade file to your PC. New software can be obtained from your dealer or downloaded from the www.philips.com/welcome website. Use the type number of your TV (e.g.
ENGLISH Connect devices 8.1 Connection overview FRANÇAISE 8. TV ANTENNA 2 1 4 R R R L L L Pr ESPAÑOL 3 5 R SPDIF OUT Pr Pb HDMI 1 11 VIDEO Y L R AV 2 AV 3 R SERV. VU 13 S-VIDEO HDMI 3 9 VIDEO DVI AUDIO IN 14 HDMI 4 15 USB 16 8 1. Antenna input 2. AV1 Component video input. Y Pb Pr and Audio L/R connectors for DVD, digital receiver or game console, etc. 3. AV2 Second component video input. 4.
HDMI - Highest quality HDMI produces the best audio visual quality possible. Both audio and video signals are combined in one HDMI cable, providing an uncompressed, digital interface between your TV and HDMI devices. You must use HDMI to experience full high definition video. You must also use HDMI cables to use Philips EasyLink as described in Use Philips EasyLink on page 26. Use only a certified HDMI cable.
Connect your devices This section describes how to connect a selection of devices with different connectors. Note that different types of connectors may be used to connect a device to your TV. The following sections describe examples only, other configurations are possible. Connect a set-top box, DVD player/recorder and game console via HDMI TV ANTENNA When connecting composite or component cables, match the cable colors to the connectors on the TV.
ENGLISH Connect a digital home theater amplifier Connect a set-top box via a composite connector TV ANTENNA TV ANTENNA Or/Ou/O RF OUT R L L L Pr SERV. U L + R + VIDEO SPDIF OUT Pr Pb Pb Y Y VIDEO AV 1 R AV 2 R R L L L Pr Pr Pb Pb Y Y SERV.
Connect a PC with an HDMI connector Connect a PC with an S-Video connector at the back TV ANTENNA TV ANTENNA FRANÇAISE ENGLISH Connect a PC R R R L L L Pr Pr R R R L L L Pr Pr Pb Pb SERV. U SERV.
Meaning DVI Digital Visual Interface A digital interface standard created by the Digital Display Working Group (DDWG) to convert analog signals into digital signals to accommodate both analog and digital monitors. RGB signals Red, Green and Blue signals These are the three video signals, red, green & blue, which make up the picture. Using these signals improves picture quality. S-VHS signals Super-VHS signals These are 2 separate Y/C video signals from the S-VHS and Hi-8 recording standards.
ESPAÑOL FRANÇAISE ENGLISH 10. Troubleshooting Symptoms Possible cause What should you do No power or indicator light. The TV is not connected to the power. 1. Press . POWER at the right side of the TV, or press . on the remote control. 2. Ensure the power cord is connected tightly to the TV power connector and to the power socket outlet. 3. Remove the power cord from the power socket outlet, wait 60 seconds and reconnect the power cord. 4. Connect the TV to a different power socket outlet.
• The implementation of the TV is based on the “Universal Serial Bus Mass Storage Class Specification Overview” (v1.2, June 23, 2003) including all documents referenced by the document. The document can be found on the USB standardization website (www.usb.org). Digital Content Issues Only FAT (DOS) formatted (initialized) portable memory is supported. Errors in this formatting can result in unreadable content. If such problems appear try to re-format the card.
ENGLISH 12. Technical specifications Feature type no.
Active control 15 Lock one or more channel/device 19 EAS 28 PIN code 19 Emergency alerts 28 Set movie rating 20 Environmental care 5 Set TV rating 20 Equalizer 16 Antenna, connect 8 Clock 18 Audio 16 Closed captions 22 Color Alternate 16 Language 16 Enhancement 15 Auto format 15 Picture setting 15 Automatic Temperature 15 F Favorite lists 17 H Channel installation 27 Component cable 31 HDCP 31 Surround 16 Composite cable 31 HDMI cable 31 Volume leveling 16 Configuring the TV in H
ENGLISH Movie ratings 21 Region ratings 22 Overview 6 MPEG artefact reduction 15 Register your TV 5 Position 7 Multimedia 23 Remote control Ratings 20 Music. See Photos and music Advanced use 13 Basic use 6 Batteries 8 FRANÇAISE N Retail store mode 27 Noise reduction 15 U Upgrade software 29 USB 23 S O Connector 30 Screen care 5 One-touch play 26 Settings 16 Settings assistant 14 P Parental control.
WHO IS COVERED: Philips warrants the product to the original purchaser or the person receiving the product as a gift against defects in materials and workmanship as based on the date of original purchase (“Warranty Period”) from an Authorized Dealer. The original sales receipt showing the product name and the purchase date from an authorized retailer is considered such proof.
© 2007 Koninklijke Philips Electronics N.V. All rights reserved.