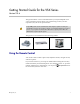
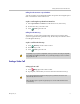
product pic here Getting Started Guide for the VSX Series Version 9.0.
Trademark Information Polycom®, the Polycom logo design, SoundStation VTX 1000®, and ViewStation® are registered trademarks of Polycom, Inc., and ImageShare™, MGC™, People+Content™, PowerCam™, PVX™, RMX 2000™, StereoSurround™, Visual Concert™, VS4000™, and VSX™ are trademarks of Polycom, Inc. in the United States and various other countries. All other trademarks are the property of their respective owners. Patent Information The accompanying product is protected by one or more U.S.
Contents Using the Remote Control . . . . . . . . . . . . . . . . . . . . . . . . . . . . . . . . . . . . . . . . . . . . . . . . . . . . . . . . . 1 VSX Series Remote Control . . . . . . . . . . . . . . . . . . . . . . . . . . . . . . . . . . . . . . . . . . . . . . . . . . . . 2 Calling and Answering . . . . . . . . . . . . . . . . . . . . . . . . . . . . . . . . . . . . . . . . . . . . . . . . . . . . . . . . . . . 3 Answering a Video Call . . . . . . . . . . . . . . . . . . . . . . . . . . . . . . . . .
Getting Started Guide for the VSX Series Categorizing Directory Entries . . . . . . . . . . . . . . . . . . . . . . . . . . . . . . . . . . . . . . . . . . . . . . . . 22 Refreshing Global Directory Entries . . . . . . . . . . . . . . . . . . . . . . . . . . . . . . . . . . . . . . . . . . . 23 Including Multiple Sites in Calls . . . . . . . . . . . . . . . . . . . . . . . . . . . . . . . . . . . . . . . . . . . . . . . . . . 24 About Multipoint Calls . . . . . . . . . . . . . . . . . . . . . . . . . . . .
Getting Started Guide for the VSX Series Version 9.0.6 This guide includes overview information that you may find helpful when you’re just starting to learn about video conferencing or when you have experience, but you need a quick refresher. Polycom® systems can be customized to show only those options used in your organization. Therefore, there may be options covered in this guide that you cannot access on your system.
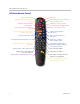
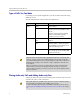
Getting Started Guide for the VSX Series VSX Series Remote Control Place or answer a call End a call Mute the sound you hear from the speakers Open the Directory so you can make a call or work with an entry Adjust the camera; navigate through menus Confirm your current selection; perform functions on highlighted items Return to the Place a Call (home) screen Increase or decrease the sound you hear from the far site(s) Zoom the camera in or out Turn automatic camera tracking on or off Mute the sound y
Getting Started Guide for the VSX Series Calling and Answering Answering a Video Call The Polycom system can answer incoming calls in one of these ways: • The system prompts you to answer the calls manually. • The system answers incoming calls automatically. When a call comes in, you hear a ringing sound, and you may see a message that includes the number of the person calling. If the person is listed in the directory, you’ll also see the person’s name.
Getting Started Guide for the VSX Series 2. Enter any additional information needed for the call. The available settings depend on the type of call and your system’s configuration. Not all calls require these settings: — Call Quality – Specify the call rate (network speed) or call type for this call. For most calls, choose Auto to let the system determine the best quality for the call. — Second ISDN number – Use two numbers only when the person you are calling instructs you to do so.
Getting Started Guide for the VSX Series Calling from the Contacts or Speed Dial List You may be able to access calling information for specific sites using the Speed Dial or Contacts list on the home screen. To place a call using the Speed Dial or Contacts list: 1. Select Speed Dial or Contacts from the home screen, if necessary. 2. Scroll to the entry you want to call. 3. Press Call to place the call. Calling from the Directory The directory is a list of sites stored locally on the Polycom system.
Getting Started Guide for the VSX Series Types of Calls You Can Make Depending on your system configuration, you may be able to make calls using ISDN, IP, or V.35. The following table lists some possible call combinations. From... You can call... By dialing... ISDN ISDN Phone number. IP Phone number of the far-site gateway and the extension (E.164 address) of the far site. Enter the extension after the gateway number or wait until the gateway prompts you for the extension.
Getting Started Guide for the VSX Series Placing an Audio-only Call You can place an audio-only call from Polycom systems that have Analog Phone or Voice Over ISDN enabled. To place an audio-only call from your system: 1. On the Place a Call screen, enter the number you want to call. To delete a digit, press Delete on the remote control. 2. Select Call Type and press on the remote control. 3. Select Phone or Analog Phone. 4. Press Call to place the call.
Getting Started Guide for the VSX Series Ending an Audio-only Call To hang up from an audio-only call: 1. Press Hang Up on the remote control. 2. Select the audio-only site from the Hang Up screen to hang up the call. If the person on the telephone hangs up first, you need to disconnect the call from the Polycom system, just as you would hang up a telephone receiver in a regular phone call.
Getting Started Guide for the VSX Series To adjust a camera using the remote control: 1. Press Near or Far to select either near-site or far-site control. During a multipoint call being hosted by a system in the call, you can only adjust a camera at the far site that is currently speaking. 2. Press the Up, Down, Left, and Right arrow buttons on the remote control to move the camera up, down, left, or right. 3. Press Zoom to zoom out or in.
Getting Started Guide for the VSX Series Setting and Using Camera Presets Camera presets are stored camera positions that you can create ahead of time or during a call. Presets allow you to: • Automatically point a camera at pre-defined locations in a room. • Select a video source such as a VCR or DVD player, a document camera, or an auxiliary camera. If your system’s camera supports electronic pan, tilt, and zoom movement, you can create up to 100 preset camera positions (0-99) for the near site.
Getting Started Guide for the VSX Series 4. Press and hold a number to store the preset position. To store a double-digit preset, press the first digit quickly and hold the second number down. Any existing preset stored at the number you enter is replaced. The system uses preset 0 as the default camera position. To delete all presets: 1. If a call is connected, press Near to choose a near-site video source. 2. Press Preset on the remote control. 3. Press Delete to delete all presets.
Getting Started Guide for the VSX Series 4. Scroll to Dual Monitor Emulation and press to enable the option. 5. Press on the remote control Home to save your change and return to the home screen. During calls using Dual Monitor Emulation without content, you can press the PIP button on the remote control to scroll through the following screen layouts: 1. Near and far sites, same size, side by side 2. Far site big, near site small 3. Near site big, far site small 4. Near site, full screen 5.
Getting Started Guide for the VSX Series Showing, Moving, and Turning Off the PIP Your system may be configured to display a Picture-in-Picture (PIP) window. During a call on a single-monitor system, the PIP displays what your main camera is sending to the far site. If the far site shows any type of content, the content appears in the main part of the screen, and the PIP changes to show the people at the far site.
Getting Started Guide for the VSX Series Select this setting... To show the PIP... Camera When you press any of the camera control buttons. Auto On connection and when you pick up the remote control. On On connection and during the call. Off Only when you press 5. Press PIP on the remote control. Home to save your change and return to the home screen.
Getting Started Guide for the VSX Series Controlling What You Hear Adjusting Volume Use the remote control to raise or lower the volume of the sound you hear. To adjust the volume: Press Volume. Changing the volume affects only the sound you hear at your site. When the VSX 3000 system is in use for video conferencing, use the remote control to adjust the volume. When the VSX 3000 is in use as a monitor for your computer, use the VOL button on the front of the system to adjust the volume.
Getting Started Guide for the VSX Series To unmute your main speakers: Press Snap on the remote control. The sound from the main speakers is restored to the previous level. Enjoying Stereo Audio in Video Calls If your video conferencing room is configured to use stereo sound, the left and right microphone inputs are configured during system setup. It is important that you do not move the microphones as this may detract from the stereo audio experience.
Getting Started Guide for the VSX Series Showing Content with People+Content IP To install the People+Content IP application on a computer: 1. On a computer with Windows XP or Windows 2000, open a web browser and go to the Polycom web site at www.polycom.com/support/video. 2. Download and install the People+Content IP software. To start showing content: 1. On the computer, start the Polycom People+Content IP application. 2.
Getting Started Guide for the VSX Series Showing Content with a Visual Concert VSX or ImageShare II Before you show content, check that the computer video is configured to use one of these supported resolutions and refresh rates: Resolution Refresh Rates (Hz) 640 x 480 60, 72, 75, 85 800 x 600 60, 72, 75, 85 1024 x 768 60, 70, 75, 85 1280 x 1024 (scaled and sent to the far site in 1024 x 768 format) 60 To set the resolution and refresh rate, go to your computer’s Display Control Panel.
Getting Started Guide for the VSX Series 2. Press Graphics or another content source. Camera on the remote control to choose To show content using an ImageShare II: 1. Connect the computer to an ImageShare II: 2. Press the blue ImageShare selection button to start and stop displaying content.
Getting Started Guide for the VSX Series Working with Directory Entries The directory on your Polycom system stores dialing information that helps you make calls quickly and easily. When a site listed in the directory calls your system, the system displays the name on the screen when the call comes in. If a site that calls you is not listed in the directory, you might be prompted to save the contact information in the directory when the call ends.
Getting Started Guide for the VSX Series Adding, Editing, and Deleting Directory Entries You can create entries for point-to-point calls and multipoint calls and save them in the Polycom system’s directory. To add a single-site entry to the directory: 1. Press Directory on the remote control. 2. Select New and specify that this is an entry for one site. 3. Specify the following required information: In this field... Enter this information...
Getting Started Guide for the VSX Series 3. Add numbers to this multiple-site entry in one of these ways: — Select entries from the directory. — Add entries manually. The number of sites that you can add depends on the capabilities of your system. 4. Specify a speed for the call. Note that each call in the multipoint conference is placed at the same speed. 5. Select Save to save the entry. 6. Enter a name for this entry as you want it to appear in the directory list. To edit an entry: 1.
Getting Started Guide for the VSX Series To delete a group: 1. Press Directory on the remote control. 2. Select Group. 3. Select Edit Groups. 4. Scroll to the group name you want to delete and then select Delete. When you delete a group, all entries in that group are deleted. If you want to keep these entries, be sure to assign them to a new group before you delete the old group. To assign an entry to a group: 1. Press Directory on the remote control. 2.
Getting Started Guide for the VSX Series Including Multiple Sites in Calls Your system may be configured to participate in multipoint calls. During a multipoint call, multiple sites can see and hear each other. You can also share content in a multipoint call, just as you can in a point-to-point call. Some systems, such as the VSX 5000 and VSX 6000, are not compatible with the optional embedded MPPlus Multipoint software.
Getting Started Guide for the VSX Series to four video sites, plus one audio site. The VSX 8000 provides multipoint support for calls that include up to six video sites, plus one audio site. To place a multipoint call by adding sites to a call: 1. Call the first site. 2. When the call connects, press Call on the remote control. 3. Select Add Call, and place a call to the next site. 4. Repeat steps 2 and 3 until all sites are connected. To place a multipoint call using a multiple-site directory entry: 1.
Getting Started Guide for the VSX Series — Press Keyboard to use the onscreen keyboard to enter characters. 4. Press Home to save your change and return to the home screen. About Multipoint Viewing Modes What you see during a multipoint call can vary depending on how the Polycom system is configured, the number of sites participating, and whether content is shared. The multipoint viewing mode configured on the host system is the one used in the call.
Getting Started Guide for the VSX Series Using Chair Control for Multipoint Calls During some multipoint calls, you can use chair control to manage the people video. In this type of call, the chair controller can choose the site whose video is sent to other sites in the conference. The chair controller can also disconnect a site or end the conference. Any participant can choose to view a specific site, request to be the broadcaster, or request to be chair controller.
Getting Started Guide for the VSX Series 5. Select a site from the list and then use the controls in the web interface to perform one of these actions: If you are... You can do this... By selecting... Chair controller Pass chair control to the selected site. Release Chair View the selected site’s video. This remains in effect until you choose Stop Viewing Site or you release chair control.
Getting Started Guide for the VSX Series To temporarily refuse incoming calls: 1. On the home screen, select screen. in the lower right corner of the 2. Select On to set Do Not Disturb. While the system is not accepting calls, you see in the lower right corner of the screen. This setting stays in effect until you change it.
Getting Started Guide for the VSX Series Muting Automatically Answered Calls Depending on your system configuration, you can choose whether to mute the audio when calls connect if your system is configured to answer calls automatically. This prevents callers from overhearing conversations or meetings. After the call connects, you can press Mute when you’re ready to unmute the call. Note that, if you enable this option during a call, the audio for the current meeting is not affected.
Getting Started Guide for the VSX Series To view scheduled calls in the calendar: 1. Select System from the Place a Call screen. 2. Select Utilities from the System screen. 3. Select Calendar from the Utilities screen. Dates with scheduled calls are marked in the calendar with a small green triangle. Using Lotus Sametime or Lotus Notes in Audio and Video Calls Depending on your system configuration, your VSX system may support SIP sites using Lotus® Sametime® or Lotus Notes® in audio and video calls.
Getting Started Guide for the VSX Series Displaying the Far Site’s Name When the Call Connects Depending on your system configuration, you can specify whether to display the far site’s name when the call connects and how long to leave the name on the screen. To specify when to display the name of the far site: 1. Select System from the Place a Call screen. 2. Select User Settings from the System screen. 3. Select Next to see more settings. 4.
Getting Started Guide for the VSX Series Adjusting for Room Lighting Depending on your system configuration, you can use the backlight control to adjust the brightness of the video that the main camera sends to the Polycom system. Adjusting this setting can be helpful when the room arrangement results in strong light coming from behind the people in the picture. Because backlight controls adjust the main camera, these controls will not affect the quality of other cameras or content sources.
Getting Started Guide for the VSX Series Changing the System Color Scheme Depending on your system configuration, you may be able to change the color scheme of your Polycom system screens. To change the color scheme: 1. Select System from the Place a Call screen. 2. Select User Settings from the System screen. 3. Select Next to see more settings. 4. Scroll to Color Scheme, press of the color schemes. 5. Press on the remote control, and select one Home to save your change and return to the home screen.
Getting Started Guide for the VSX Series To transfer a call: 1. While in a call, press access the tone pad. on your Polycom system remote control to 2. Press Dot on the remote to activate flash hook. The first far-site system is placed on hold. 3. Wait for a dial tone, then dial the extension of the far-site system to which you want to transfer the call. The call connects both audio and video between the local system and the second far-site system. The first far-site system is still on hold. 4.
Getting Started Guide for the VSX Series To stop streaming a conference: 1. Select System from the Place a Call screen. 2. Select Utilities from the System screen. 3. Select Web Streaming from the Utilities screen. 4. Clear the Start Streaming option to stop the stream. Viewing a Stream Before you view the streamed conference, you need to: • Install the QuickTime player on your computer. • Obtain the IP address of the video conferencing system and the password (if any) from the conference organizer.
Getting Started Guide for the VSX Series Placing a Video Call with the SoundStation VTX 1000 Conference Phone If your Polycom video conferencing system and SoundStation VTX 1000 have been configured to work together, you can use the conference phone to place video calls. To place a video call using the SoundStation VTX 1000 phone: 1. Leave the SoundStation VTX 1000 conference phone on hook. 2.
Getting Started Guide for the VSX Series Muting the Audio in a Call that Includes a SoundStation VTX Conference Phone You can use the mute button on the SoundStation VTX conference phone to mute the audio in video calls. To mute the audio in a call with the SoundStation VTX 1000 conference phone: Do one of the following: — Press the Mute button on the conference phone. — Press Mute on the remote control. The red indicator lights on the conference phone show when the audio is muted.
Getting Started Guide for the VSX Series From the Polycom system: 1. Press Hang Up on the remote control. 2. On the Hang Up screen, do one of the following: — Select which site to disconnect. — Choose Hang Up All to end the call for all sites. Ending a Call with Audio-only Participants Your conference may include a mix of video participants and audio-only participants. If an audio-only participant hangs up during the call, you need to disconnect the call from the conference.
Getting Started Guide for the VSX Series Before You Begin Check that the computer video is configured to use one of these supported resolutions and refresh rates: Resolution Refresh Rates (Hz) VGA (640 x 480) 60, 72, 75 VGA (720 x 400) 70 SVGA (800 x 600) 56, 60, 72, 75 XGA (1024 x 768) 60, 70, 75 SXGA (1152 x 864) 75 SXGA (1280 x 960) 60 SXGA (1280 x 1024) 60, 75 Macintosh (640 x 480) 67 Macintosh (832 x 624) 75 To use your VSX 3000 system as a computer monitor: 1.
Getting Started Guide for the VSX Series Video Conferencing Tips Read through these quick tips for ideas on how to optimize your video conferencing experience. You'll find general tips for a better meeting, as well as simple suggestions for improving video and audio quality, and for showing documents. Tips for Great Meetings • Make sure that you have the video number(s) of the site(s) you want to call or that the site(s) are listed in a directory.
Getting Started Guide for the VSX Series VSX Set-Top and Component Systems • Place the microphone on the table in front of the people in the meeting. If your room is very large, consider adding additional microphones. • If your video conferencing room is configured to use stereo sound, the microphones are positioned and configured during system setup. It is important that you do not move them as this may detract from the stereo audio experience.