® SoundPoint IP 300 SIP User Guide SoundPoint® IP 300 SIP 1.4.
Contents Introduction ............................................... 1 Parts List ................................................... 1 Installing SoundPoint® IP 300 SIP.................. 2 Connecting Network and Power Source................................2 Connecting the Handset and Optional Headset ....................3 Attaching the Base.................................................................3 Features .................................................... 4 Key Descriptions ....................
Voicemail and Voice and Text Messaging............................15 Distinctive Ringing / Call Treatment.....................................16 Presence / Status / Buddy Lists...........................................16 Instant Messaging................................................................17 Phone Reboot......................................................................17 Troubleshooting ........................................ 18 Safety and Compliance...............................
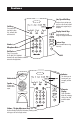
Introduction Thank you for choosing the SoundPoint® IP 300 SIP. This unit provides business telephony features and functions such as Multiple Call Appearances, Call Hold, Transfer, and Conference over an IP network. In this User Guide you will find everything you need to quickly set up your new telephone.
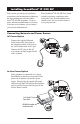
Installing SoundPoint® IP 300 SIP The SoundPoint® IP 300 SIP User Guide includes regulatory compliance information that your System Administrator should review and can also be found at: www.polycom.com This section provides basic installation instructions and information for obtaining the best performance with the SoundPoint® IP 300 SIP telephone. If you require additional information or assistance with your new telephone, please contact your System Administrator.
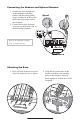
Connecting the Handset and Optional Headset 1. Connect the short straight end of the telephone cord to the handset and the corresponding longer straight end of the cord to the handset jack on the back of the telephone. 2. Connect the headset (optional accessory) to the headset jack on the back of the telephone. (Optional) For a list of compatible headsets, go to: www.polycom.com Attaching the Base 1. Place all cords in the recessed area above the modular jacks as shown. 2.
Features Line/Speed Dial Keys Use these keys to activate up to two lines or one line and a speed dial that can be assigned to your telephone. Soft Keys The screen will display labels for these keys, to identify their context-sensitive Display Control Keys Use the arrow keys to scroll through the displayed information. 1 Headset Microphone Mute Dial Pad GHI ABC 3 JKL MNO 4 5 PQRS 7 TUV * OPER 8 Menu DEF 2 6 DoNotDisturb Feature Keys Redial Access important features using these keys.
Key Descriptions Feature Key Description Sel Sel Sel Sel Mutes audio transmission locally during calls. Sel Sel Allows users to place and receive calls through an optionally conDel Del nected headset. Directories Sel Sel Directories Sel Sel Services Services Directories Line or Speed Dial keys. Call Lists DelDel Call Lists Services Scrolls through menu options.
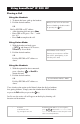
Using SoundPoint® IP 300 SIP Placing a Call Using the Handset: 1. To obtain dial tone, pick up the handset. 2. Dial the desired number, During a call, users can alternate between handset or headset modes by pressing the key. OR Dial by SIP URL or IP† address: Selobtaining dial tone press Name Sel • After • Enter URL or IP (press * for “.” and # for “@”) • Press Send to complete the call.
1 4 HI HI 77 Answering a Call Services Menu Using Call Lists the Handset: 1 Pick up the handset. Buddy Status Using My Status Listen Mode: 4 GHI Press the Answer soft key. Redial GHI 77 PQRS Using the Headset:PQRS 2 ABC DEF DEF 5 JKL MNO JKL MNO 88 WXYZ TUV TUV OPER Incoming calls may be ignored Messages by pressing the Reject soft key or Do Not Disturb during ringing.
3 DEF DEF DelDel Menu Menu Directories Directories General Services Key Use Services Messages Messages 22 data, 33 Conference Conference To navigate through menus and11to enter ABC DEF ABC DEF these are useful tips: Transfer 44 55 66 Transfer ABCABC DEFDEF GHIGHI JKLJKL MNO MNO GHI GHI JKL JKL MNO MNO PQRS PQRS TUVTUV WXYZ WXYZ Sel 1. Use Redial and or the Next Redial 7777 8888 9999 and Prev soft keys to scroll PQRS through TUV WXYZ PQRS TUV WXYZ Hold Hold lists.
Call Timer Call progress on an active call is monitored through a local call timer. This is visible within the active call window on the display. Sel Del Conference Directories Ending Servicesa Call Menu Replace the handset, or press Headset Mode. DEF Press the line key or the EndCall soft key.
Sel Menu Messages Do Not Disturb Del Press Do Not Disturb to prevent the telephone from ringing on incoming calls. A flashing icon and text on the display indicates that Menu Do Not Disturb is on. Hold 1 CallsABCreceived DEF while Do Not Disturb is Messages 2 are3logged in the Missed Call enabled list. 4 To turn off Do JKL MNO Not Disturb, press 5 6 again.
Sel Sel Display Contrast Del To adjust the contrast on the display to a level: Del Directories comfortable Conference Services 3 Call Lists DEF DEF 6 Buddy Status MNO Menu 1. Press . Select Settings followed by Contrast. 2. Press theMessages Up or Down soft keys (or volume keys) to increase or decrease ABC DEF Do Not Disturb the display contrast.
Contact List Sel In addition to a directory of missed, placed, or received calls, the telephone can store a local directory of 200 or more contacts*. Users can add, delete, edit, dial, search, or instant-message any contact in Del a few key strokes. this list through just To add or edit a contact: To search for a particular contact: Menu 3 DEF DEF 6 MNO MNO 99 WXYZ WXYZ # 1. Press , select Directories and Contact List. Messages 2.
Speed Dial Sel Pre-assigned numbers can be associated with speed dial entries for rapid automated dialing. If a line key is unassigned to a line, it can act as a speed dial key for the first speed dial entry. Other speed dial entries can be viewed from the idle display by pressing . Del To assign John to a Speed Dial entry: 3 DEF DEF 6 MNO MNO 99 WXYZ WXYZ Menu 1. Press , select Directories and Contact List. 2.
Multiple Call Appearances Each line configured on the telephone can have two call appearances. This is useful if there is an active call and an incoming call arrives on the same line. In the example shown, there is in an outbound call with Bob Smith. The second diagram shows an incoming call from James Green. Soft key labels are updated on the display to enable the user to: 1. Answer this incoming call, the first call is automatically placed on Hold. 2. Reject the second incoming call. 3.
Voicemail and Voice and Text Messaging Users can send and receive both Voice* and Text messages on the telephone. Received messages will be indicated by a flashing Message Waiting Indicator LED on the front of theSeltelephone and optionally a visual notification on the display. A stutter dial tone in place of normal dial tone is used to indicate that one or more voice messages are waiting at the message center. SIP Instant (Text)Sel Messaging is supported in real-time.
Sel Distinctive Ringing / Call Treatment Users can set distinctive incoming ringing tones for contacts in their local directory. This allows identificaDel tion of a contact by a specific ring tone. To set a distinctive ring for a local contact: 3 DEF DEF 6 MNO MNO 99 WXYZ WXYZ # 5. Press the Save soft key or Cancel to abandon the change. Menu 1. Press , select Directories and Contact List. Messages 2. Using the arrow keys, scroll through the directory to choose a contact. Do Notand Disturb 3.
Del To view and change Presence settings: 3 DEF DEF 6 MNO MNO 99 WXYZ WXYZ # Menu 1. Press and select Presence. 2. Choose My Status to change your Messages own status (online, busy, etc.). This affects information sent to watching Do Not Disturb telephones. Presence information will also be sent to watching telephones when the user goes off-hook or invokesHold Do Not Disturb. The My Status display can also be accessed by pressing the MyStat soft key from the idle display. 3.
Troubleshooting No Dial-Tone Verify if dial tone is present on any other audio paths: Verify power is correctly applied to the SoundPoint® IP 300 SIP telephone: • Check that the display is illuminated. • Make sure the LAN cable is inserted properly at the rear of the telephone (try unplugging and re-inserting the cable). • If using in-line powering, check that the switch is supplying power to the telephone (contact your System Administrator).
No Audio on Headset Verify correct connections: • Ensure the headset is plugged into the jack marked Headset at the rear of the telephone. • Ensure the headset amplifier (if present) is turned on and/or the volume is correctly adjusted. • Swap the handset into the headset jack at the rear of the telephone and verify that audio or dial tone is now present. For a list of compatible headsets, go to: www.polycom.
Safety and Compliance Part 15 Rules 2. This device must accept any interferences received, including interference that may cause undesired operation. This device is compliant with Part 15 of the FCC Rules. Operation is subject to the following two conditions: 1. This device may not cause harmful interference, and Class B Digital Device or Peripheral Note: This equipment is tested and complies with the limits for a Class B digital device, pursuant to Part 15 of the FCC Rules.
Industry Canada (IC) This Class [B] digital apparatus complies with Canadian ICES-003. Cet appareil numérique de la classe [B] est conforme à la norme NMB-003 du Canada. CE and VCCI Mark This SoundPoint® IP 300 SIP is marked with the CE mark. This mark indicates compliance with EEC directories 89/336/ EEC and 73/23/EEC. A full copy of the Declaration of Conformity can be obtained from Polycom Ltd., 270 Bath Road, Slough, Berkshire, SL1 4DX, UK.
Exclusions Polycom will not be liable under this limited warranty if its testing and examination disclose that the alleged defect or malfunction in the product does not exist or results from: • • • • Failure to follow Polycom’s installation, operation, or maintenance instructions. Unauthorized product modification or alteration. • Unauthorized use of common carrier communication services accessed through the product.
OR ITS AUTHORIZED RESELLER HAS BEEN ADVISED OF THE POSSIBILITY OF SUCH DAMAGES, AND LIMITS ITS LIABILITY TO REPAIR, REPLACEMENT, OR REFUND OF THE PURCHASE PRICE PAID, AT POLY- COM’S OPTION. THIS DISCLAIMER OF LIABILITY FOR DAMAGES WILL NOT BE AFFECTED IF ANY REMEDY PROVIDED HEREIN SHALL FAIL OF ITS ESSENTIAL PURPOSE.
ITY, FITNESS FOR A PARTICULAR PURPOSE AND NONINFRINGEMENT. IN NO EVENT SHALL THE AUTHORS OR COPYRIGHT HOLDERS BE LIABLE FOR ANY CLAIM, DAMAGES OR OTHER LIABILITY, WHETHER IN AN ACTION OF CONTRACT, TORT OR OTHERWISE, ARISING FROM, OUT OF OR IN CONNECTION WITH THE SOFTWARE OR THE USE OR OTHER DEALINGS IN THE SOFTWARE.
Polycom, Inc. 1565 Barber Lane Milpitas, CA 95035 ©2004 Polycom, Inc. All Rights Reserved. Polycom®, SoundPoint®, and the Polycom logo design are registered trademarks of Polycom, Inc. in the U.S. and various countries. All other trademarks are the property of their respective compainies. 1725-11319-001 Rev.